| Author |
Message |
elmegil

Joined: Mar 20, 2012
Posts: 2177
Location: Chicago
Audio files: 16
|
 Posted: Sun Aug 31, 2014 6:34 am Post subject: Posted: Sun Aug 31, 2014 6:34 am Post subject:
|
  |
|
| Wow, fast work! Very nice.... |
|
|
Back to top
|
|
 |
PHOBoS

Joined: Jan 14, 2010
Posts: 5599
Location: Moon Base
Audio files: 705
|
|
|
Back to top
|
|
|
AlanP
Joined: Mar 11, 2014
Posts: 746
Location: New Zealand
Audio files: 41
|
| Posted: Tue Sep 09, 2014 9:36 pm Post subject:
|
|
|

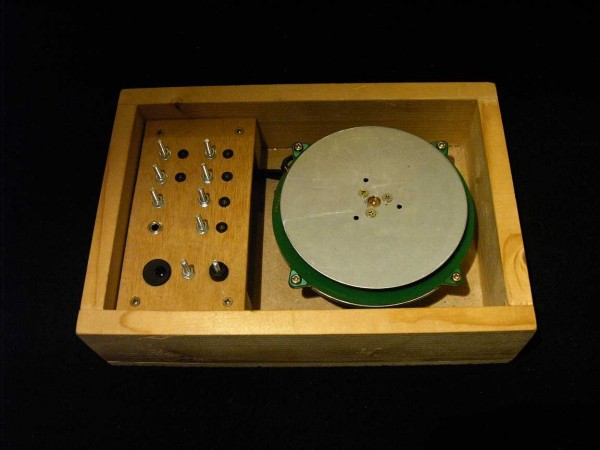
So, who wants a sequencer?  This uses Fonik's Baby Ten schematic. This uses Fonik's Baby Ten schematic.

'Tis working, gate, step selector, push buttons and all. Did a spot of troubleshooting (had two 100k resistors where I needed 10k), but other than that putting the switches in the board/panel was the most annoying part. Just waiting on knobs from Erthenvar now, but other than that it's all done.
I was never hugely happy with my first Bany Ten sequencer layout, but I'm very happy with this one. No wires, nice and clean, slightly smaller panel. This time, you can easily turn the knobs with your fingers |
|
|
Back to top
|
|
|
Skrog Productions

Joined: Jan 07, 2009
Posts: 1196
Location: Scottish Borders
Audio files: 155
|
| Posted: Thu Sep 11, 2014 10:37 am Post subject:
|
|
|
That looks great Alan,
minimal signal path to the pots is the key to less noise & hum , esp. in audio delay FX circuits, nice module
Dave. |
|
|
Back to top
|
|
|
harrymatic
Joined: May 12, 2011
Posts: 10
Location: United Kingdom
|
| Posted: Thu Sep 11, 2014 12:19 pm Post subject:
|
|
|
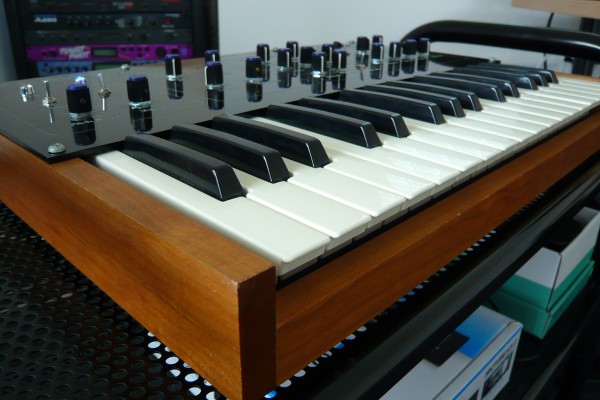
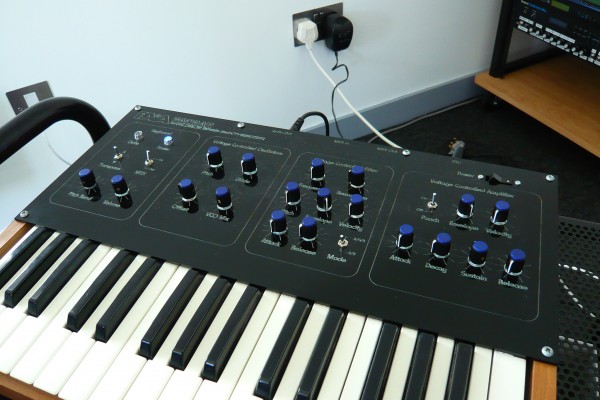
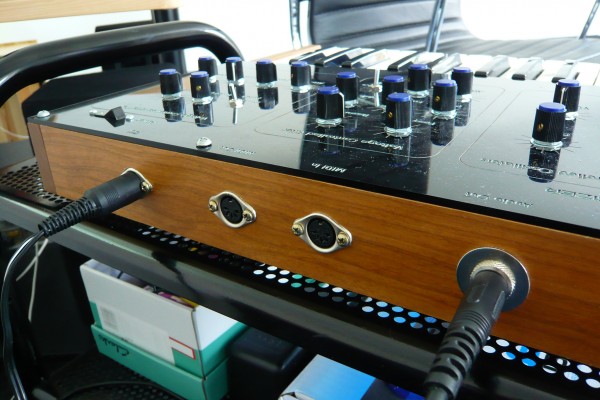
Finally got around to finishing my PAiA Fatman 
I cheated and bought a pre-built one from eBay for about £100 - would have cost me nearly double that to import the kit from the US though. Final build cost for the entire thing was about £150.
The case is solid cherry and I laser cut the panel from 5mm acrylic. Keyboard guts are from an old Roland controller. The sound is fantastic, really nice filter and the ability to assign the keyboard velocity to the VCF and/or the VCA is especially useful.
| Description: |
|
| Filesize: |
758.58 KB |
| Viewed: |
286 Time(s) |
| This image has been reduced to fit the page. Click on it to enlarge. |
|
| Description: |
|
| Filesize: |
669.11 KB |
| Viewed: |
282 Time(s) |
| This image has been reduced to fit the page. Click on it to enlarge. |
|
| Description: |
|
| Filesize: |
672.87 KB |
| Viewed: |
288 Time(s) |
| This image has been reduced to fit the page. Click on it to enlarge. |
|
| Description: |
|
| Filesize: |
721.05 KB |
| Viewed: |
286 Time(s) |
| This image has been reduced to fit the page. Click on it to enlarge. |
|
|
|
|
Back to top
|
|
|
AlanP
Joined: Mar 11, 2014
Posts: 746
Location: New Zealand
Audio files: 41
|
| Posted: Thu Sep 11, 2014 10:00 pm Post subject:
|
|
|
| That Fatman is hugely impressive. I take it you infilled? I've come across pedal builds where plastic was lasercut -- on the back side (mirrored), through a layer of paint. |
|
|
Back to top
|
|
|
harrymatic
Joined: May 12, 2011
Posts: 10
Location: United Kingdom
|
| Posted: Fri Sep 12, 2014 12:51 am Post subject:
|
|
|
Thanks for the comment.
I didn't need to infill the plastic, as acrylic tends to go white when its laser engraved - showing up very nicely against the black background. |
|
|
Back to top
|
|
|
kkissinger

Joined: Mar 28, 2006
Posts: 1356
Location: Kansas City, Mo USA
Audio files: 42
|
| Posted: Fri Sep 12, 2014 7:13 am Post subject:
|
|
|
Oh, I enjoy this thread.
And I am aching to build again -- I am in the process of moving and all my DIY stuff is packed up.
One of my first projects (once I get settled) will be to build a synthesizer that I can travel with that can do most of music that I have done on the most recent streaming broadcasts but in a pre-patched, easy-to-set-up-on-stage format.
Anyway, there is a lot of building that I want to do and this thread is a real inspiration.
_________________
-- Kevin
http://kevinkissinger.com |
|
|
Back to top
|
|
|
elmegil
Joined: Mar 20, 2012
Posts: 2177
Location: Chicago
Audio files: 16
|
| Posted: Fri Sep 12, 2014 7:52 am Post subject:
|
|
|
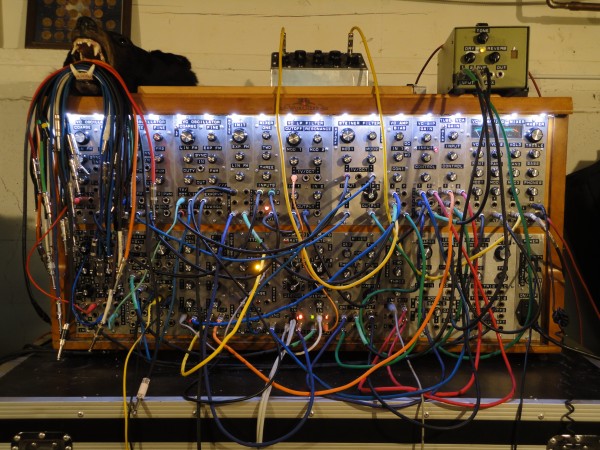
My last build:
 |
|
|
Back to top
|
|
|
sonicwarrior

Joined: Dec 22, 2005
Posts: 266
Location: Cologne, Germany
|
| Posted: Fri Oct 03, 2014 4:19 am Post subject:
|
|
|
Embarrassingly this is my first finished project in 2014 and my goal is 12 finished projects. 
MOTM-480 with resonance distortion trimmer mod:
  |
|
|
Back to top
|
|
|
isak

Joined: Dec 13, 2009
Posts: 847
Location: Israel
Audio files: 18
|
| Posted: Sun Oct 12, 2014 11:33 pm Post subject:
|
|
|
Hi All
it took me 2 years to finish this amazing project!


contains:
2 X ARP2600 VCO's, board Design by Theff from EM
2 X VCF's - Steiner Parker and ARP4072 by Yusynth.
1 X VCF by MFOS for SINE subosc.
1 X white and pink Noise by Yusnth.
1 X SubOsc by Roland SH101 (my PCB design)
1 X Dual Glide by Yusnth
1 X Gate to Trig by CGS modded by Sebo from EM.
2 X ENV by Roland Sys100 board design by Rick Holt AKA FrequencyCentral.
1 X LFO by MFOS
1 X VC-LFO by Yusynth.
1 X VCA by Thomas Henry
1 X Mixer by Yusnth
1 X 12AU7 Tube Preamp by Mick Bailey from DIYStompboxes, modded by me.
1 X ACX FREAKING AMAZING MIDI2CV! the Code is modded specially for me for this project by Dmitry Shtatnov.
1 X Power Supply by MFOS
i want to thanks all the people that supported me along the way.
to all the brilliant modules designers!
DIY is rocking and pumping my head out
this vid lip is in Hebrew, sorry for the non Hebrew Speakers.
yet again, sound is international language.
please post here if you have any questions/comments .
Enjoy watching the vid as i enjoyed making this amazing synth.
https://www.youtube.com/watch?v=7bFmo1gOCac
cheers,
Isak E.
_________________
http://www.myspace.com/mgmtrance |
|
|
Back to top
|
|
|
Skrog Productions
Joined: Jan 07, 2009
Posts: 1196
Location: Scottish Borders
Audio files: 155
|
| Posted: Mon Oct 13, 2014 11:46 am Post subject:
|
|
|
Nice work Isak .
super panel you have made , the sub thickens out the vco waves nicely .
That's a chunky motherboard heatsink & fan , do you find you get much heat generated ? ,
Great synth
Dave. |
|
|
Back to top
|
|
|
isak
Joined: Dec 13, 2009
Posts: 847
Location: Israel
Audio files: 18
|
| Posted: Mon Oct 13, 2014 12:10 pm Post subject:
|
|
|
| Skrog Productions wrote: | Nice work Isak .
super panel you have made , the sub thickens out the vco waves nicely .
That's a chunky motherboard heatsink & fan , do you find you get much heat generated ? ,
Great synth
Dave. |
thanks Dave
it took me 3 month to design this panel
i use the MFOS wall wart as a power supply, so...yes the 7815 and 7915 are getting very hot, after sorted the heat problem, now i have the 2 transformers heat problem. 
all the inside is getting hot so after about 30 min or so the VCO's tune is getting stable, its starting in about -30 cent after 30 min it stable to between 0 to 1 cent.
_________________
http://www.myspace.com/mgmtrance |
|
|
Back to top
|
|
|
dave the butcher

Joined: Jan 21, 2014
Posts: 23
Location: austria
|
| Posted: Tue Oct 14, 2014 6:48 am Post subject:
|
|
|
| what a coool synth! |
|
|
Back to top
|
|
|
Benjamin AM

Joined: Nov 04, 2010
Posts: 83
Location: Boise
|
|
|
Back to top
|
|
|
isak
Joined: Dec 13, 2009
Posts: 847
Location: Israel
Audio files: 18
|
|
|
Back to top
|
|
|
PHOBoS
Joined: Jan 14, 2010
Posts: 5599
Location: Moon Base
Audio files: 705
|
|
|
Back to top
|
|
|
Skrog Productions
Joined: Jan 07, 2009
Posts: 1196
Location: Scottish Borders
Audio files: 155
|
| Posted: Tue Oct 14, 2014 11:09 am Post subject:
|
|
|
I LOVE the patch cable holder , help to scare away unwanted visitors to the synth. hehehe
Cool.
Dave. |
|
|
Back to top
|
|
|
isak
Joined: Dec 13, 2009
Posts: 847
Location: Israel
Audio files: 18
|
| Posted: Tue Oct 14, 2014 11:33 am Post subject:
|
|
|
| PHOBoS wrote: | | looks and sounds great isak but what's the big knob on the side ? |
Thanks PHOBoS
The big knob on the side is the master volume, I didn't had space in the front panel.
Actually it turns out to be very comfortable
_________________
http://www.myspace.com/mgmtrance |
|
|
Back to top
|
|
|
isak
Joined: Dec 13, 2009
Posts: 847
Location: Israel
Audio files: 18
|
| Posted: Tue Oct 14, 2014 1:05 pm Post subject:
|
|
|
Hi PHOBoS, as a contrast to your amazing looking synth I give you my non music related project (only cause your synth remind me an arcade machine).
Take that...


Design and built by me.
2 month of labor.
More then 2500 arcade games.
5.1 speakers (subwoofer behind the screen).
Connected to the net to play "Super Street Fighter4" worldwide 
PS2 emulator inside and much much more!
Sorry PHOBoS, I had to answer your arcade synth 
Cheers
_________________
http://www.myspace.com/mgmtrance |
|
|
Back to top
|
|
|
MoonBase 69

Joined: Sep 16, 2014
Posts: 19
Location: Outpost 7, Florida
|
|
|
Back to top
|
|
|
PHOBoS
Joined: Jan 14, 2010
Posts: 5599
Location: Moon Base
Audio files: 705
|
|
|
Back to top
|
|
|
isak
Joined: Dec 13, 2009
Posts: 847
Location: Israel
Audio files: 18
|
| Posted: Wed Oct 15, 2014 3:03 am Post subject:
|
|
|
| PHOBoS wrote: | awesome job on the MAME isak!
how did you make those side panels ?
(btw if you have any more non-music related builds you can post them here) |
Cool, thanks
I side panels are actually big stickers after photoshop, then I went to the guys that makes full stickers to cars, advertising etc...
They printed on a big printer machine, then i cut them with scissor, he told me not to put them direct, first put soap with sponge on the sides then revel the sticker and then place it.
This is for not to have bubbles
_________________
http://www.myspace.com/mgmtrance |
|
|
Back to top
|
|
|
AlanP
Joined: Mar 11, 2014
Posts: 746
Location: New Zealand
Audio files: 41
|
| Posted: Thu Oct 16, 2014 11:43 am Post subject:
|
|
|
I wasn't hugely happy with my first Yusynth Minimoog VCF layout -- too many wires, too spread out... so I did another layout.

The panel is a pig to photograph, but it looks really good IRL, honest!

Yes, I put the TL072 in after I took the photo (too excited that it worked!)
Two sandwiched PCBs -- one jack board, one engine board, the zipties are because the pin friction is not enough to hold them together, I reckon. |
|
|
Back to top
|
|
|
dave the butcher
Joined: Jan 21, 2014
Posts: 23
Location: austria
|
| Posted: Fri Oct 24, 2014 11:36 am Post subject:
|
|
|
| Oh i LOVE this thread, all these beautiful builds! |
|
|
Back to top
|
|
|
|

 Forum index » DIY Hardware and Software