| Author |
Message |
THeff

Joined: Sep 01, 2006
Posts: 229
Location: Florida
Audio files: 33
|
 Posted: Sat Feb 13, 2010 12:23 am Post subject:
DIY ARP-2600 Modular Synthesizer Posted: Sat Feb 13, 2010 12:23 am Post subject:
DIY ARP-2600 Modular Synthesizer |
  |
|
Hi all,
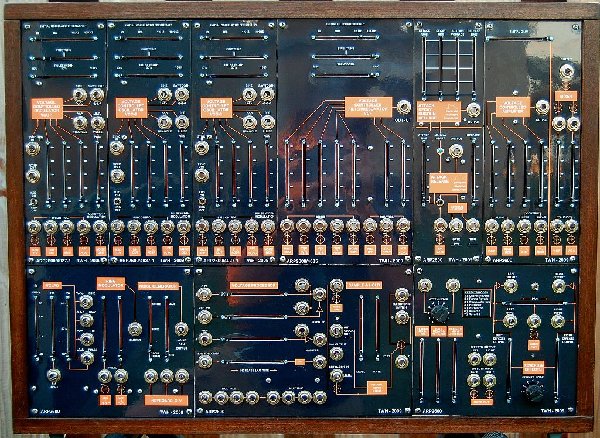
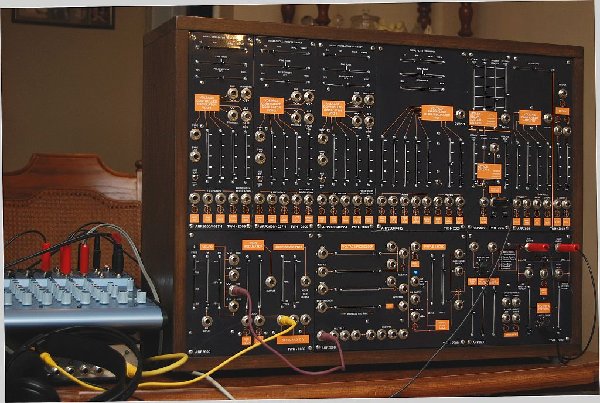
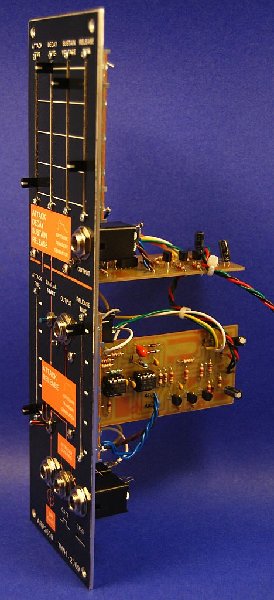
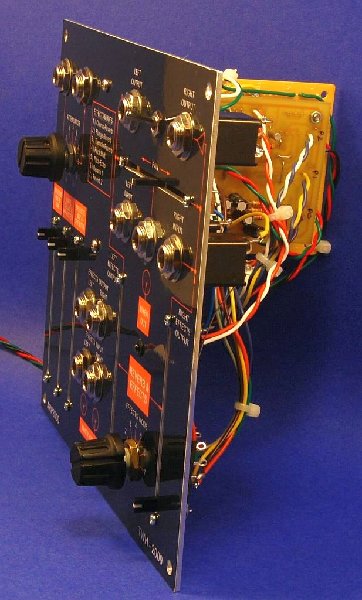
I have finally gotten around to posting some info on a DIY ARP-2600 clone synth that I built the last three months of 2009. The ARP-2600 was always very intriguing to me. I guess it's a combination of the slide pots, cool graphics, and normalized patching that attracted me so much.
The word "clone" is used loosely here because there are a lot of differences from the original ARP-2600. One big difference is that it is modular and not one large front panel. I tried to maintain the orange, black and white graphics as close as possible.
I also tried to capture the original sound by cloning the oscillators (4027-1) and the filter (4035- Odyssey) very closely. The other modules, VCA, AR, ADSR, Ring Mod., Noise, S/H, and reverb use various other designs.
I have never had the privilege of actually playing the 2600, so I cannot verify the closeness of the sound.
The size and shape are a little different than the original because I used a case from a previous synthesizer that I built. The front panel speakers were not installed in order to fit everything in.
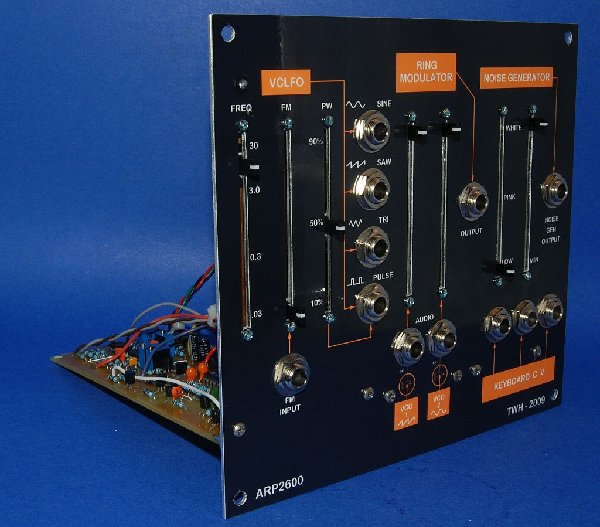
All three VCOs are like VCO #2 in the original 2600, meaning they all have Sine, Saw, Triangle, and Pulse waveforms available, including PWM. I also added sync to each like the Odyssey.
A separate VCLFO (a 4027-1 in LF mode) was added, in order to keep the other oscillators always available for audio use.
For the reverb I decided not to use springs and instead used the Spin Semiconductor FV-1 Reverb IC.
The 1/8" jacks were traded for 1/4" jacks out of preference.
More documentation about the synth will be coming in the near future, but for now here are some pictures and an MP3 recording that I made in December.
I have always loved the song "Frankenstein" by Edgar Winter, which was performed on an ARP-2600 in 1972. There is a cool YouTube video of Edgar Winter performing it.
The MP3 file enclosed is "Frankenstein" performed on the DIY ARP-2600 clone.
Here are the specifics:
Recorded using a MIDI file, sequenced with Cakewalk Sonar. I did not create the MIDI file.
All of the synth sounds were created with the DIY 2600. The drums, organ, and guitar were created with the Thomas Henry GM Voice (a Yamaha daughter card).
The filter sweep at 3:17 - 3:54 was manually created. I watched the Edgar Winter video many times to see how he did it!.
I would like to take this opportunity to thank Steve Daniels of Small Bear Electronics for special ordering the 1 meg slide pots needed for several of the modules. I could not find them anywhere and contacted Steve about them. He now stocks several values of the slide pots if you are interested, for very reasonable prices!
Regards,
-Tim
| Description: |
|
| Filesize: |
316.06 KB |
| Viewed: |
2900 Time(s) |
| This image has been reduced to fit the page. Click on it to enlarge. |
|
| Description: |
|
| Filesize: |
214.67 KB |
| Viewed: |
2172 Time(s) |
| This image has been reduced to fit the page. Click on it to enlarge. |
|
| Description: |
|
| Filesize: |
293.8 KB |
| Viewed: |
2023 Time(s) |
| This image has been reduced to fit the page. Click on it to enlarge. |
|
| Description: |
|

Download (listen) |
| Filename: |
DIY ARP2600 Frankenstein TWH 12-12-09.mp3 |
| Filesize: |
3.27 MB |
| Downloaded: |
2639 Time(s) |
|
|
|
Back to top
|
|
 |
peng

Joined: Feb 23, 2006
Posts: 111
Location: Chicago
Audio files: 2
|
| Posted: Sat Feb 13, 2010 12:54 am Post subject:
|
|
|
Incredible job!!!
Pat yourself on the back a bunch of times for me.
I'm also impressed with how small it is behind the panel.
p. |
|
|
Back to top
|
|
|
xpmtl

Joined: Aug 10, 2007
Posts: 162
Location: Brussels, Belgium
|
| Posted: Sat Feb 13, 2010 2:39 am Post subject:
|
|
|
nice job Tim, i'm drooling 
_________________
http://sdiy.xpmtl.net |
|
|
Back to top
|
|
|
TekniK

Joined: Aug 10, 2008
Posts: 1059
|
| Posted: Sat Feb 13, 2010 2:42 am Post subject:
|
|
|
| realy nice! |
|
|
Back to top
|
|
|
nerdware

Joined: Jul 11, 2009
Posts: 91
Location: UK
|
| Posted: Sat Feb 13, 2010 3:11 am Post subject:
|
|
|
Tasty. Can we hear it too?
_________________
http://soundcloud.com/nerdware/
"render unto digital what is due to digital, render unto analogue what is due to analogue" |
|
|
Back to top
|
|
|
j.dilisio

Joined: May 19, 2009
Posts: 200
Location: baltimore
|
| Posted: Sat Feb 13, 2010 5:54 am Post subject:
|
|
|
Thats amazing!
How are the graphics done?
_________________
DRONEGOAT |
|
|
Back to top
|
|
|
loydb
Joined: Feb 04, 2010
Posts: 393
Location: Providence, RI
|
| Posted: Sat Feb 13, 2010 6:14 am Post subject:
|
|
|
Nerd - there's an mp3 link under the last pic.
Heff, that is a gorgeous build, and so clean. Great work. |
|
|
Back to top
|
|
|
nerdware
Joined: Jul 11, 2009
Posts: 91
Location: UK
|
| Posted: Sat Feb 13, 2010 6:25 am Post subject:
|
|
|
| Braindrop wrote: | | Nerd - there's an mp3 link under the last pic. |
So there is! I was so distracted by the internals...Thanks.
Top demo!
_________________
http://soundcloud.com/nerdware/
"render unto digital what is due to digital, render unto analogue what is due to analogue" |
|
|
Back to top
|
|
|
RF

Joined: Mar 23, 2007
Posts: 1502
Location: Northern Minnesota, USA
Audio files: 28
|
| Posted: Sat Feb 13, 2010 6:49 am Post subject:
|
|
|
Really wonderful job!
bruce
_________________
www.sdiy.org/rfeng
"I want to make these sounds that go wooo-wooo-ah-woo-woo.”
(Herb Deutsch to Bob Moog ~1963) |
|
|
Back to top
|
|
|
Dan Lavin

Joined: Nov 09, 2006
Posts: 649
Location: Spring Lake, Mi, USA
Audio files: 21
|
| Posted: Sat Feb 13, 2010 8:48 am Post subject:
|
|
|
Theff,
Thanks so much for posting this! It's both an inspiration for craftsmanship and musicianship. I'm not sure if I like the hardware or the song better!
_________________
Synth DIY since 1977! |
|
|
Back to top
|
|
|
TekniK
Joined: Aug 10, 2008
Posts: 1059
|
| Posted: Sat Feb 13, 2010 10:26 am Post subject:
|
|
|
| Love the demo mp3 |
|
|
Back to top
|
|
|
Dego

Joined: Apr 22, 2008
Posts: 139
Location: Sweden
|
| Posted: Sat Feb 13, 2010 11:06 am Post subject:
|
|
|
demo and synth is very cool  |
|
|
Back to top
|
|
|
v-un-v
Janitor


Joined: May 16, 2005
Posts: 8932
Location: Birmingham, England, UK
Audio files: 11
G2 patch files: 1
|
| Posted: Sat Feb 13, 2010 12:01 pm Post subject:
|
|
|
Wow! Nice!
Groovy hard detective funk track too!!  
_________________
ACHTUNG!
ALLES TURISTEN UND NONTEKNISCHEN LOOKENPEEPERS!
DAS KOMPUTERMASCHINE IST NICHT FÜR DER GEFINGERPOKEN UND MITTENGRABEN! ODERWISE IST EASY TO SCHNAPPEN DER SPRINGENWERK, BLOWENFUSEN UND POPPENCORKEN MIT SPITZENSPARKSEN.
IST NICHT FÜR GEWERKEN BEI DUMMKOPFEN. DER RUBBERNECKEN SIGHTSEEREN KEEPEN DAS COTTONPICKEN HÄNDER IN DAS POCKETS MUSS.
ZO RELAXEN UND WATSCHEN DER BLINKENLICHTEN. |
|
|
Back to top
|
|
|
EdisonRex
Site Admin

Joined: Mar 07, 2007
Posts: 4579
Location: London, UK
Audio files: 172
|
| Posted: Sat Feb 13, 2010 12:34 pm Post subject:
|
|
|
Tom, that is a fairly good cover of Frankenstein, by Edgar Winter. That's not detective rock. That's fairly early electro rock. I still have it in my tunes collection.
Very nice interpretation of a 2600, THeff. It sounds a lot cleaner than my 2600, but then again, it's a lot newer and your power supply is modern. I especially like the modules, and a very nice finish on that. What did you use?
_________________
Garret: It's so retro.
EGM: What does retro mean to you?
Parker: Like, old and outdated.
Home,My Studio,and another view |
|
|
Back to top
|
|
|
THeff
Joined: Sep 01, 2006
Posts: 229
Location: Florida
Audio files: 33
|
Posted: Sat Feb 13, 2010 12:38 pm Post subject:
Subject description: More info and pictures... |
|
|
Thanks everyone for the encouraging feedback!
| Quote: | | j.dilisio - How are the graphics done? |
I created the graphics using TurboCad (a poorman's AutoCad), inkjet printed it on glossy photo paper, heat-seal laminated the photo, and then attached it to the panels using 3M spray adhesive. This is obviously not the most robust design compared to silkscreen, or engraving, but it does allow you use any colors that you want with stunning contrast.
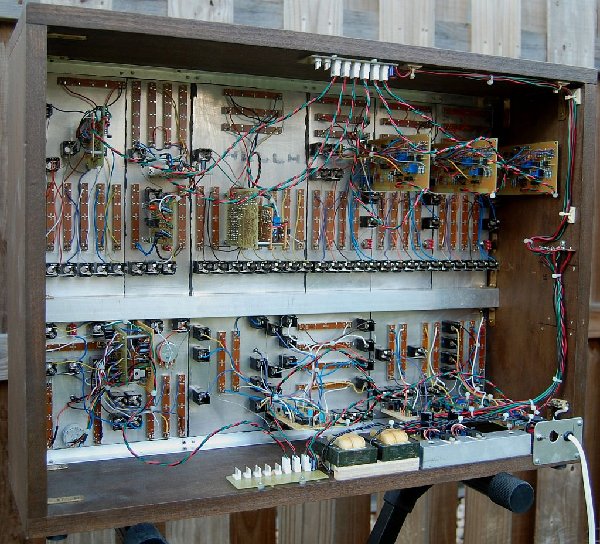
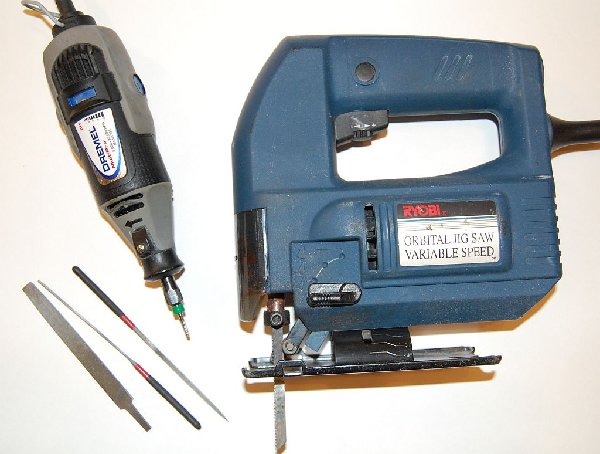
Without a doubt the hardest part of the whole project was cutting the slots for the slide pots!
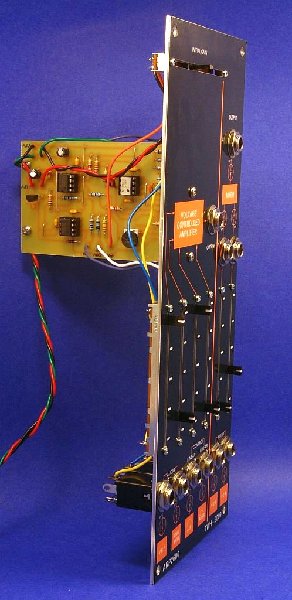
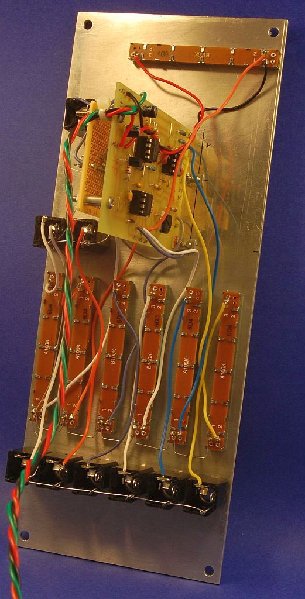
Here's more details of how it came together:
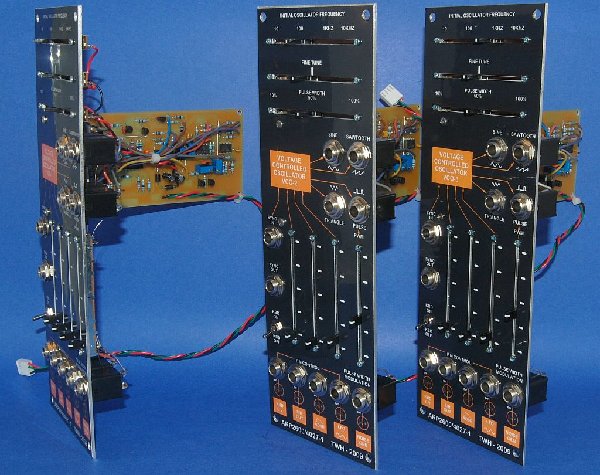
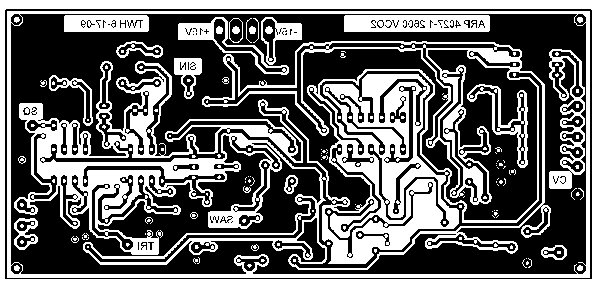
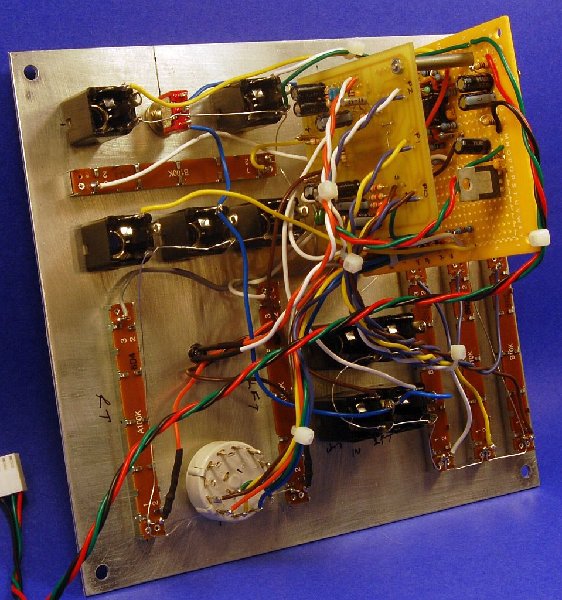
1.) VCOs - I created the PCBs by consolidating the 4027-1 module and the waveform generators into one board. The VCLFO is the same board with a larger timing capacitor.
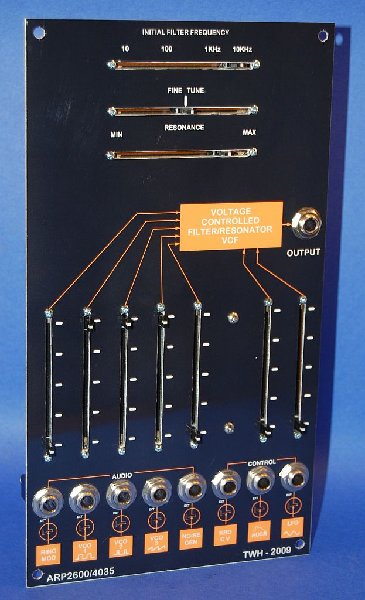
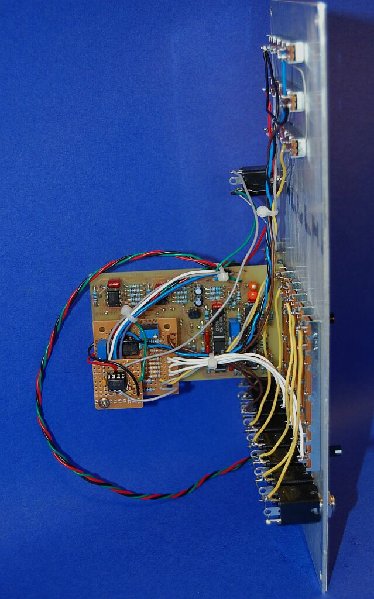
2.) Filter - I used the 40235 PCB design floating around the web, but only built the 4 pole 4035 part of it. The added perfboards provide CV mixing, audio mixing, and output buffering.
3.) ADSR & AR- I used two of Yusynth's ADSR design and PCBs. One was wired for ADSR and the second one for AR only. His design is nice because it is simple and has a built-in LED driver
4.) The VCA is Thomas Henry's design and PCB. I chose this because it is very close to the Odyssey's CA3080 VCA design.
5.) Audio Mixer & PAN - Follows the original ARP-2600 design, I just perfboarded it.
6.) Ring Modulator - I used Fonik's AD633 design and PCB just because it is a simple, nice, clean deisgn.
7.) Noise Generator - I used Electric Druid's PIC 12F675 design, followed by the original ARP-2600 "White, Pink, Low Freq" filter circuit. It was all just placed on a small perfboard.
8.) The Voltage Processor, Clock, A/B Switch, and Sample/Hold - All built on a small perfboard. The Voltage Processor & Clock follows the original ARP-2600 design. The A/B Switch uses a DG211 cmos IC in place of the two FETS in the original design. I chose to use the LF398 S/H IC for simplicity in the Sample/Hold circuit.
9.) Finally, The Reverb - I used the Spin Semiconductors FV-1 IC, and a PCB layout floating around the web. This chip provides 2 reverbs and other EFXs without the mechanical boing of the springs. I added a small perfboard to provide input/output leveling and a diode matrix for binary to decimal conversion of the EFXs selection. This allowed me to use a rotary switch.
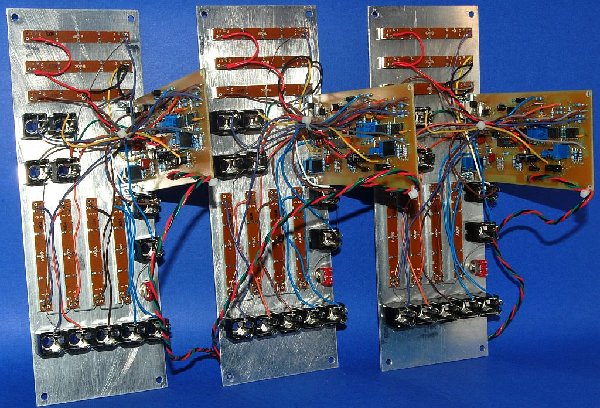
The pictures enclosed are of the VCO and Filter modules before they were installed. More module pictures to follow.
Lastly, I have enclosed another MP3 recording demo. This time it is "Duel - Electric Dreams". The multi-track recording was made using a MIDI file, and Cakewalk Sonar. * I did not create the original MIDI file.
All of the voices in the recording were created with the DIY 2600 synth with the exception of the drums.
The song is supposed to be a duel between a cello and a synth...hopefully this was somewhat achieved.
BTW: I built the Acoupel PIC based 4 channel MIDI CV/GATE to drive the synth with the Sonar sequencer. You can see it in the bottom left of the full front picture. It is the small unmarked aluminum panel with the MIDI jack and nine 1/4" jacks.
| Description: |
|
| Filesize: |
164 KB |
| Viewed: |
1189 Time(s) |
| This image has been reduced to fit the page. Click on it to enlarge. |
|
| Description: |
|
| Filesize: |
209.53 KB |
| Viewed: |
1064 Time(s) |
| This image has been reduced to fit the page. Click on it to enlarge. |
|
| Description: |
|
| Filesize: |
94.77 KB |
| Viewed: |
961 Time(s) |
| This image has been reduced to fit the page. Click on it to enlarge. |
|
| Description: |
|
| Filesize: |
139.82 KB |
| Viewed: |
899 Time(s) |
| This image has been reduced to fit the page. Click on it to enlarge. |
|
| Description: |
|
Download (listen) |
| Filename: |
Duel-Electric Dreams.mp3 |
| Filesize: |
2.59 MB |
| Downloaded: |
1677 Time(s) |
|
|
|
Back to top
|
|
|
yusynth

Joined: Nov 24, 2005
Posts: 1314
Location: France
|
| Posted: Sun Feb 14, 2010 2:39 pm Post subject:
|
|
|
Nice project , congratulations !
_________________
Yves |
|
|
Back to top
|
|
|
kkissinger
Stream Operator

Joined: Mar 28, 2006
Posts: 1457
Location: Kansas City, Mo USA
Audio files: 45
|
| Posted: Sun Feb 14, 2010 10:11 pm Post subject:
|
|
|
Tremendous work inside and out. Congratulations on creating such a wonderful looking and sounding instrument!
_________________
-- Kevin
http://kevinkissinger.com |
|
|
Back to top
|
|
|
fonik

Joined: Jun 07, 2006
Posts: 3950
Location: Germany
Audio files: 23
|
| Posted: Mon Feb 15, 2010 6:09 am Post subject:
|
|
|

_________________

cheers,
matthias
____________
Big Boss at fonitronik
Tech Buddy at Random*Source |
|
|
Back to top
|
|
|
johans121

Joined: Jun 19, 2007
Posts: 178
Location: Huntsville, AL (USA)
|
Posted: Tue Feb 16, 2010 2:26 pm Post subject:
Subject description: More info and pictures... |
|
|
| THeff wrote: |
Without a doubt the hardest part of the whole project was cutting the slots for the slide pots! |
How did you cut the slots?
_________________
Don't feed me Indian, you WILL regret it!
-Jim |
|
|
Back to top
|
|
|
THeff
Joined: Sep 01, 2006
Posts: 229
Location: Florida
Audio files: 33
|
Posted: Tue Feb 16, 2010 10:25 pm Post subject:
Subject description: Slot cutting info and Closeups of the ADSRs, Ring Mod, VCLFO, & Noise |
|
|
Thanks again everyone of the compliments!
Especially Yves and Matthias, since I used some of your designs!
| Quote: | | How did you cut the slots? |
First I made a small entry hole using the Dremel tool and a PCB router bit. Second I made the major cuts using the jig saw. I then widened the slot with the router bit, and cleaned the slots up with several files. Expect several blisters on your fingers before your are done. 
I have enclosed more pictures showing the Yusynth ADSR & AR PCBs, and the module containing the VCLFO PCB, Fonik Ring Modulator PCB, and Noise perfboard.
I have also included anther MP3 file, Gerson Kingsley's "Popcorn". The original song was released in 1972 by a group called "Hot Butter"... no I am not making this up! 
Again this MP3 file is a multi-track recording from a MIDI file. All of the voices in the recording except the drums are from the DIY synth.
I have had a request to post the PCB artwork for the ARP 4027-1 VCOs that I designed. I will be posting those soon.
Regards,
-Tim
| Description: |
|
| Filesize: |
165.25 KB |
| Viewed: |
803 Time(s) |
| This image has been reduced to fit the page. Click on it to enlarge. |
|
| Description: |
|
| Filesize: |
86.37 KB |
| Viewed: |
813 Time(s) |
| This image has been reduced to fit the page. Click on it to enlarge. |
|
| Description: |
|
| Filesize: |
126.55 KB |
| Viewed: |
970 Time(s) |
| This image has been reduced to fit the page. Click on it to enlarge. |
|
| Description: |
|
| Filesize: |
181.49 KB |
| Viewed: |
887 Time(s) |
| This image has been reduced to fit the page. Click on it to enlarge. |

|
| Description: |
|
Download (listen) |
| Filename: |
DIY ARP2600 Popcorn 12-19-09.mp3 |
| Filesize: |
1.77 MB |
| Downloaded: |
1604 Time(s) |
|
|
|
Back to top
|
|
|
THeff
Joined: Sep 01, 2006
Posts: 229
Location: Florida
Audio files: 33
|
Posted: Thu Feb 18, 2010 10:31 pm Post subject:
Subject description: Artwork and details on the VCO PCB |
|
|
Hi Again,
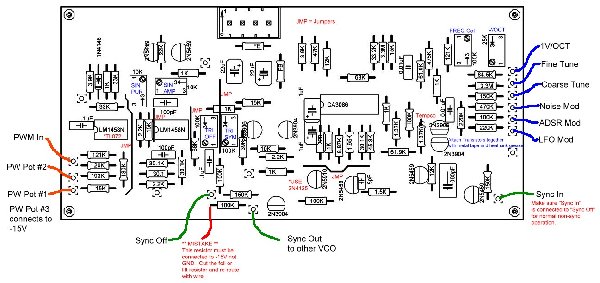
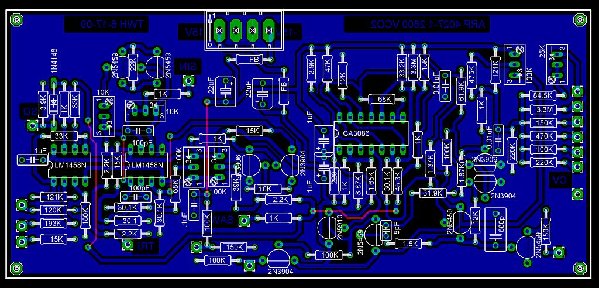
As requested here are the details for the VCO PCB that I designed for the DIY ARP-2600 clone. I do not want to post the ARP schematics, please refer to the service manual which is readily available on the web.
This PCB provides all of the inputs and outputs of VCO #2 on the original synth.
I also added the Odyssey Sync Output and hard Sync Input.
I have been very pleased with the ease of tuning these VCOs, and the stability.
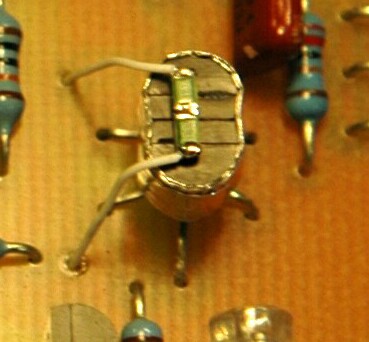
On my boards I applied heat sink grease to the flat sides of the expo 2N3904 and 2N3906 transistors, bonded them together with aluminum A/C tape, and glued the SMD tempco resistors (1.8K and 68 ohm) to the top. (see picture).
I have enclosed another Demo MP3 file. This time a little J S Bach from a MIDI file. All voices are from the DIY 2600 synth....enjoy!
Regards,
-Tim
| Description: |
|
| Filesize: |
30.43 KB |
| Viewed: |
76923 Time(s) |
|
| Description: |
|
| Filesize: |
748.3 KB |
| Viewed: |
1448 Time(s) |
| This image has been reduced to fit the page. Click on it to enlarge. |
|
| Description: |
|
| Filesize: |
166.68 KB |
| Viewed: |
2384 Time(s) |
| This image has been reduced to fit the page. Click on it to enlarge. |
|
| Description: |
|
| Filesize: |
156.41 KB |
| Viewed: |
1750 Time(s) |
| This image has been reduced to fit the page. Click on it to enlarge. |
|
| Description: |
|
Download (listen) |
| Filename: |
Bach vari 2 part invention.mp3 |
| Filesize: |
1.69 MB |
| Downloaded: |
1668 Time(s) |
|
|
|
Back to top
|
|
|
andrewF

Joined: Dec 29, 2006
Posts: 1176
Location: australia
Audio files: 4
|
| Posted: Fri Feb 19, 2010 8:06 am Post subject:
|
|
|
what a beautiful looking and sounding synth!

thanks for the pcb designs too, will try it in my next etching session. |
|
|
Back to top
|
|
|
StephenGiles
Joined: Apr 17, 2006
Posts: 507
Location: England
|
| Posted: Sat Feb 20, 2010 9:45 am Post subject:
|
|
|
Wonderful project - I was waiting for Jeff Beck to crash in during the mp3! Talking of whom, I recommend a listen to his guitar solo in Crossroads during the 18 Feb gig with Eric Clapton in New York - I think many keyboard players would have a problem playing all those notes!!!
http://www.youtube.com/watch?v=w5WCYn6n7UE |
|
|
Back to top
|
|
|
neandrewthal

Joined: May 11, 2007
Posts: 672
Location: Canada
|
| Posted: Sun Feb 21, 2010 11:17 pm Post subject:
|
|
|
Beautiful work and sample. Congrats!
And Stephen, I thought I was caught in a time warp for a second. I type Jeff Beck in the search engine every time I want to find the Buchla VC portamento thread.
_________________
" I went through quite a few trannies til I found one I liked" - Wild Zebra |
|
|
Back to top
|
|
|
THeff
Joined: Sep 01, 2006
Posts: 229
Location: Florida
Audio files: 33
|
Posted: Mon Feb 22, 2010 5:42 pm Post subject:
Subject description: Highlighting the last modules |
|
|
Thanks Andrew, Stephen, and Neandrewthal...very flattering words! 
Here is the last installment of the modules that make up the DIY ARP-2600 Modular Synthesizer.
Here you can see the VCA module with Thomas Henry VCA PCB and mixer on the perboard.
You can also see the Reverb module with the Spin Semiconductor FV-1 IC. I used the Tonepad PCB layout and added the perfboard for input/output signal conditioning and the diode matrix switching.
I have included a picture of the Bergfotron power supply.
Lastly, the final MP3 demo is entitled "Midnight Express" from a MIDI file. As before, all of the voices except the drums are produced by the DIY synth.
Regards,
-Tim
| Description: |
|
| Filesize: |
85.66 KB |
| Viewed: |
832 Time(s) |
| This image has been reduced to fit the page. Click on it to enlarge. |
|
| Description: |
|
| Filesize: |
101.81 KB |
| Viewed: |
763 Time(s) |
| This image has been reduced to fit the page. Click on it to enlarge. |
|
| Description: |
|
| Filesize: |
106.04 KB |
| Viewed: |
828 Time(s) |
| This image has been reduced to fit the page. Click on it to enlarge. |
|
| Description: |
|
| Filesize: |
194.75 KB |
| Viewed: |
812 Time(s) |
| This image has been reduced to fit the page. Click on it to enlarge. |
|
| Description: |
|
| Filesize: |
184.73 KB |
| Viewed: |
905 Time(s) |
| This image has been reduced to fit the page. Click on it to enlarge. |

|
|
|
|
Back to top
|
|
|
|

 Forum index » DIY Hardware and Software
