 Basics of sound synthesis on the Nord Modular Basics of sound synthesis on the Nord Modular
by Rob Hordijk
The Nord Modular synthesizer offers the possibility of designing an endless variety of sounds. It gives total freedom to interconnect the various modules (working blocks) that together make up for a synthesizer sound. An assembly of several of these modules, connected in a sensible way is called a patch.
Where other synths have a fixed number of modules or parameters and are restricted in their internal signalpaths, the Modular offers any number of a certain type of module to be used, until the limits of the internal processors is reached. And most important, those modules can be interconnected any way you want.
You probably have played with the factory presets for a while and now you want to get started designing your own sounds on the Nord Modular. If you already met with an analog or virtual analog synthesizer, you will feel comfortable with many of the modules the Modular offers. But if this is all new to you, you might be puzzled by their names and the sheer number of modules in the Editor program and the manual. So, to get going and at the same time discover many of the little and bigger secrets, we included this workshop. We recommend to study it well. If you click on the pictures the patch will be loaded into the Modular editor and load directly in the active slot of your Modular if it's 'online'.
Introduction into sound design
A way to look at music is as an ordered collection of sounds. Every sound is played by a musician or a sequencer at a given moment. Such a sound has three important parameters: the timbre of the sound, the pitch it is played at and the loudness-contour with which it is played. An acoustic instrument always has the same range of timbre and pitch. The loudness-contour depends on the way the instrument can be played, e.g. a plucked string instrument versus a bowed or blown instrument. Electronic instruments however can produce many timbres and mimic many ways instruments can be played. Modular electronic synthesizers can also play any pitch, which gives the possibility to play in any scale - and even make your own scales if you would want to. Much of the design of an analog synthesizer is based on how you can play those three basic parameters, timbre, pitch and loudnesscontour. So if you design a sound of your own, what you basically do is define how timbre, pitch and loudness change over time, starting at the moment when you start/play the sound.
There are several approaches manipulating these three basic parameters. They are generally known as synthesis methods. The Nord Modular can do at least three basic types of synthesis: subtractive synthesis, additive synthesis and synthesis through waveshaping.
Some more about the fundamentals of sound synthesis
Subtractive synthesis or traditional analog synthesis
Oscillators
The module that defines the pitch of a sound is called an oscillator. It produces pitched waveforms, the raw audio material to be used as a starting point for a sound. In general we will need at least one oscillator in a traditional synthesizer patch.
Have a look at the oscillator tab in the Modular editor program. You will see an abundance of different oscillator types. Each type will perform better than the other ones for some specific purpose or synthesis method. During the design of the Modular great care was taken to make them all of outstanding quality.
The oscillators are divided in master and slave types. The difference is that master oscillators all have 'blue' inputs to control the pitch proportionally to the keyboard notevalue or a varying modulation signal. They also feature a grey 'slave output'. The slave oscillators don't have the mentioned inputs, instead they have a single grey 'master input'. If this grey master input is connected to the grey output on a master oscillator, the slave oscillator will track the pitch of the master oscillator with some fixed frequency ratio, adjustable on the slave oscillator. As a result of this connection a slave oscillator will also inherit all pitch modulations applied to a master oscillator's blue Pitch inputs through the master/slave link.
Sometimes a very small frequencydrift between a master and a slave oscillator can be heard. The reason for this is that digital circuitry, although much more stable than analog circuitry, is not absolutely stable due to very small truncation errors inherent in digital calculations. These can cause the sound to be slightly different on consecutive keystrokes, giving some life to your sounds.
Digital oscillators like the ones used in the Modular and other digital synthesizers can introduce small 'digital artifacts' in the audio. As the Modular uses a 96kHz samplerate and advanced anti-aliasing algoritms, these are generally well beyong the hearing range. Sometimes, on very high frequencies and with deep modulation factors, the digital artifacts still might be heared. This can easily be avoided by reducing the modulation levels or avoiding to play keys in the highest octaves.
The traditional oscillator waveforms
Traditional analog oscillators, as used on analog synthesizers of the past, feature a sawtooth waveform and a square waveform as output signals. More advanced analog oscillators feature an additional triangle waveform and maybe a sine waveform. Also, many oscillators offer the possibility to control the 'pulsewidth' of the square waveform and often the possibility of modulating this pulsewidth by a varying control signal. All these waveforms are pitched, they are tuned to a specific note by playing that note on a keyboard.
A sound doesn't need to have a distinct pitch. Examples are the sounds of cymbals, the hissing of the wind or the sound of an ocean surf. Unpitched sounds are generally based on noise, which can be generated with a dedicated noise oscillator. In general a noise oscillator is able to generate different timbres of noise.
Here is a picture of what the signals produced by oscillators look like when plotted graphically. These waveforms were chosen because they all feature different acoustic properties.

The importance of a sawtooth waveform is that it has all harmonics present. The volume of each harmonic is 1/n for the n-th harmonic. This waveform is useful to synthesize sounds like brass instruments.
The square wave features only the odd harmonics and their volume is 1/n as well. Waveforms with only odd harmonics present have the distinct hollow character typically associated with wooden windinstruments like e.g. the clarinet.
When the pulsewidth of the square wave is narrowed the even harmonics reappear. The width of the pulse is expressed in a percentage. When the pulse is ON for 1/3 and OFF for 2/3 of the time it is called a pulsewidth of 33%. So, the square wave is actually a 50% pulsewidth pulse wave.
The volume of each harmonic depends on the pulsewidth. The formula to calculate the individual volumes of the harmonics is a bit too complex to mention here. Instead, when using pulse waves judgement by ear is important as a slight change in pulsewidth can drastically change the character of the synthesized sound. A pulse wave with a pulsewidth of between 25% and 40% can be very useful in synthesizing strings.
The triangle wave has only the odd harmonics like the squarewave, but their relative volume is 1/n^2. This makes it sound less bright than the square wave. It can be used to synthesize the sound of e.g. a silver flute.
The sine wave has no harmonics at all. Pure sine waves do not occur in nature, so there are no acoustic instruments based on only a single sine wave. However adding several sine waves with their pitch in a simple harmonic relation, is commonly used to make drawbar organ sounds, like the sound of a Hammond tonewheel organ.
Noise can come in many varieties. In essence it is a randomly changing, chaotic signal. However randomness will always have specific statistical properties. These will give the noise its specific character or timbre. Noise is best seen as a signal containing an endless number of sine waves of all possible pitches, each pitch with a different volume. If the statistical distribution of the volumes is uniform, which means every pitch has the same volume, the noise sounds very bright. This type of noise is called white noise and is very useful in generating hihat and cymbal sounds.
If the volume of the sinewaves decreases with a curve of about -6 dB per octave when their pitches rise, the noise sounds much warmer. This is called pink noise. It is useful to make the sound of the wind or ocean surfs. If it decreases with a curve of about -12 dB per octave we call it brown noise. This type of noise can be useful to make thunderous sounds.
Scientific studies on perception of sound by humans show that most people prefer noise that decreases with -3 dB per octave.
It is a good thing to note that oscillators do have a timbre of themselves. In a synthesizer patch the timbre of the sound is generated by the interaction of the timbre of the oscillator and that of the timbre processing modules, like filters. So when starting to design a sound the first thing to do is to choose a suitable waveform on a suitable oscillator.
On the Modular the pitch of the oscillators tracks the notes played on the keyboard or the MIDI input of the Nord Modular. With the [KBT] button or knob on the oscillator module we can turn this feature off if we would wish to do so.
Synthesizer sounds will in general be triggered by some action, like pressing a key on a keyboard or maybe a note command in a sequencer program. The moment this action takes place, the volume of the sound will rise to some maximum value and then decay until the volume is zero again. The traditional module that is capable of controlling the volume is called a VCA or voltage controlled amplifier. But this module needs another module that generates the control signal defining the rise and fall of the volume. Such a module is called an envelope or contour generator. The type of envelope or contour is generally used in the name. For our convenience the designers of the Nord Modular combined the VCA and the envelope generator in single modules. However, a traditional VCA module is present as the 'Gain Controller' module from the mixers tab.
An envelope module will not automatically trigger if a key on the keyboard is pressed. Instead you must explicitly 'tell' the envelope generator to do so by means of a 'Gate'-signal. There are two modules capable to generate the needed keyboard trigger signal when a key is pressed. These are the "Keyboard - Voice" and the "Keyboard - Patch" module from the In/Out modules tab. When a key is pressed the Gate will go ON. It stays ON until the key is released. However, there is a very important difference between the Voice Gate and the Patch Gate. The Voice Gate will always retrigger an Envelope module if a new key is pressed, also when one or more other keys are still pressed. But the Patch Gate will stay ON as long as ANY key remains pressed on the keyboard. This is very useful for traditional monophonic sounds, where you maybe don't want an envelope being retriggered until all keys are released. Use the Patch Gate in monophonic sounds if you plan to play legato style.
The volume contoured audio signal from an oscillator has to be routed to an external amplifier and boxes by one or more of the four physical outputs of the Modular. In the patch a connection to an Output module from the In/Out tab is needed to route the signal to these physical outputs.
|
To summarize the following modules are needed to design the most basic synthesizer patch |
|
Oscillator module |
|
Envelope Generator/VCA module |
|
Keyboard module to make the envelope generator react to the keyboard or a MIDI device |
|
Output module to route the generated audio to the outside world |
Here is an example of such a very basic patch. Click on the picture to load it into the editor program and the Modular.

If a key is played on the keyboard a sine wave note is heard.
Now sine waves don't really sound very musical, so lets have a look at what can be done with this little patch to make it a bit more useful musically.
The envelope contour of the ADSR-Env1 module is not very realistic, normally a sound will decay a bit. Even if you want to make it appear as if the sound is quickly damped when the key is released, it will still have a very short decay. Also the attack is much to sudden, resulting in a click when pressing a key. You might also want to play this sound polyphonically. So what you do is turn the A knob on the ADSR-Env1 module a bit to get rid of the keyclick. Then set the R knob to a more realistic release time. Also set the number of voices to 8 voices, allowing for eight simultanious notes in this little synth.

Here is a table to get an idea of how you can set the Attack and the Release timesettings for different types of instruments:
|
Instrument type |
Attack time |
Release time |
|
Electric organs |
1,5 to 4,6 msec |
14 to 35 msec |
|
Pipe organs |
14 to 35 msec |
35 to 170 msec |
|
Reed instruments |
35 msec |
35 to 75 msec |
|
Bowed instruments |
14 to 95 msec |
170 msec |
|
Percussive instruments |
1,2 msec |
170 msec to several seconds |
|
Plucked instruments |
1,2 msec |
14 msec to several seconds |
The times given are just guidelines to use as a starting point. Especially the release time depends on the way of playing you want to mimic. In any case, what you need to keep in mind is this: an acoustic instrument has e.g. a string or a reed that vibrates, but that vibration is transferred to the body of the instrument, which resonates along. In general it is the resonances of the body of the instrument that gives the fullness to the sound. It always takes a little time before the resonance in the body is build up. And after the reed or the string is damped the body always keeps resonating for a little while longer.
Longer release times can be used to simulate the effect of reverberation in the resonant body or to simulate a spatial reverberation effect.
In the simple patch the volume stays constant if we keep a key pressed. This is natural for e.g. vintage electronic organ sounds, but in reality many sounds start to decay immediately after the attack. This behaviour can be controlled by the D and the S knobs on the ADSR-Env1 module. The S knob controls the sustain level, if we turn this level back to zero we will hear the sound quickly decay after a keypress. Additionally setting the D knob to a value of e.g. 1,4 sec will produce an envelope contour like on a plucked string instrument.
The envelope contour is very important for a sound and should never be underestimated.

Experiment with the effect of the waveforms of the OscB1 module. This oscillator is capable of four waveforms, a sine, a triangle, a sawtooth or a square waveform. When trying out the different waveforms you can hear that the sine wave is absolutely dull and is very limited musically. In contrast the sawtooth and square waveforms are very rich and bright. Notice that, when playing the patch with other instruments, the brighter a waveform sounds, the more presence it has in the arrangement.
The way to breathe more life into a sound is called modulation. This technique lets the synthesizer dynamically control one of the sounds parameters itself. In other words, it lets the synthesizer turn one or more knobs by itself. There are several modules that are capable of generating control signals useful for modulation. The outputs of these modules are mostly connected to the blue inputs of the modules we want modulated. But red inputs can handle these signals as well. Red inputs also allow for modulation signals in the audio range, which mostly results in drastic timbre changes.
Adding a bit of vibrato can make a sound a bit more lively. For this a module is needed that can generate a slowly varying, repetitious signal, to modulate the pitch of the oscillator. Such a module is called a LFO or Low Frequency Oscillator. It is very similar to a standard oscillator, only the frequencyrange is lowered several octaves compared to the audio oscillators. On the Nord Modular we have a special tab with LFO generators capable of generating the very low frequency waveforms used for modulation purposes.

The output of the LFO is connected to the frequency input of the OscB1 module, the LFO frequency is set to 5 to 6 Hz and the Pitch input knob on OscB1 is opened a little bit. For vibrato it is not necessary to have a lot of modulation, just a little touch is sufficient. But, by opening the Pitch input knob fully, you can hear that the modulation range of the modular is indeed very deep, much deeper even that most traditional analog synths!
The OscB1 module features a PWidth input. In the next example this input is connected to the LFO module output. The LFO to Pitch connection, used in the previous example, is disconnected. If the input control knob of the PWidth input is opened you hear that the timbre of the pulse wave gets modulated in rhythm with the LFO signal. The sound gains richness, a bit like there are several instruments playing in unison. This effect is called pulsewidth modulation or PWM. Its very useful in synthesizing the unison and ensemble effects of strings and orchestral sounds. Notice that PWM also introduces some subtle additional vibrato.

Filters
The range of sounds from a single oscillator patch can be greatly enhanced by 'substracting' (=selectively removing) frequency components from the basic waveforms of the oscillator, hence the name substractive synthesis. Filters are the modules capable of doing this task. There are a lot of different filters around, and their names more or less imply what they do.
The two filtertypes most commonly found on traditional analog synthesizers are the so called 12dB SVF (State Variable Filter) multimode filter and the 24dB LPF (Low Pass Filter). The 24dB LPF is commonly associated with the more expensive synthesizers, but reasoning that a 24dB LPF is 'better', wouldn't do justice to the 12dB SVF, as on bigger analog modular systems you would typically find both. Which one is needed depends largely on the type of sound you are after.
The Modular 12dB SVF multimode filter has three simultaneous outputs for lowpass, bandpass and highpass. By mixing these outputs other interesting filtercurves can be made.
The Modular features two 24dB filters, one of them a traditional LPF, but with buttons for a 12dB, 18dB or 24dB filtering curve. The other filter is configurable as lowpass, bandpass, highpass or bandreject by simply choosing the according button. Additionally it can be configured by two buttons for a 12dB or 24dB filtering curve. On the 24dB multimode filter you can control the cutoff frequency and resonance by an audio signal, making the filter one of the best in the business. In contrast to the three outputs on the SVF multimode filter the 24dB LPF filters have only one output. Notice that you are not limited to a 24dB filtering curve only!
Internally a steep filter is constructed of several sections. Each section represents as so called pole, which actually is a mathematical term. What happens in mathematical terms is of no concern to us, however, frequently filters are advertized as having a specific number of poles. What is important is to realize that each section, or pole, contributes 6dB to the total filtering curve. So, a 2-pole filter has a curve of 12dB and a 4-pole filter 24dB. Luckily we can simply chain filters in series to achieve a steeper filtering curve. This means that adding three 24dB filters in series makes up for a 12-pole or 72dB filter. In practise 24dB is already so steep a filtering curve that in general adding more sections or poles isn't really that audible anymore. But if you decide you do want a 96dB lowpass filter, on the Modular it's possible! Simply cascade four filters in series, which adds up to a 16-pole superfilter.
In the next example a multimode filter is added to the patch. To make use of the three outputs a three input mixer with the inputs connected to the three outputs of the filter is added.

Traditionally the filter is placed after the oscillator(s), but before the VCA/Envelope module. The reason for this is that analog circuitry can generate a considerable amount of noise and placing the VCA at the end of the signalchain will make the VCA act as a noise gate for the noisy circuitry before it. The Modular modules don't generate this kind of noise and on the Modular the filter(s) can be placed without restriction after VCA/Envelope modules. Later it is shown that placing the filter after the Envelope/VCA module might have some good uses.
With the mixersettings as in the patch the filter doesn't have any influence on the sound. The audio from the oscillator is split in three bands by the filter, but these three parts are mixer together again. By turning the rightmost knob down, which controls the amount of highpass on the mixer module, all the high frequency components disappear from the sound. Turning the middle knob down, which controls the amount of bandpass, makes the sound even duller. Opening the highpass knob halfway to a setting of around 50 to 60 will put some brightness back into the sound.
Now slowly open the big knob to the left on the multimode filter, this one sets the cutoff frequency, until it says 3.95kHz. Notice that changing the cutoff frequency gives a subtly different effect compared to opening the highpass knob on the mixer.

When playing this patch up and down the keyboard, the sound is much brighter in the higher octaves. This is caused by the cutoff frequency tracking the keyboard. But acoustic instruments don't loose all their brightness in the lower octaves, and it is more natural if the lower octaves sound a bit brighter and the higher octaves a bit less. This can be accomplished by changing the tracking of the filter to the keyboard by tweaking the KBT knob. When set half way (the default value) the filter tracks the keyboard accurately. Closing the KBT knob completely will prevent the keyboard tracking and the cutoff value in the display will be the exact cutoff value, regardless which note we play. In a patch like this a value of 50% to 75% might be a good choise.
A special feature of filters with multiple poles is boosting the frequency at exactly the cutoff frequency. This is called resonance, emphasis or the Q-factor of the filter. This effect is especially musical if the cutoff slowly changes when a note is played. To get this effect the cutoff modulation input of the filter is connected to the blue control signal output on the ADSR-Env1 module. Then the D-knob and the S-knob are tweaked to get a slowly falling control signal when we keep a key pressed.
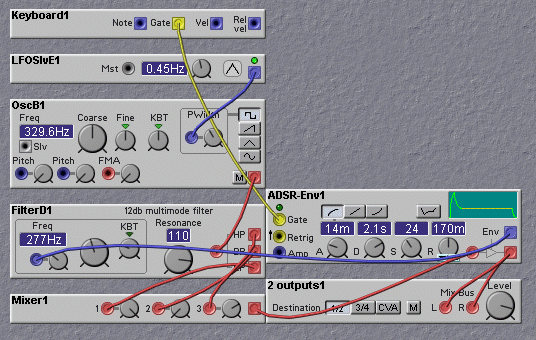
The cutoff frequency is turned down to 277 Hz, the KBT set to 50% and the Resonance is raised to a whopping 100. On the ADSR-Env1 module the Attack is set to 14 msec, the Decay to 2.1 sec, the Sustain level to 24 and the Release to 170 msec. Also, the amount of highpass on the mixer is raised to around 95 to get a nice contrast between the sweeping resonance and the bright high frequency components of the PWM modulation on the oscillator.
The multimode filter is capable of generating a subtle phasing effect when the amount of lowpass and highpass is both at maximum on the mixer and the bandpass knob is at minimum. The filter has now in fact become a bandreject filter, as everything except the bandpass portion of the sound is present. This effect works best when the Resonance is set to a low value. In the next example a sawtooth waveform on the oscillator is used and the LFO is slowly sweeping the multimode filter.
This effect can be applied to the overall sound if the patch is set to polyphony. For this a new multimode filter is placed in the Poly Area of the patch. Check the Modular manual if you haven't yet worked with the Poly Area.

Boosting the fundamental
A very useful property of the highpass output of the multimode filter is to boost the fundamental of the sound. This seems a bit contradictory, to use a highpass filter to boost the lowest frequency component. But imagine that the filter is tracking the keyboard and the cutoff frequency is equal to the frequency of the oscillator. This will pass the signal from the oscillator virtually unchanged, but if the Resonance is raised to a value above 100, the fundamental at the cutoff frequency will be amplified, which results in a considerate boost of the fundamental in relation to the other harmonics.
Additionally, in the Poly Area the behaviour of the multimode filter is changed from the phasing bandreject to a mode where the bandpass is somewhat stronger than the lowpass and the highpass. Combined with a relatively high Resonance setting this gives an effect of a parametric EQ which is swept through the audio by the LFO, giving a subtle Wah-pedal effect. By switching the '2 outputs1' module in the Voice Area between output 1/2 and CVA you can either only hear the bassboost effect or both effects.

One warning about the resonance setting of the multimode filter, if it is set too high the filter will start to oscillate and turn into a sinewave generator. This certainly can have interesting uses, but if you don't want this oscillation effect keep the resonance setting below 125. Another thing is that when the Resonance is set to a very high value, there is the risk that the volumelevel of the resonance exceeds the allowable dynamic range in the Modular. This might result in clipping when playing several keys at once. When using a mixer after the multimode filter, as in our examples, it is sufficient to turn the mixerknobs back to a value of 105 which gives 6dB attenuation at the inputs of the mixer. This will in all but the most extreme cases prevent clipping due to overload.
To summarise, the multimode filter is a very versatile filter capable of many interesting uses. Take some time to play with all the possibilities that were summed up and try to imagine some filtermodes for yourself. It does really pay off to spend a considerable amount of time listening to small changes of the knobs, there is an enormous range of subtle timbre changes possible. The best thing is not to wildly start tweaking away, but make very small changes in the timbre and then play some tune for a while. This gives much more feel of what filters actually can do for your music. And it is fun, of course...
The Modular features two 24dB filters, a classic LPF type and a multimode type. The cutoff slope on the classic LPF is switchable between 12dB, 18dB and 24dB cutoff. The cutoff slope on the 24dB multimode filter is switchable for 12dB and 24dB cutoff. On this filter there are four filter modes: lowpass, bandpass, highpass and bandreject. In contrast with the 12dB SVF multimode filter it has only a single output. Additional features on the 24dB multimode are two modulation inputs for cutoff and one input to modulate the resonance setting. As these are red inputs they accept audio-frequency signals. This filter allows for very complex and deep modulations, especially when using suboctave audio signals to modulate the various settings.
Here is a simple patch that allows you to try out different settings on the two 24dB filter types.

When opening the resonance knob a distinct resonance frequency sweeping through the audio range is heard. Another thing to notice is that the lower frequencies get attenuated by raising the resonance. This is to prevent severe clipping distortion with very high resonance settings, as the resonating frequencies level could become higher than the headroom of the digital signal! On the 24dB multimode filter the behaviour can be controlled by the GC button right above the resonance knob. Disabling the GC will give a louder signal at high resonance settings but beware of the clipping danger. Avoid using this setting with a resonance knob setting higher than 50. Later on, when more oscillators are added to the patch, it is wise never to disable the GC button, unless you really know you will stay within the headroom.
In the next example the LFO modulates the cutoff frequency. The slope is steep enough to suppress the audio signal when the cutoff frequency is very low. This means that a filter can actually emphasize the attenuation of an envelope when using the envelope contour to modulate the cutoff frequency. In this case both the VCA and the filter follow the same contour making the sound 'snappier'. What actually happens is that the perceived rise and fall speeds of the envelope contour seem to get shorter as we associate bright sounds with a loud volume and dull sounds with a lower volume. The amount of envelope contour on the filter is modulated by a LFO. This is a nice example of the interesting modulation possibilities of the Modular. Speeding up the LFO to almost the frequency of the envelope attack gives a slowly evolving rhythmic pattern to the sound.

Resonance adds to the expressiveness of a filter. But there are times when a steep cutoff slope is wanted without a strong resonance peak. An example is when the Modular is used for filtering audio material like sampleloops or recordings fed on the audio inputs of the Modular. A way to prevent a strong resonance and still get a very steep cutoff slope is to use a bandreject filter just in front of a lowpass filter. This bandreject filter is tuned to exactly the resonance frequency of the lowpass filter. In this case the bandreject filter must accurately follow the cutoff contour and modulation of the lowpass filter! A very high resonance setting can now be used on the lowpass filter. As the resonant frequency is filtered out of the signal by the bandreject filter before it enters the second filter, there is simply nothing to resonate on, as the next example clarifies.
It is best to keep the bandreject filter to the 24dB setting, the second LPF can optionally be set to 12dB to give the filtering a slight phasing-like character.
Notice that the smallest alteration of the cutoff frequency on only one of the filters immediately introduces a very strong resonance peak.

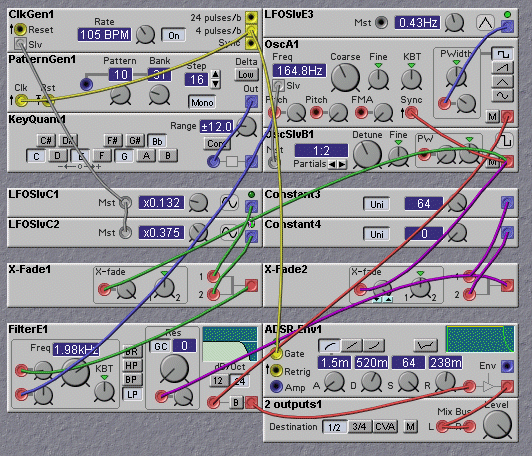
The next example can be used on audio material. It is an adaptation of the previous example, but with an audio input module instead of an oscillator. Two filtersections are used to filter the left and right channel of a stereo signal. On one filter section the LFO signal is inverted by a ControlMixer module from the Control tab, making the input material 'ping pong' between the outputs.
Notice the X-Fade modules used to control the output between dry and wet effect. Control of these modules is done by a Constant module from the Control tab. This module simply gives a fixed value set by the knob. The value from the Constant module is routed through a Switch module from the Mixers tab, creating a Bypass button mechanism. The red morph is used to control the amount of filter sweep and the green morph is used to control the cutoff frequency without modulation. The modulation tempo can be set in BPM on the ClkGen1 module in the upper right of the patch.
Notice that, like in the previous example, the smallest alteration of the cutoff frequency on only one of the filters immediately introduces a very strong resonance peak.

On the 24dB multimode filter the cutoff frequency can be modulated by the signal from the oscillator. Different waveforms give different effects, the square- and pulsewave give the most pronounced effect. Reversing the phase of the audio on the modulation input changes the effect as well. One of the reasons this type of modulation is used on a 24dB lowpass filter is to prevent the filter to remove all the brightness from a sound without loosing the expressiveness of the filter. Modulating the cutoff frequency by the filters audio input signal can give some of the brightness back without destoying the expressiveness of the filter. It can even add considerably to the expressiveness. In the next example the amount of audio modulation on the filter is controlled by the LevMult1 module. By changing this setting the sound of the filter is drastically altered. This effect works best on square and sawtooth waves. The polarity of the signal modulating the red filter modulation input is very important. If the signal is controlled by a negative value on the LevMult1 module the polarity or phase of the signal is reversed. Usually just a little bit of modulation signal is sufficient.
Notice how all the LFOs are controlled by the ClkGen1 module by means of grey master/slave connections. This gives a convenient method of controlling the tempo of all LFOs with just one knob by a BPM value related to the tempo of the song you're working on.

When feeding audio to the red resonance modulation input, remember that there is no such thing as a negative resonance. So the input only reacts to positive signals. In general that means the signal level must be greater than zero. In the patch an InvertLevelshift module from the Audio tab in the editor shifts the audio signal to a positive only signal. However this doesn't mean that you shouldn't feed a normal bipolar signal to this input. The input would only react to the positive part of the signal. With the InvertLevelshift module a choise for both types of signal can be made and the signal can be invert it as well. This is a very useful module for these purposes. Of course it's possible to use this module on the cutoff modulation input of the filter as well.
Add an InvertLevelshift module yourself now and insert it between the oscillator output and one of the filters red cutoff modulation inputs. Experiment with the different possible settings at different oscillator pitches to get a feel for the filters effects.
Notice that the signal on the resonance modulation input is added to the value set by the big resonance knob. This means that if the resonance knob is halfway open the modulating signal has to be reduced in level by closing the modulation level input knob halfway. Remember that a morph can be used to control two or more knobs at the same time.
The filter resonance reacts different to different waveforms. On a sinewave there might be no effect at all, except for a significant boost of the signal level when the cutoff frequency is set to the same pitch as the oscillator pitch. The effects are very strong on the square- and sawtoothwave, but the effects on the triangle wave are much less. The reason is that the sawtooth wave and the squarewave have a so called 'transient' present in their waveform. That is that particular point on the waveform where there is a sudden drastic change. On the sawtooth, this is the point where the waveform suddenly falls from maximum level to minimum level. The squarewave has two points in its waveform where such a sudden and drastic level change occurs. At such a moment there is a considerable amount of energy released and this energy 'exites' the filter. In other words a short burst of energy is fired in the filter, causing decaying ripples in the waveform in the rhythm of the cutoff frequency.
You could compare this effect to a situation where you have a microphone in a room which is feeding back through the speakers when the mixerfader is completely open. If you open the fader for a very short time once every ten seconds you hear the loud feedback beep every time the fader is fully open. The moment the fader is quickly closed again the decaying reverberation of the beep in the room can still be heard for a short while. Now compare the room, microphone and amplifier with the filter and the quickly opening of the fader as the transient in the sawtooth waveform. This is actually more or less what happens in a filter. In scientic research the filter characteristics are often not defined by their poles, cutoff frequency and resonance setting, but instead by the filters so called impulse response, or how the filter reacts to these transients. The impulse response reveals everything about a filters filtering characteristics, but one needs to do some analyzing to produce the impulse response from a filter. So for us there is no practical use to look at impulse responses in a mathematical way. Still it demonstrates the importance of the presence or absence of transients in an audio signal that is going to be filtered by a sharp filter. In the Modular manual are some graphs showing the ripples after a transient in the filtered waveforms, so we won't reproduce them here.
To summarize, feeding a bit of the audio signal to one of the red cutoff modulation inputs and to the red resonance modulation input can change the timbre and expressiveness of the filter. It is used to prevent a filtered sound becoming dull and boring. In general only a little bit of audio on the cutoff modulation input is sufficient. The resonance modulation input reacts only to the positive part of the signal. The polarity and phase of the audio fed to both modulation inputs is very important in the resulting timbre. A Levelshift / Inverter module from the Audio tab or an Adjustable gain controller from the mixer tab can be used to control the amount and polarity of the modulating audio signal.
Experimenting a lot with subtle changes in the filter settings is necessary to really get a feel for what a filter can do to a sound. Remember that the modulation range of the Modular is very wide, so apply changes with care when designing a sound. If the sound has to be tweaked live, find the minimum and maximum tweaking range first and use a morph to be sure that only the wanted range can be used.
Next is a patch to experiment some more with audio modulation of the filter cutoff and resonance.

Knob1 controls the amount of audio modulation of the cutoff frequency. Follow the green cables to see how the signal is routed. Knob2 controls the amount of modulation of the resonance, the routing is shown by the purple cables. The red morph, which is assigned to knob6 crossfades between full modulation and no basic resonance or full resonance without modulation. Knob3 controls the amount of envelope signal on the cutoff frequency. Knob4 is interesting to look at, it crossfades between full audio or enveloped audio to go to the cutoff modulation input on the filter.
Note that the effects are more interesting on a sawtooth wave if the polarity of both audio modulation signals are inverted.
White and pink noise contain by definition all possible frequencycomponents in the audible range. This is an interesting feature as this means that theoretically, and with the right filter, every possible sound can be filtered from noise! Only, this would require filters of arbitrary 'shape' and an enormous high quality. This kind of filters are only possible in real time with very powerful and expensive numbercrunching supercomputers, so that's a bit out of our league. Still there is a broad range of sounds that can be filtered out of noise.
Here is an example of a breathy, wooden pipe organ-like sound filtered from pink noise by a bandpass filter with a maximum resonance. Only the 24dB multimode filter is accurate enough not to resonate at its maximum resonance setting, so this patch doesn't work with any other filter module.

Using more bandpass filters allows for chords to be filtered from noise. In the next example eight filters are used to filter out an eerie chord from the noise. Additionally the resonance is modulated by a rectified sinewave with a frequency in a simple 3:4 relation to the clock that drives the envelope module, creating a rhythmic pattern. A lowpass filter is added that follows the envelope contour, enhancing the punchy effect of the envelope.

Using lots of filters quickly eats away DSP-resources. However, by being creative with all the techniques possible with modular synthesis (in other words by using tricks), complex and characteristic sounds can be created. In the next patch the idea of filtering noise with a bandpass filter is used to create a VoxHumana sound, which might come in handy if you ever land up in heaven ;-).
Only three filters are used to filter three uncorrelated noise sources to three hissing pitches. The additional trick is using the AM inputs on the sinewave slave oscillators as ringmodulators. This way a much more characteristic timbre is created. This patch might be a bit to early to analyze in depth yet, still it is a good example of how powerful filtering can be in synthesis.

Playing modes
Many of the monophonic analog synthesizers of the past offered playing modes like legato and portamento/glide. Up to this point most of the example patches have been polyphonic. Now some of the common traditional monophonic synthesizer playing modes will be reviewed.
In legato play the Envelope generator is not retriggered if a new key is pressed before another key is depressed. To use this mode on the Nord Modular the Keyboard Voice module is substituted for a Keyboard Patch module. The Gate output of this module follows the rules of the legato playing mode. This mode is normally used in a patch with only a single monophonic voice, but on patches with more voices it can be an interesting effect.

In this patch the Keyboard Patch module and a 24dB filter are used. Using a LFO with a reset input makes the vibrato restart on the first keypress after all keys have been released. However, playing legato will not reset the the LFO. As you can hear the sawtooth waveform in combination with the 24dB filter makes a sound that can be associated with a brass windinstrument. Only the attack/decay combination is not really like such an instrument, but this setting is choosen to demonstrate the legato effect more clearly.
Now lets add portamento to the patch. In this mode the frequency does not immediately jump to the new key but slides towards it. A Portamento module from the Ctrl tab is added to process the Keyboard Patch note output in order to give the portamento slides.

When using the Portamento module the keyboard tracking has to be disabled for both the oscillator and the filter. So turn the KBT knobs on both those modules back to zero. Now the blue Latest note output of the KbdPatch1 module is connected to the blue input on the Portamento module. The output of the Portamento module is routed to one of the control inputs of the oscillator and one of the control inputs of the filter. The control input knob on the oscillator is turned completely open to make it track the keyboard again. The control inputs on the filter modules are twice as sensitive as the control inputs on all the other modules, see the Modulars manual. So that control input knob has to be set halfway to position 64 to make it track the keyboard. On the Portamento module we can set the portamento time.
As you can see a conncetion is made between the Patch gate output and the Portamento module yellow On input. If that connection is not made portamento will always be on, however if it is connected the Portamento will only work when keys are played with legato. If all keys are depressed and then a new note is pressed the Modular will directly play the correct pitch without a slide. But holding the key and pressing another key will slide to the new pitch.
An interesting effect is if portamento is only applied to the cutoff frequency of the filter, but not on the oscillator. This is especially nice with a relatively high Resonance setting. To do this the cable between the Portamento output and the oscillators Pitch input is disconnected. Set the oscillator KBT to its default value. Or add a second portamento module with a longer time setting for the filter only.

Delayed LFO
A very popular effect in the seventies is delayed LFO. In this playing mode LFO modulation starts a little while after the keypress and is also gradually faded in. There is not a module that does exactly this in a straightforward way. Actually a couple of modules have to be combioned to do this. But it is a very good example of the way you handle a modular synth using several basic function modules to combine into a 'greater module' with a more advanced function. So some thinking required for this example.
What is available is the keyboard gate signal. This is ON as long as a key is pressed. But what is wanted is a gate signal that starts a controllable time after the key is pressed and stays ON until a new key is pressed. This last thing is important as the modulation needs to keep on going when the key is released and the envelope enters the release phase. In the Logic tab there are several modules that can do basic processing on gate signals. There is a module that can give a pulse of controllable length starting at the moment when it receives a gate signal. If such a module is used a pulse can be made that lasts for e.g. 100 msec after the keypress. Still this is not what is needed, instead a reversed polarity version of this pulse is needed. Luckily there is a module that inverts the polarity of a gate signal, it changes an ON state into an OFF state and vice versa. So if a pulse is generated with the Pulse module and then that pulse is reversed in polarity with the inverter exactly the right kind of gate signal is generated. Then a control signal is needed that slowly fades in when that new gate goes ON and drops back immediately back to zero when the gate goes OFF. To get such a signal a trick on the portamento module is used. If the new gate is connected to both the blue input and the yellow On input of the portamento module the following will happen. When the gate is OFF the Portamento is inactive as the yellow On input is low. The output will be low as the blue input is also low. When the gate arrives the module will activate the portamento as the yellow input is now ON. On the input there is now a high signal and the output will slowly rise towards the high level on the blue input. Then, when the gate goes low again, the output will imediately drop to zero again, as both inputs will be low again. So here is the delayed and slowly rising control signal which will be used to control the level of the LFO.
The patch looks like this. Try to follow the gate signal and read the explanation carefully again until you understand whats happening.

Notice that for the delayed LFO the Keyboard Voice gate is used. This makes clear that both the Voice gate and the Patch gate can be present in the same patch. But keep in mind that when making such a patch polyphonic by adding voices it might become difficult to play the keyboard sensibly.
Of course its fun to experiment with different LFO waveforms and modulating either the oscillator vibrato or the filters cutoff frequency. In the next example a square waveform is used on the LFO. It is routed through a Diode module to cut away the part of the squarewave that has a negative polarity. Then it goes through a VCA/Gain controller module to control the level. Finally the value on the output of the VCA is quantized to exact half notes over a one octave range with a Note Quantizer module. Pressing a key will now introduce popping notes that steps through the octave until the pitch keeps popping to a note exact an octave above the note that is played. As an alternative for the portamento module to generate the rising control signal, an ADSR-Envelope generator is used. This module uses somewhat more DSP-resources, but it has the advantage that it can make a nice lineair rising slope by pressing the middle button above the A and D knobs. This makes the rising notesteps more regular than is possible with the Portamento module, which slows down when its output value approaches its input value.

If you don't immediately understand the workings of the Diode and the NoteQuantizer module, look them up in the Modulars manual, so you get a thorough understanding of their workings and what they exactly do in this particular case.
So far the possibilities of traditional single-oscillator analog synthesizers were covered.
You have seen which modules you always need, like the output module, a keyboard module if you want to play with a keyboard, a sound source like an oscillator, a volume contour controlling module like an envelope generator and you have seen that adding a filter greatly enhances the timbre possibilities.
You have also seen and heard that modulation is a very important part of a sound. Playing modes are important as well and the traditional ones were covered.
Last but not least you have seen how you can gradually increase the modulation, which is one of the important techniques to make those typical "modular synthesizer" sounds.
The next part of the workshop will cover topics that have to do with manipulation of the timbre of synthesizer sounds.
Special oscillator types
The spectral oscillator
This is a new oscillator-type with a controllable timbre. It provides for two basic waveshapes, one with all harmonics present and the other with only the odd harmonics. The big difference with the traditional sawtooth and square wave oscillators is that the amount of presence of the harmonics can be controlled without a filter.
The next example is an electric piano patch that consumes so little DSP-resources it can be played with 8-voice polyphony on a single DSP Micromodular. Only the Spectral oscillator and two envelope modules are used. To prevent the sound becoming too bright in the higher octaves and too dull in the lower octaves a morph is used on the Spectral shape control. This morph is controlled by the keys played on the keyboard, a higher note makes the morph close the Spectral shape control, effectively controlling the brightness.

The next example is a somewhat more complex patch. It is still possible to use it with 16-voice polyphony on a non-expanded Modular Rack or Modular Key. In the Poly Area a Chorus unit is used to give a more orchestral effect to the sound.

Note that a 6dB highpass filter is used before the output of the Voice Area. The purpose of this filter is not to shape the timbre, the frequency is choosen so low that it will not affect the sound. Here it is instead used to remove so called DC-components in the signal produced by the modulation of the filter by the oscillator signal. This prevents overload of the input of the Poly Area when using a lot of voices.
There might be times that a crackling sound can be heard when several keys are played at the same time. The cause is often overload when several voices are added together. The Spectral oscillator is particular sensitive to this kind of distortion, as the transients present in the waveform when the Spectral shape is set to be very bright, are so strong they almost reach the point of overload. The 6dB highpass filter can in many cases prevent this type of unwanted distortion in the Poly Area. So remember to use the 6dB highpass filter in the way it is used in this patch, if you ever experience such distortion.
The Formant oscillator
This oscillator resembles a noise generator in many ways. A digital noise generator is nothing more than a little 'program' that produces a series of pseudo random numbers. Pseudo means that there is actually a system in the numbers and after a given amount of numbers the series will repeat itself. Normally there are so many numbers that the repetition only occurs after several hours, or even days. The formant oscillator uses the same principle, but the series are restarted on the rhythm of an audio frequency. So on a high pitch it produces maybe 60 numbers and then repeats with the same numbers. On a lower pitch it starts with the same 60 numbers, but maybe 100 more are added to the series. This gives the acoustic effect of fixed formant frequencies. With the Timbre button you can choose between 128 different series of numbers. In practise the Formant oscillators signal is always very bright. To use it we will in general need to do some processing to give the signal some more 'beef'. In the next example the Formant oscillator is used in a complex patch where several advanced tricks are used. So there will be no analysis of the patch yet, you can do that later, when you feel completely at home with the Modular. The patch is put here to give an idea of what the Formant oscillator can sound like. The Modular does not contain a reverberation engine, but this patch you might want to play with lots of wide Lexicon Ambience-type reverb on an external EFX-processor to enhance the moody, ethereal character even more.

Notice however how the ClkRndGen1 module in the upper lefthand corner is used to choose a different timbre for every keypress.
Using more oscillators in a voice
The timbre possibilities of a synthesizer are increased when more than one oscillator per voice is used. The more expensive traditional analog synthesizers offered two to three independent oscillators. There are several typical effects possible, some will be covered in the next part of the workshop.
A traditional way to beef up the sound of a synthesizer is to use two or more slightly detuned oscillators. The effect is a bit similar to PWM modulation of a pulse wave, but any waveform can be used. Take a look at the next example where two sawtooth oscillators are present in the patch.

Knob1 is used to detune the second oscillator on the right. By turning that knob you will hear a lively full unison sound if it is almost halfway. Detuning too much will introduce a beat frequency between the oscillators, so experiment a little with knob1 to get a feel for the right amount of detune to give a pleasing effect.
Oscillators consume quite a lot of DSP-resources, so the designers of the Modular have come up with a technique that saves a bit of these resources. When using two oscillators it is common to have a fixed frequency ratio between them. Instead of using two full oscillators with their own modulation controls you can use what is called a master/slave pair. Only the master oscillators have a Coarse/Fine pitch control and pitch modulation controls. By means of a single grey connection we can make a slave oscillator inherit the modulation of the master oscillator. On the slave oscillator there is a control that sets a fixed pitch ratio to the master oscillator pitch. This saves a few percent of DSP-resources that can now be used for an extra filter, envelope generator, etc. Additionally it makes the patch much easier to tune, as the basic pitch does only have to be set on the master oscillator. The next example does sound exactly the same as the previous, only a slave oscillator is used instead of the second master oscillator.

Again knob1 can be used to detune the slave oscillator. Now play some notes on the keyboard and you will hear that the slave oscillator tracks the keyboard exactly like the master oscillator does. However, when you remove the grey cable between the master oscillators Slv output and the slave oscillators Mst input and play some notes, the frequency of the slave oscillator remains fixed to the E4 key.
With the Partials control on the slave oscillator the ratio can be set in harmonic intervals. That means that if the display shows 1:1 the slave's fundamental is the same as the master's fundamental. If the ratio is 2:1 the slave's fundamental is equal to the second harmonic of the master, so twice as high.
Next to unison another common technique to beef up the sound is using adding a suboctave. This is simply a second oscillator tuned exactly an octave below the main oscillator. There are several different approaches to do this. The first choise that must be made is which oscillator will play the suboctave. In the next example another oscillator pair is added together with a switch to toggle between the two pairs. In one pair the slave is one octave lower and in the other the master. The big difference is that on both pairs the master oscillator is set to a sinewave.

When the 4-1Switch1 module is set to position 1 or 2 the wave of the suboctave is a sawtooth and that of the master is a sinewave, which is now equeal to the second harmonic in the sawtooth wave. This sounds a bit like a cheap plastic speakerbox. When we set the opsition of the switch to 3 or 4 the original character of the sawtooth wave is heard, but with some added beef from the sinewave one octave lower.
Now try out different waveform setttings on the master oscillators on both pairs and notice how different the effects can be. Although in the example with the sinewave the second pair will probably have most peoples preference, that might differ for other waveform combinations.
On traditional analog synthesizers a so called suboctave generator is used instead of an independent second oscillator. This suboctave generator can be set to a frequency exactly one or two octaves below the main frequency, but it cannot be detuned and is always a squarewave. In the next example a squarewave slave oscillator is used to obtain this suboctave. A master oscillator with a choise of waveforms is used for the main pitch. The output of the slave oscillator is connected to the red Sync input of the master oscillator to prevent detuning. Use knob1 to control the suboctave level. For those of you already familiar with analog synthesizers and hardsyncing of oscillators, this must work, as the slave oscillator is set to an exact ratio of 1:2.

Another very interesting way of adding the suboctave is to modulate the filter cutoff with the suboctave square wave. To do this the 24dB filter with the red modulation inputs must be used. Here is the example.

The use of filter modulation by the suboctave square wave has two effects. Besides the introduction of the suboctave it 'spreads out' the resonant frequency of the filter to two frequencies. As can be heard this adds considerably to the brightness and expressiveness of the filter.
The same principle is used in the next example where the squarewave suboctave oscillator output is used to control two Crossfade modules. The first Crossfade module is set to a way that it switches between two LFO oscillators. The output is routed to a red modulation input of the 24dB multimode filter. The effect is that one cycle of the master oscillators waveform is filtered with a cutoff controlled by LFO1 and the next cycle is filtered with a cutoff controlled by LFO2. Besides introducing the suboctave in the signal this gives the effect of using two filters with different modulation patterns instead of one.
The same trick is used on the resonance control. The second Crossfade module switches between two Constant modules. The output is routed to the Resonance control input on the filter. Each Constant value controls the resonance for one of the two LFO modulation patterns. Tweak the Constant module values to discover the expressiveness of this type of suboctave filter modulation. Instead of LFO's and Constant modules Envelope generators can be used as well.
The squarewave slave oscillator can be PWM modulated. However, if you do so the syncing of the master oscillator starts to sound dirty. This is as the oscillator syncs to the transient that is swept by the PWM. By reversing the polarity of the suboctave square the master will sync on the right transient and the dirt in the master oscillators signal disappears. The reversing of the polarity can best be done by a Level shifter /Inverter module from the Audio tab. By using a pulse wave on the master oscillator as well, and modulating it from a different LFO, a fat PWM sound can be achieved. Only the modulation of a filter does not work very well with a PWM modulated pulse wave, so the signals of the two oscillators are simple mixed together in a traditional way. In the next example another master/slave pair is added, slightly detuned to the first pair. The four uncorrelated LFOs, the four pulse oscillators, all with a different basic pulsewidth setting, the unison oscillator pairs and the suboctaves all work together to get the thick, powerful sound.

The next patch is a variation on the suboctave/PWM principle. One master and two slave oscillators are used, the lowest and the highest frequency pulses are PWM modulated. From the mixed signal a very high signal band around 4kHz is bandpass filtered, and this filtered signal is fed through an extra Chorus module, to get an extra thick, noisy sound. The Poly Area contains a stereo flanger with a subtle panning effect.

An example of a 'completed' patch
The last example of this workshop is an assembly of the techniques covered sofar, although some techniques are used which have not been discussed yet. Most of these will be covered in the other workshops. So, analyzing the complete patch might be a bit too soon yet. But try to recognize as much as you can in this patch. At least you should be able to grasp what happens in the synthesis part of the oscillators and filter now. Many parts of the patch follow the architecture of a traditional one-oscillator with suboctave synthesizer architecture, but there are some extensive additional modulation possibilities.
The display of the cables was disabled during the screen capture, in order to keep the picture legible. If you load the patch in your Modular, you can reactive the cable display. Or just click on an output with the mouse to see the routing of that particular output signal. The modules with a specific name do control a specific part of the synthesis and are probably tweakable. The module without names are equally important, but they are not meant to be tweakable by the author. After a while you should be able to recognize a module only by its appearance. As a help, double clicking on the grey body of a module pops up it's type.
The oscillator section has a simultanious pulsewave, a sawtooth and a suboctave. There are four possible suboctave sound, a squarewave one octave down, a squarewave two octaves down, a stepwave two octaves down and a 'stepped trapezoid' waveform two octaves down. All possible waveforms are generated by a total of four oscillators, all synced to the two-octaves-down slave oscillator.
The cutoff and resonance can be modulated by the suboctave waveforms. You will find out that, although the suboctave waveforms that are two octaves down don't really sound so much different when heard 'raw', the modulations these different waveforms produce on the filter modulation inputs do sound distinctly different.
In the middle of the right column there is a group of modules to create a very bright 'phat' distortion sound, similar to the better vintage fuzz boxes like e.g. the Big Muff. This distortion is especially expressive with somewhat higher resonance settings of the filter. This is an example of synthesis by waveshaping. Notice that it is the combination and interacting of the modulation of the filter by the suboctave waveforms and the fuzzy distortion that accounts for the very expressive sounds. Tweak the knobs to your liking.

In the upper left column there is some fiddling about with the gate signal and the Clockgenerator signal. This is to force the modulation patterns to restart when a key is pressed, but prevent a restart of the clock when playing patterns in legato fashion. If you feel ready delve deeper into how and why this works, check out the extensive 'Using Logic Modules' workshop. In this workshop many additional information regarding the inner workings of the Modular is given.
Below the Gate processing modules there is the LFO and pattern generator section. The pattern is created with the aid of a Sample&Hold module, to which a separate workshop is dedicated. If the RETRG button is On the patch plays a pattern when pressing a key on the keyboard, if the button is Off you can play the patch normally by the keyboard. The pattern is dependent on the ratio between the Clock generator module and the LFO. The tempo however is dependent only on the Clock generator. So if you want to create a different pattern at a different tempo, first tweak the TEMPO value to the right BPM and then detune the LFO and tweak the controls on the QUANT module to get an interesting pattern.
Don't forget to read the Modular's manual from beginning to end one more time again!!!
This concludes the basic workshops.
Click on the following link to open a workshop that helps to model your own 'vintage' analog synthesizer.
Building your own synth model