|
Radio / Connect Info Edcast
How to connect up to the electro-music stream using Edcast or Oddcast.
The Edcast / Oddcast tooling has been discontinued, and then re-continued as Edcast reborn - many people still have an older version. Edcast is available for Windows, either as a standalone progrom or as a plugin for Winamp. There also is a Linux version which is commandline based. For windows the standalone version is easier to use, but the plugin version may give some more routing flexibility. Contents
The windows standalone version
These directions should work for Edcast as well as the older Oddcast standalone version in Windows. Installation
Run the installer. After you accept the license agreement, be sure to click that you wish to install the LAME encoder so you can stream MP3 file format.  You will be directed to a web page for the Lame encoder. I suggest you download the latest non-alpha or non-beta "bundle" and install it in your Program Files directory which is usually on the C: drive. After Edcast is finished installing, copy the file lame_enc.dll from your Lame installation to the directory where Edcast was installed. Configuration
Now you are ready to test out your Edcast installation. Click on the Edcast icon that is on your desktop or run the standalone exe file in the Edcast directory. You will see a screen like this: 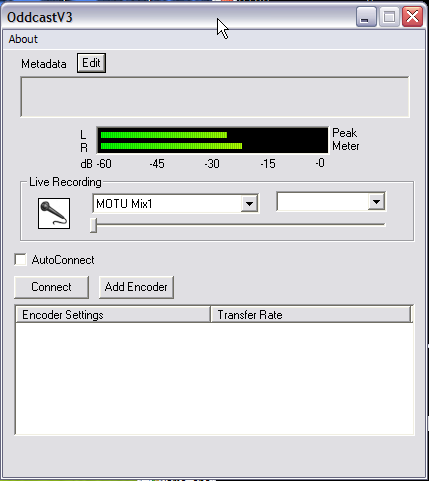 Select the audio device you want to use for your stream. It may be different from the MOTU device shown on my example. You can see the meters operate if you have a signal. Sometimes when the device is configured incorrectly or there is no input to the device you'll see the meters at full scale. Ignore the Live Recording button and the slider unless you have a standard Windows sound card with DXI drivers. When the VU meters do not show any signal you may have to click in them to make them work. Then click on the Add Encoder button and a line will appear in the text area below the Encoder Settings heading. Double click on that new line and the configuration windo will appear, looking like this:  Note, your port number and password will be different. Clear out the Mountpoint field because it is not used for MP3. Make sure the Encoder Type is MP3 Lame and the server type is Shoutcast. Now click on the YP Settings Tab at the top of the configuration window. You'll see this: 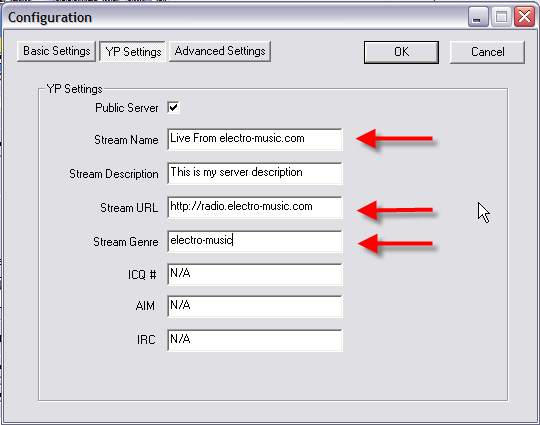 You can use a different stream name if you wish, to describe your event. Next, click on the Advanced Settings tab:  This is optional, but if you check of the two check boxes and include a directory you will be able to make a simultaneous recording of your stream. If you don't click Save as WAV it will save the MP3 file. Next, click OK and return to the main Edcast window. Click on the Connect button and see if you connect to the server. If it keeps trying and not getting through, then recheck your settings making sure you have the port and password correct. There is a chance that the http://radio.electro-music.com server is down. To check, use this URL http://radio.electro-music.com:8070 but replace 8070 by your port number. You should see the Shoutcast D.N.A.S. screen. Almost finished now... If everything is working, check the AutoConnect box. This will automatically reconnect if something causes a disconnect during your stream. Finally, Click on the Edit button next to the word Metadata near the top of the window. This is where you put in the title of your performance. Put that in the Metadata field - leave the rest of the stuff alone.  You can edit the metadata anytime you want while you are streaming. If you are streaming a concert you may want to make the metadata identify who is performing. Alternatively you can use a file to specify your meta data. The location of the stream title metadata is in the file C:\Program Files\edcast\streamtitle.txt Please put something about your content in this file. I put a shortcut to that file on my desktop. When all is working well, you will see something like this: 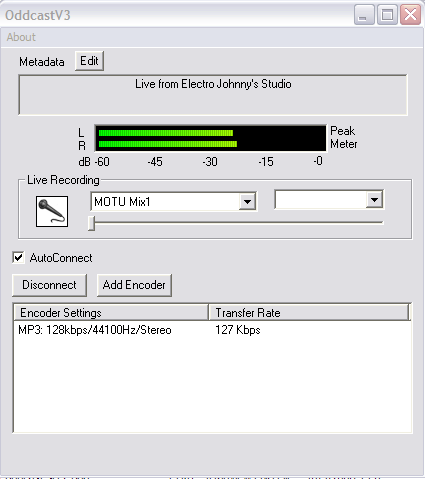 Installation
First download and install the latest version of WinAmp onto your Windows computer. As of this writing, 5.12 is the newest. You don't need the PRO version; the free version has all the features you'll need. Get WinAmp here: http://www.winamp.com/player/ You can find installation WinAmpinstructions on that site. In order to broadcast to a running SHOUTcast server using the winamp plugin, you will need the SHOUTcast Source for Winamp 2.x DSP Plug-in, a piece of software which adds SHOUTcast broadcast ability to the Winamp software. (Don't worry about the word source in that title, it is pre-compiled and ready to run). The DSP Plug-in acts as a bridge between your Winamp software and a SHOUTcast DNAS server (which electro-music.com is running to broadcast). To obtain the latest copy of the plugin, please click here. Instructions are included with the installer. Installing the plug-in is easy, configuring it is a bit tricky. One tip, make sure Winamp is not running when you install the plugin. Use the default installation options. The following is from the plug-in configuration instructions, but edited a bit to be more relevant for electro-music.com streaming: Configuration
Once you've installed Winamp and the DSP, you're ready to configure the plug-in.
(It isn't necessary to use the soundcard mixer in the bottom part of this configuration window. This works only for commercial PC sound cards. If you have a professional audio interface, like a Firewire MOTU 828 or something, that mixer section won't even work.) 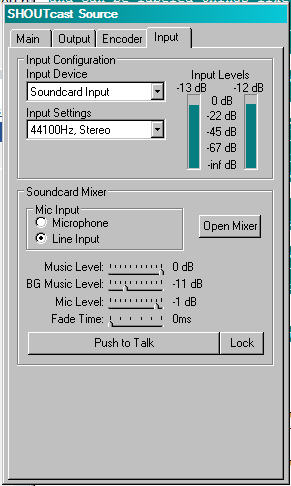 Note: on the windows below, we set up two outputs and two encoders - one for 128 kbps and one for 24 kbps:
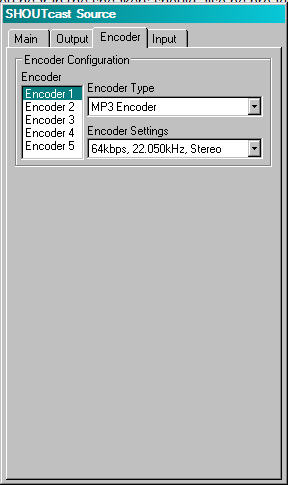 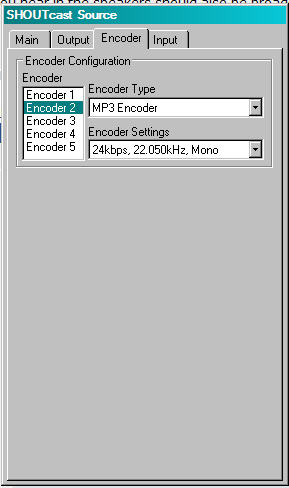
Hopefully, these screen scans will help a bit... Note: the port numbers you will be given are most probably not the one shown on these screen shots. 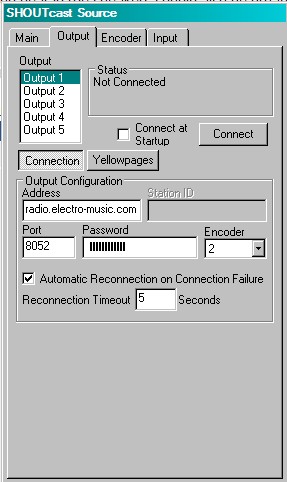 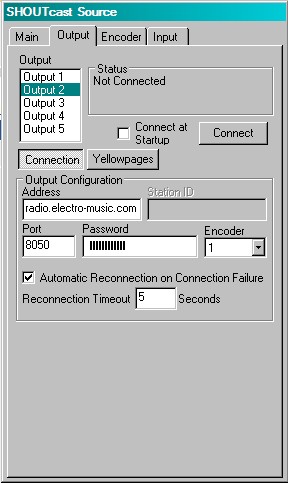
 There is more information in the README file that comes with the plugin. Read it if you are interested. Additional tooling
Jasper's LineIn plugin for WinAmp can be a very usefull addition. It enables you to select other sound sources than the primary line in or microphone in as the source for broadcasing. For instance not all sound 'cards' may be used without it. See : http://home.hccnet.nl/th.v.d.gronde/dev/lineinWA2/doc/index.html Once you have that plugin installed it will show up amongst WinAmp's Input plugins. When you double click on it you should be able to select all of your sound devices, and it's even possible to make presets. For this the Shoutcast plugin for WinAmp must be configured a bit different from what was outlined above. Under Input configuration/Input device you'd want to select "WinAmp (reccomened)" instead of the usual "SoundCard input" selection. The Line In plugin will run your selected input through WinAmp. The drawback of this is that when WinAmp is installed as your default music player and you click on some music link or file that one will open up in WinAmp and you'll be streaming that instead of what you intended to stream. So it could be useful to set up another media player as your default music player when you are streaming out using WinAmp. |
Edit - History - Print - Recent Changes - Search Page last modified on 2013-04-02 18:59 [UTC-7] - 6717 views