| Author |
Message |
cbm

Joined: Oct 25, 2005
Posts: 381
Location: San Francisco
|
 Posted: Fri Jul 10, 2009 6:14 pm Post subject: Posted: Fri Jul 10, 2009 6:14 pm Post subject:
|
  |
|
| macumbista wrote: | | If I could request one more photo, it would be a close-up of the set screws on the back side, that you mentioned lock it into place (where I thought maybe gravity would do the job by itself). |
OK, I'll try and get to that later tonight.
| Quote: | | Also....are those audio jacks coming out of the backside of the top boat? |
Yeah, there are a few little cutouts where things can be mounted to the boat. The 227e mixer uses one, the 225e midi interface uses one, the charger for the 222e rings uses one.
In the link you posted to Johan's cabinet http://www.synthi.se/bcab/b2.jpg you can see the blanking plates installed on the back of the top and middle boats. If you had a module than uses one of these, the blanking plate would be removed and a little circuit board mounted on a little metal plate would be screwed in there. An awful amount of thought went into this system.
_________________
Chris Muir
http://www.eardrill.com <– My jobby (more than a hobby, less than a job) |
|
|
Back to top
|
|
 |
cbm
Joined: Oct 25, 2005
Posts: 381
Location: San Francisco
|
| Posted: Fri Jul 10, 2009 6:18 pm Post subject:
|
|
|
| macumbista wrote: | | And my other question is...with all those cables, and the fact that you have to unplug them before closing the case, what do you do when you have to pack it up for a gig? |
Unplug them. I tend to use a standard "base patch," which I've gotten pretty fast at patching, and then patch on top of that.
It does mean that I need about an hour to set up, although I can do a crappy job in about 40 minutes.
_________________
Chris Muir
http://www.eardrill.com <– My jobby (more than a hobby, less than a job) |
|
|
Back to top
|
|
|
macumbista

Joined: Sep 12, 2007
Posts: 398
Location: berlin
Audio files: 3
|
| Posted: Sat Jul 11, 2009 2:46 am Post subject:
|
|
|
| cbm wrote: | | In the link you posted to Johan's cabinet http://www.synthi.se/bcab/b2.jpg you can see the blanking plates installed on the back of the top and middle boats. If you had a module than uses one of these, the blanking plate would be removed and a little circuit board mounted on a little metal plate would be screwed in there. |
I was wondering what those cutouts were for...thanks!
| cbm wrote: | | An awful amount of thought went into this system. |
For USD20K, I would hope so!!!!! Is there anyone on this forum interested in buying one of my (slightly used) kidneys? Reply by PM 
| cbm wrote: | | I tend to use a standard "base patch," which I've gotten pretty fast at patching, and then patch on top of that. |
I figured "performative patching" would be a big part of using this machine.
best!
D.
_________________
Esoteric drones and nonlinear distortion
Custom/handmade experimental instruments
macumbista.net |
|
|
Back to top
|
|
|
macumbista
Joined: Sep 12, 2007
Posts: 398
Location: berlin
Audio files: 3
|
| Posted: Sat Jul 11, 2009 3:11 am Post subject:
|
|
|
| cbm wrote: |
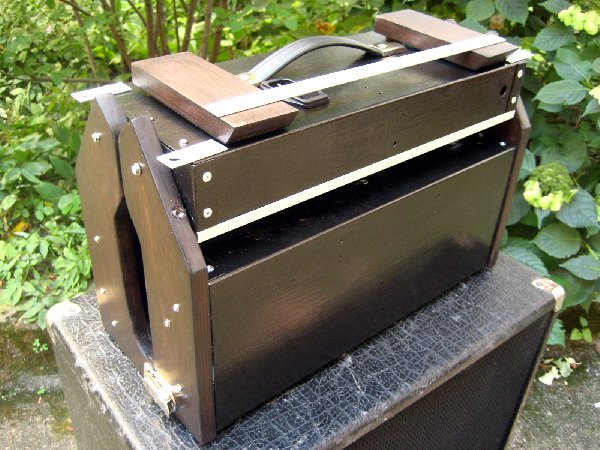
Hopefully this is end-on enough: |
The angle of the boats respective to each other is 143 degrees (i.e. the middle boat is at 37 degrees from the table). Now I have to decide if I want to re-cut my wood or not....
_________________
Esoteric drones and nonlinear distortion
Custom/handmade experimental instruments
macumbista.net |
|
|
Back to top
|
|
|
akrearke
Joined: Sep 08, 2008
Posts: 53
Location: US
|
| Posted: Mon Jul 27, 2009 6:53 pm Post subject:
|
|
|
| I am building a clone of a buchla 200 and this cabinet thread inspired me. I have done my own design to day, but the specks are a little different. I would recommend to anyone trying this out to picture it as a square box and then cut away the excess. Very challenging to get the angles right for the 37 degree slant on the cabinet. very cool thanks to everyone who lent a hand in this thread. |
|
|
Back to top
|
|
|
v-un-v
Janitor


Joined: May 16, 2005
Posts: 8932
Location: Birmingham, England, UK
Audio files: 11
G2 patch files: 1
|
| Posted: Mon Jul 27, 2009 10:25 pm Post subject:
|
|
|
Just for the record;
http://electro-music.com/forum/ntopic-21723.html
The Solidworks version was never finished, as the specification asked for were impossible to realise, as the deeper the boats got, the more out of proportion the whole thing came (Don, you're a genius!), and having to redraw and dimension where holes went (for fixing together) became to much of a chore to repeat over and over again. So in the end I just thought that life was too short and went for a walk instead! 
If you use the plans in this link, I accept no responsibility whatsoever, if building from it ends, in total disaster! got me?
_________________
ACHTUNG!
ALLES TURISTEN UND NONTEKNISCHEN LOOKENPEEPERS!
DAS KOMPUTERMASCHINE IST NICHT FÜR DER GEFINGERPOKEN UND MITTENGRABEN! ODERWISE IST EASY TO SCHNAPPEN DER SPRINGENWERK, BLOWENFUSEN UND POPPENCORKEN MIT SPITZENSPARKSEN.
IST NICHT FÜR GEWERKEN BEI DUMMKOPFEN. DER RUBBERNECKEN SIGHTSEEREN KEEPEN DAS COTTONPICKEN HÄNDER IN DAS POCKETS MUSS.
ZO RELAXEN UND WATSCHEN DER BLINKENLICHTEN. |
|
|
Back to top
|
|
|
ericcoleridge

Joined: Jan 16, 2007
Posts: 889
Location: NYC
|
| Posted: Mon Jul 27, 2009 11:42 pm Post subject:
|
|
|
On the 200e, the middle boat is a little deeper than the outside boats-- if I remember right, it's 3.25" deep; the outside boats 2.75".
I was able to use readymade 3" deep alluminum boats (from Mouser), so I made my drawing to accomodate all three boats being 3" deep; However, I don't believe this altered the proportions at all. I can post my 1:1 drawings if anyone is interested. They're not exactly perfect--I'm sure--but useable possibly.
I didn't precisely measure the angles, I just traced the wood panels from a photo, and then scaled them to the right measurements. As I understand it, outstretched/open, the cabinet should measure approx 18" from the front bottom endpanels forward edge to the very back edge of the top endpanels. |
|
|
Back to top
|
|
|
macumbista
Joined: Sep 12, 2007
Posts: 398
Location: berlin
Audio files: 3
|
| Posted: Tue Jul 28, 2009 9:59 am Post subject:
|
|
|
Smart not to accept any liability, v-un-v. Every time I changed just about anything, especially the angle that the case opened up to, I have to fiddle with everything. My advice to anyone trying this out is to use something like Illustrator, Inkscape or Sketchup to draft something that fits the dimensions you are working with. Use the "rotate" tool in the software to pivot the side panel on an axis that you have defined (i.e. where you plan to put the screw hole) and see if it collides with anything! Simply rescaling someone else's drawing has pretty good odds that something won't work!
_________________
Esoteric drones and nonlinear distortion
Custom/handmade experimental instruments
macumbista.net |
|
|
Back to top
|
|
|
macumbista
Joined: Sep 12, 2007
Posts: 398
Location: berlin
Audio files: 3
|
| Posted: Sat Aug 29, 2009 8:43 am Post subject:
|
|
|
New photos! Still have a bit of internal wiring to do here, and I discovered that painting metal isn't really my forté, but that's life in the DIY world. Enjoy...
| Description: |
|
| Filesize: |
517.4 KB |
| Viewed: |
609 Time(s) |
| This image has been reduced to fit the page. Click on it to enlarge. |

|
| Description: |
|
| Filesize: |
569.3 KB |
| Viewed: |
555 Time(s) |
| This image has been reduced to fit the page. Click on it to enlarge. |

|
| Description: |
|
| Filesize: |
607.57 KB |
| Viewed: |
593 Time(s) |
| This image has been reduced to fit the page. Click on it to enlarge. |

|
| Description: |
|
| Filesize: |
563.64 KB |
| Viewed: |
535 Time(s) |
| This image has been reduced to fit the page. Click on it to enlarge. |

|
| Description: |
|
| Filesize: |
603.83 KB |
| Viewed: |
562 Time(s) |
| This image has been reduced to fit the page. Click on it to enlarge. |
|
_________________
Esoteric drones and nonlinear distortion
Custom/handmade experimental instruments
macumbista.net |
|
|
Back to top
|
|
|
Sound
Joined: Jun 06, 2006
Posts: 842
Audio files: 1
|
| Posted: Sat Aug 29, 2009 5:07 pm Post subject:
|
|
|
| Uau, you artist |
|
|
Back to top
|
|
|
ericcoleridge
Joined: Jan 16, 2007
Posts: 889
Location: NYC
|
|
|
Back to top
|
|
|
macumbista
Joined: Sep 12, 2007
Posts: 398
Location: berlin
Audio files: 3
|
| Posted: Sun Aug 30, 2009 11:20 pm Post subject:
|
|
|
@ ericcoleridge: Thanks thanks thanks. You're much too kind I didn't even think that there might be ready-made boats actually...
I guess I should just go over the process of how I did this in steps:
1--Calculated boat sizes on paper.
2--Sheet steel purchased, cut and bent at Modulor in Berlin. Boats are made from 1 C-shaped section for the length and two smaller C sections for the end-caps.
3--Ordered power supply from Curetronic.
4--Drilled holes for screws/rivets, XLR gooseneck lamp and power supply.
5--Designed wooden side panels on the computer in Inkscape (this was probably the most complex part, and I made a few different prototypes before I got the thickness and angle I wanted).
6--Printed side panel design on A4 paper and redrew onto wood with carbon-copy paper.
7--Cut wooden panels with electric scroll/decoupier saw. Cut wooden legs.
8--Drilled holes and screwed in the locking mechanism in the side of the wooden panels (small set screws to keep the boats in place when the case is open).
9--Sanded/stained wood panels + legs.
10--Painted metal boats with Hammerite brand "Hammerschlag" black. I gave it several heavy coats with a brush, so the paint job is very rough. I kind of like that handmade feel, but if you wanted it to look more "pro" I'd recommend spraying. I would have liked to bake the finish to harden it, but I didn't want all my cookies to taste like paint afterwards
11--Assembled metal boats with Pro-forma rails. The boats and rails are riveted, however the handle, legs, latches, power supply, gooseneck XLR and side panels are all screwed/bolted.
I'll try to answer any other questions here when I have time for it...
_________________
Esoteric drones and nonlinear distortion
Custom/handmade experimental instruments
macumbista.net |
|
|
Back to top
|
|
|
macumbista
Joined: Sep 12, 2007
Posts: 398
Location: berlin
Audio files: 3
|
| Posted: Sat Sep 05, 2009 6:00 am Post subject:
|
|
|
In case anyone's interested, here's the PDFs for the side panels. These are calculated at 172mm for the height of the boats (4U), and they open to a comfortable angle of 37 degrees.
| Description: |
|

Download (listen) |
| Filename: |
topIII.pdf |
| Filesize: |
2.4 KB |
| Downloaded: |
1014 Time(s) |
| Description: |
|
Download (listen) |
| Filename: |
bottomIII.pdf |
| Filesize: |
2.2 KB |
| Downloaded: |
1170 Time(s) |
_________________
Esoteric drones and nonlinear distortion
Custom/handmade experimental instruments
macumbista.net |
|
|
Back to top
|
|
|
mistercooper

Joined: Jul 17, 2006
Posts: 62
Location: Seattle
|
| Posted: Sat Sep 05, 2009 10:16 pm Post subject:
|
|
|
| akrearke wrote: | | I am building a clone of a buchla 200 and this cabinet thread inspired me. I have done my own design to day, but the specks are a little different. I would recommend to anyone trying this out to picture it as a square box and then cut away the excess. Very challenging to get the angles right for the 37 degree slant on the cabinet. very cool thanks to everyone who lent a hand in this thread. |
One adopts a 37 degree position for the purposes of astral projection. Coincidence? I think not. |
|
|
Back to top
|
|
|
Pehr

Joined: Aug 14, 2005
Posts: 1307
Location: Björkvik, Sweden
Audio files: 2
|
|
|
Back to top
|
|
|
v-un-v
Janitor
Joined: May 16, 2005
Posts: 8932
Location: Birmingham, England, UK
Audio files: 11
G2 patch files: 1
|
| Posted: Sun Sep 06, 2009 3:27 am Post subject:
|
|
|
| Pehr wrote: |
YES! That's the kind of blueprint I understand
not these &%"¤! cad-files or whatever they're called    |
It's exactly the same thing, except CAD files contain measurement data that both humans and CNC machines can read. For example, do you know how long that piece of wood is without being told? Do you know how thick it is? Of course you don't!
FWIW, I highly expect that these PDF's were drawn on some sort of CAD system anyway. 
Tom 
_________________
ACHTUNG!
ALLES TURISTEN UND NONTEKNISCHEN LOOKENPEEPERS!
DAS KOMPUTERMASCHINE IST NICHT FÜR DER GEFINGERPOKEN UND MITTENGRABEN! ODERWISE IST EASY TO SCHNAPPEN DER SPRINGENWERK, BLOWENFUSEN UND POPPENCORKEN MIT SPITZENSPARKSEN.
IST NICHT FÜR GEWERKEN BEI DUMMKOPFEN. DER RUBBERNECKEN SIGHTSEEREN KEEPEN DAS COTTONPICKEN HÄNDER IN DAS POCKETS MUSS.
ZO RELAXEN UND WATSCHEN DER BLINKENLICHTEN. |
|
|
Back to top
|
|
|
macumbista
Joined: Sep 12, 2007
Posts: 398
Location: berlin
Audio files: 3
|
| Posted: Mon Sep 07, 2009 10:39 am Post subject:
|
|
|
| v-un-v wrote: | | FWIW, I highly expect that these PDF's were drawn on some sort of CAD system anyway. |
Actually, I drew the whole thing in 2D in Inkscape (FLOSS Adobe-Illustrator clone). Since I'm not a machine, I already knew how big and thick the wood might be
_________________
Esoteric drones and nonlinear distortion
Custom/handmade experimental instruments
macumbista.net |
|
|
Back to top
|
|
|
v-un-v
Janitor
Joined: May 16, 2005
Posts: 8932
Location: Birmingham, England, UK
Audio files: 11
G2 patch files: 1
|
| Posted: Mon Sep 07, 2009 1:01 pm Post subject:
|
|
|
| macumbista wrote: | | v-un-v wrote: | | FWIW, I highly expect that these PDF's were drawn on some sort of CAD system anyway. |
Actually, I drew the whole thing in 2D in Inkscape (FLOSS Adobe-Illustrator clone). Since I'm not a machine, I already knew how big and thick the wood might be |
"Actually"?
CAD stands for "Computer Aided Design". Most CAD packages are 2D- and that includes Inkscape!!
_________________
ACHTUNG!
ALLES TURISTEN UND NONTEKNISCHEN LOOKENPEEPERS!
DAS KOMPUTERMASCHINE IST NICHT FÜR DER GEFINGERPOKEN UND MITTENGRABEN! ODERWISE IST EASY TO SCHNAPPEN DER SPRINGENWERK, BLOWENFUSEN UND POPPENCORKEN MIT SPITZENSPARKSEN.
IST NICHT FÜR GEWERKEN BEI DUMMKOPFEN. DER RUBBERNECKEN SIGHTSEEREN KEEPEN DAS COTTONPICKEN HÄNDER IN DAS POCKETS MUSS.
ZO RELAXEN UND WATSCHEN DER BLINKENLICHTEN. |
|
|
Back to top
|
|
|
v-un-v
Janitor
Joined: May 16, 2005
Posts: 8932
Location: Birmingham, England, UK
Audio files: 11
G2 patch files: 1
|
| Posted: Mon Sep 07, 2009 1:10 pm Post subject:
|
|
|
You'll probably appreciate that Buchla has put a lot of consideration into this design. Buchla imo is by proper means of the definition, a genius. And it wasn't just electronics that he was good at. Where I went terribly wrong, is that I assumed that this same design could be made into a "frac-rack". WRONG!
In the end, I just had too much child care to deal with, than constantly pissing around with these stupid CAD programs. I'm supposed to do this for a living, but it bores me shitless 
Give me a Leica, a summicron and a day out without my screaming children any day! 
_________________
ACHTUNG!
ALLES TURISTEN UND NONTEKNISCHEN LOOKENPEEPERS!
DAS KOMPUTERMASCHINE IST NICHT FÜR DER GEFINGERPOKEN UND MITTENGRABEN! ODERWISE IST EASY TO SCHNAPPEN DER SPRINGENWERK, BLOWENFUSEN UND POPPENCORKEN MIT SPITZENSPARKSEN.
IST NICHT FÜR GEWERKEN BEI DUMMKOPFEN. DER RUBBERNECKEN SIGHTSEEREN KEEPEN DAS COTTONPICKEN HÄNDER IN DAS POCKETS MUSS.
ZO RELAXEN UND WATSCHEN DER BLINKENLICHTEN. |
|
|
Back to top
|
|
|
Pehr
Joined: Aug 14, 2005
Posts: 1307
Location: Björkvik, Sweden
Audio files: 2
|
|
|
Back to top
|
|
|
frenchyinmunich
Joined: Jun 23, 2009
Posts: 115
Location: Germany
|
| Posted: Thu Sep 10, 2009 1:50 am Post subject:
Buchla front panels |
|
|
Hello,
I recently started to built few Buchla modules.
I never seen a Buchla in Europa during the last 25 years, since I am into electronic music playing.
I would like to associate to my boards the original front panel design.
If I would have the possibilty to have a Buchla just near my home, I would do the design myself. Unfortunatly, I don't have one accessible and I don't know how to do the closest as possible...
Could someone help me? In giving some front panel design file or the exact dimension of the panels?
Best regards,
F |
|
|
Back to top
|
|
|
lanxe

Joined: Feb 24, 2005
Posts: 102
Location: Columbus, OH - Now Carson City NV
|
| Posted: Mon Nov 02, 2009 12:17 pm Post subject:
|
|
|
I would love to see more progress from everybody that is building these style cases. Since it is a difficult design, its interesting to see how we all think a bit differently to solve some problems.
What hinges are you guys using? I just used 1/4" steel shafts cut to length with a 1/4" collars.

 |
|
|
Back to top
|
|
|
macumbista
Joined: Sep 12, 2007
Posts: 398
Location: berlin
Audio files: 3
|
| Posted: Mon Nov 02, 2009 12:43 pm Post subject:
|
|
|
| lanxe wrote: | | What hinges are you guys using? I just used 1/4" steel shafts cut to length with a 1/4" collars. |
Ummm......long threaded screws run through a plastic tube and a nut+washer on the other end
Actually, I see you have an interesting solution to the part I found the hardest, which is the tabs which hold the case open and preserve the angle. Seems like you have a flat panel running across the middle of the wooden sides, where I followed [i.e. tried to follow] the original design with tabs at the very outside and set screws. Note to anyone trying set-screws: it's a pain in the ass to get it all precise!!!! Mine are functional (mostly) but very sloppy.
_________________
Esoteric drones and nonlinear distortion
Custom/handmade experimental instruments
macumbista.net |
|
|
Back to top
|
|
|
macumbista
Joined: Sep 12, 2007
Posts: 398
Location: berlin
Audio files: 3
|
| Posted: Mon Nov 02, 2009 1:11 pm Post subject:
|
|
|
Also, curious to know what material you used for the boats... you mentioned the boats themselves are pre-fab. Aluminum? How much does your whole case weigh (minus modules)? I'm wondering if I'll be able to keep mine within the 20kg (including Pelicase) allowed by most European airlines....
_________________
Esoteric drones and nonlinear distortion
Custom/handmade experimental instruments
macumbista.net |
|
|
Back to top
|
|
|
lanxe
Joined: Feb 24, 2005
Posts: 102
Location: Columbus, OH - Now Carson City NV
|
| Posted: Mon Nov 02, 2009 1:53 pm Post subject:
|
|
|
yes, in the open position there are straps that bolt into the wood (actually into wood anchors made of steel....I tried brass, but it was too soft). Without these straps the case would stay open, but wanted to close if pressure was put on certain portions of the face. The downside is it requires one to bolt the straps in when in the open position, the upside is its rock stable.
The boats are the ones I think ericcoleridge was referring to from mouser. They are the 7"x17"x3" BUD prefab boats. They are great. The total weight is very manageable, I cant say the exact weight as I dont have a scale. But I will say that it is rather light and I dont think there would be any issues with taking it on a plane.
I may build another one with the knowledge that I have gained from this one. Some mistakes were made, and I am not completely satisfied with a few things. I never routed power between the boats either. |
|
|
Back to top
|
|
|
|

 Forum index » DIY Hardware and Software


