| Author |
Message |
PHOBoS

Joined: Jan 14, 2010
Posts: 5881
Location: Moon Base
Audio files: 709
|
 Posted: Wed Oct 09, 2019 3:27 pm Post subject:
mini MIDI to CV converter with Gate and Trigger outputs Posted: Wed Oct 09, 2019 3:27 pm Post subject:
mini MIDI to CV converter with Gate and Trigger outputs
Subject description: uses Arduino nano & MCP4725 DAC |
  |
|
I added a simple MIDI to CV converter to a MIDI keyboard. At the moment it only makes use of NoteOn and NoteOff messages but I might
add Pitch Bend later. The keyboard I used also has some knobs that send out CC messages so maybe I will do something with that too.
I tapped the midi signal of from the keyboard PCB but if you want to use it with a regular MIDI input you can add the circuit with the 6n137
optocoupler. I don't have the right rotary encoder (with a switch) yet so that'll be installed when it arrives. (could take a couple of weeks)
Here's some info, a schematic, the arduino sketch and some photos.
| Code: | // * ============================================================================================================================== *
// * DESCRIPTION: *
// * ------------ *
// * This is a very basic MIDI to CV converter originally intended to be added to a MIDI keyboard[*]. It has a 1V/Oct CV output *
// * with a range of 5 octaves (in semitones) and it will ignore any MIDI notes that are out of this range. The MIDI octave range *
// * it responds to can be adjusted in the code (low_octave) and can be set between -1 (octaves -1 to 3) and 4 (octaves 4 to 8). *
// * It can be set higher but then the total range will of course be less than 5 full octaves. *
// * *
// * It uses last note priority but doesn't memorize any notes. This means that if you press a key and hold it, then press another *
// * key the CV will correspond with the last pressed key. But if you release this key it will not return to the CV for the first *
// * held down key. (the Gate output does however stay on). *
// * *
// * It also has a Gate output that stays high when at least one note is on and a Trigger output that sends out a short pulse *
// * whenever a key is pressed (or a new MIDI NoteOn message is received). The length of this trigger pulse can be adjusted in *
// * the code (trigger_time) but it is not 100% accurate. *
// * *
// * The first time the arduino is booted it uses preset values to control the DAC. These might work straight away but because *
// * the DAC uses the supply voltage as a reference and isn't entirely linear it will probably need some calibration. *
// * There are 2 calibration procedures; *
// * - Quick calibration calculates all the values for the DAC based on 1 setting but is not very accurate. *
// * - Note calibration makes it possible to precisely adjust and store the output voltage for each note individually at any *
// * given time. (this could also be used for creating non-western tuning scales) *
// * *
// * *
// * [*]requires some extra circuitry for an external MIDI connection. *
// * *
// * ============================================================================================================================== * |
(there's some more info in the sketch)
| Description: |
|
| Filesize: |
53.49 KB |
| Viewed: |
3350 Time(s) |
| This image has been reduced to fit the page. Click on it to enlarge. |
![mini MIDI to CV [V1.0].gif](phpbb-files/thumbs/t_mini_midi_to_cv_v10_452.gif)
|
| Description: |
|
| Filesize: |
99.71 KB |
| Viewed: |
660 Time(s) |
| This image has been reduced to fit the page. Click on it to enlarge. |

|
| Description: |
|
| Filesize: |
136.09 KB |
| Viewed: |
655 Time(s) |
| This image has been reduced to fit the page. Click on it to enlarge. |
|
| Description: |
|
| Filesize: |
151.06 KB |
| Viewed: |
778 Time(s) |
| This image has been reduced to fit the page. Click on it to enlarge. |
|
| Description: |
|

Download (listen) |
| Filename: |
MINI_MIDI_TO_CV_V1_0.ino |
| Filesize: |
42.66 KB |
| Downloaded: |
1198 Time(s) |
_________________
"My perf, it's full of holes!"
http://phobos.000space.com/
SoundCloud BandCamp MixCloud Stickney Synthyards Captain Collider Twitch YouTube |
|
|
Back to top
|
|
 |
ixtern
Joined: Jun 25, 2018
Posts: 145
Location: Poland
|
| Posted: Mon Oct 14, 2019 1:03 am Post subject:
|
|
|
| Thanks! Nice simple solution and clear understandable software. Although I have Midi2CV from Erica Synths, I am thinking about my own to make. |
|
|
Back to top
|
|
|
PHOBoS
Joined: Jan 14, 2010
Posts: 5881
Location: Moon Base
Audio files: 709
|
| Posted: Mon Oct 14, 2019 2:33 pm Post subject:
|
|
|

here's version 1.1 with some small changes:
- replaced digitalWrite for Trigger and Gate outputs with direct PORT manipulation (faster).
- moved the encoder debounce from the adjust_dac_value() function to the read_enc() function.
- added inputs for (DIP)switches to set the octave range.
The switches are optional and if left out the default range (set with low_octave) is used.
| Description: |
|
| Filesize: |
56.58 KB |
| Viewed: |
1611 Time(s) |
| This image has been reduced to fit the page. Click on it to enlarge. |
![mini MIDI to CV [V1.1].gif](phpbb-files/thumbs/t_mini_midi_to_cv_v11_513.gif)
|
| Description: |
|
Download (listen) |
| Filename: |
MINI_MIDI_TO_CV_V1_1.ino |
| Filesize: |
48.76 KB |
| Downloaded: |
1143 Time(s) |
_________________
"My perf, it's full of holes!"
http://phobos.000space.com/
SoundCloud BandCamp MixCloud Stickney Synthyards Captain Collider Twitch YouTube |
|
|
Back to top
|
|
|
ixtern
Joined: Jun 25, 2018
Posts: 145
Location: Poland
|
| Posted: Tue Oct 15, 2019 4:47 am Post subject:
|
|
|
Maybe it would be better to separate initial debug sequence with if statement and debug on/off variable (or debug define). Debug is very useful during development and test phases but not needed when code is mature so anyone can set temporary debug preference.
I prefer such approach in my sketches. With if - all debugs are ommited during execution, with define - debugs are not compiled making program smaller (if there are many and complex debugs). |
|
|
Back to top
|
|
|
PHOBoS
Joined: Jan 14, 2010
Posts: 5881
Location: Moon Base
Audio files: 709
|
|
|
Back to top
|
|
|
ixtern
Joined: Jun 25, 2018
Posts: 145
Location: Poland
|
| Posted: Wed Oct 16, 2019 3:23 am Post subject:
|
|
|
| PHOBoS wrote: | I am not sure what 'initial debug sequence' you are refering too.
Almost thought I accidentally uploaded a test version. |
This one (apart from reading data from eeprom):
| Code: |
// copy data from the EEPROM to the dac_data[] array and print a list of all the values
Serial.begin(9600); // set the baudrate to 9600kbps for the serial monitor
Serial.println("values for the DAC stored in EEPROM:");
for (byte n=0; n<=60; n++) {
read_dac_data_from_eeprom(n); // copy the EEPROM value corresponding with note n to the dac_data[] array
Serial.println(dac_data[n]); // print value
}
Serial.flush(); // wait untill all the serial data has been send
|
|
|
|
Back to top
|
|
|
PHOBoS
Joined: Jan 14, 2010
Posts: 5881
Location: Moon Base
Audio files: 709
|
| Posted: Wed Oct 16, 2019 6:09 am Post subject:
|
|
|
oh, that's a feature 
I thought it might be usefull if you calibrated it and wanted to save the dac settings for some reason.
I used it myself to paste into the preset array after calibration, and it could be used to save different scales.
You can take it out of the code but I don't really see a downside to it being there.
_________________
"My perf, it's full of holes!"
http://phobos.000space.com/
SoundCloud BandCamp MixCloud Stickney Synthyards Captain Collider Twitch YouTube |
|
|
Back to top
|
|
|
Pastor McPurvis
Joined: Nov 09, 2018
Posts: 4
Location: Lake Worth, Florida, USA
|
|
|
Back to top
|
|
|
PHOBoS
Joined: Jan 14, 2010
Posts: 5881
Location: Moon Base
Audio files: 709
|
| Posted: Fri Nov 22, 2019 3:34 pm Post subject:
|
|
|
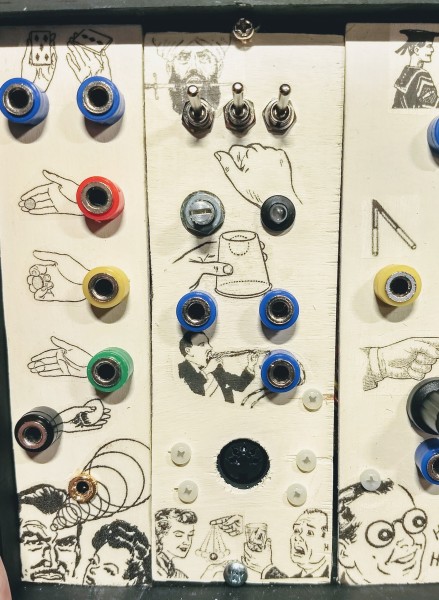
awesome! 
I like the panel designs, makes me curious what the one on the left is.
I am working on a version with an arpeggiator but haven't implemented the latch function yet. All controls are done through
midi CC so it wouldn't require any extra (or changes in) hardware, besides maybe an input for an external clock input.
_________________
"My perf, it's full of holes!"
http://phobos.000space.com/
SoundCloud BandCamp MixCloud Stickney Synthyards Captain Collider Twitch YouTube |
|
|
Back to top
|
|
|
Pastor McPurvis
Joined: Nov 09, 2018
Posts: 4
Location: Lake Worth, Florida, USA
|
| Posted: Fri Nov 22, 2019 3:55 pm Post subject:
|
|
|
The one on the left is a simple passive multiple I use to split CV, and a power input because I set up my power supply as a bench top unit to use both for testing and power for the rack.
The additions sound great. I'll be sure to keep an eye out for them.
All the best! |
|
|
Back to top
|
|
|
bubzy

Joined: Oct 27, 2010
Posts: 594
Location: United Kingdom
Audio files: 64
|
| Posted: Sun Jul 12, 2020 1:16 am Post subject:
|
|
|
hi phobos!
wondering how difficult it would be to implement multiple channel outs?
obviously would require separate DACS for each out but could make sequencing from software more interesting
_________________
_Richard_  |
|
|
Back to top
|
|
|
PHOBoS
Joined: Jan 14, 2010
Posts: 5881
Location: Moon Base
Audio files: 709
|
| Posted: Sun Jul 12, 2020 7:19 pm Post subject:
|
|
|
hi bubzy
you mean multiple CV outs by using multiple midi channels ?
that would be possible and yeah you need more DACs. The nano only has 2 I2C outputs and I don't think you can even change it on the DAC.
You could use a DAC with multiple outputs though. Not exactly sure if tuning would work well as the voltage for every note is stored in the
internal eeprom and there's not much room in there, but that could also be added. Code wise it probably wouldn't be that hard to do.
_________________
"My perf, it's full of holes!"
http://phobos.000space.com/
SoundCloud BandCamp MixCloud Stickney Synthyards Captain Collider Twitch YouTube |
|
|
Back to top
|
|
|
blue hell
Site Admin

Joined: Apr 03, 2004
Posts: 24499
Location: The Netherlands, Enschede
Audio files: 298
G2 patch files: 320
|
| Posted: Mon Jul 13, 2020 4:59 am Post subject:
|
|
|
Usually you can have like 8 of the same device on one i2c channel with external address selection bits ... that would be a bit hard with a 6 pin device though .. time to have a look at the data sheet [1] ...
Ah, datasheet says the DAC has one external address line A0, so you can have two per i2c interface ...
And then it also says that that it has 8 possible addresses .. hmm .. how .. right .. that comes form the order code [2] ... you can order different combinations of A1 and A2 .. so that makes eight per i2c channel .. so then you could have 16 ananalog outputs 
Hmm .. but you'll have to contact µChip about that, default for (A2, A1) seems to be (0, 0) ... so the other three combinations may be for big customers only ...
Four then I guess on two i2c channels.
[1] https://www.microchip.com/wwwproducts/en/en532229
[2] order codes are: MCP4725 xx T E /CH where xx can be A0, A1, A1 or A2 for address bits (A2,A1) being (0,0), (0,1), (1,0) or (1,1)), T for tape and reel. E for temperature range, /CH for package type.
_________________
Jan
also .. could someone please turn down the thermostat a bit.

Last edited by blue hell on Mon Jul 13, 2020 5:09 am; edited 1 time in total |
|
|
Back to top
|
|
|
blue hell
Site Admin
Joined: Apr 03, 2004
Posts: 24499
Location: The Netherlands, Enschede
Audio files: 298
G2 patch files: 320
|
| Posted: Mon Jul 13, 2020 5:02 am Post subject:
|
|
|
Hmm .. they seem a bit expensive too?
Edit, stumbled on a bad supplier I guess .. also seeing now that Mouser has A1, A2 and A3 versions as well as A0. 
_________________
Jan
also .. could someone please turn down the thermostat a bit.
|
|
|
Back to top
|
|
|
PHOBoS
Joined: Jan 14, 2010
Posts: 5881
Location: Moon Base
Audio files: 709
|
|
|
Back to top
|
|
|
blue hell
Site Admin
Joined: Apr 03, 2004
Posts: 24499
Location: The Netherlands, Enschede
Audio files: 298
G2 patch files: 320
|
| Posted: Mon Jul 13, 2020 6:47 am Post subject:
|
|
|
Interesing chip, it does bus voltage level translations too.
_________________
Jan
also .. could someone please turn down the thermostat a bit.
|
|
|
Back to top
|
|
|
gabbagabi

Joined: Nov 29, 2008
Posts: 652
Location: Berlin by n8
Audio files: 23
|
|
|
Back to top
|
|
|
PHOBoS
Joined: Jan 14, 2010
Posts: 5881
Location: Moon Base
Audio files: 709
|
| Posted: Mon Jul 13, 2020 11:47 am Post subject:
|
|
|
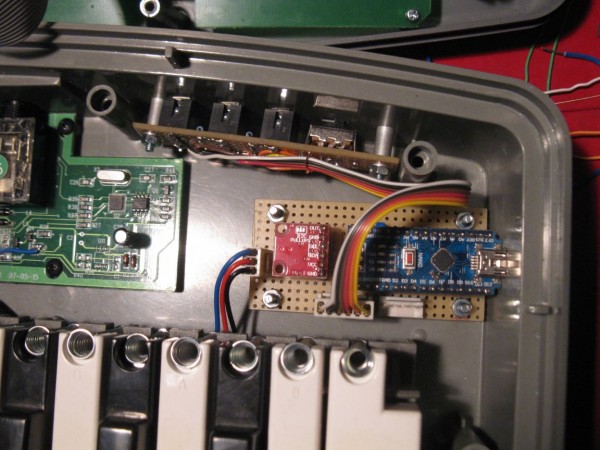
Oh, I hadn't noticed Tayda sells arduinos too!
I'd have to look at the specs for the pro mini but I doubt it is very different. However, it doesn't have a USB port so programming it is a little bit less
convenient. Code will probably work mostly as it is, because the actual pin mapping is done by the IDE. For example in the code the encoder button
is connected to digital pin 4 which is actually pin 22 on the nano and a different pin on the pro mini but it doesn't have to be adjusted. Of course you
will have to connect the button to the correct pin. Maybe the I2C pins are different let me check,..
nope, looks like those are the same too, I guess it makes sense as both boards are based on an ATmega328P.
| Quote: | | it seems u have the dac in a red enclosure? is it a kind of smd2dip adapter? |
Not really an smd2dip adapter as it has some other components on it aswell but similar.
They are designed that way to be used with arduinos and you can plug it in a breadboard.
_________________
"My perf, it's full of holes!"
http://phobos.000space.com/
SoundCloud BandCamp MixCloud Stickney Synthyards Captain Collider Twitch YouTube |
|
|
Back to top
|
|
|
bubzy
Joined: Oct 27, 2010
Posts: 594
Location: United Kingdom
Audio files: 64
|
| Posted: Tue Jul 14, 2020 10:15 am Post subject:
|
|
|
welp, i built the single version on breadboard quickly and it works like a charm nice job.
will dig into your code and see if i can play about, maybe get a few mcp4922's running.
does the midi library support polyphony?
_________________
_Richard_ |
|
|
Back to top
|
|
|
PHOBoS
Joined: Jan 14, 2010
Posts: 5881
Location: Moon Base
Audio files: 709
|
|
|
Back to top
|
|
|
michelangelo_n
Joined: Sep 14, 2020
Posts: 1
Location: Italy
|
| Posted: Mon Sep 14, 2020 9:57 am Post subject:
|
|
|
| Hi, this is a nice project! which kind of encoder are you using? does a normal potentiometer do the job? I'm using a B100k pot and measuring the voltage out of the wiper for calibration. but I'm not sure I'm doing it right. |
|
|
Back to top
|
|
|
PHOBoS
Joined: Jan 14, 2010
Posts: 5881
Location: Moon Base
Audio files: 709
|
|
|
Back to top
|
|
|
wallybob
Joined: Sep 26, 2015
Posts: 7
Location: Iowa
|
| Posted: Tue Jan 12, 2021 3:08 pm Post subject:
|
|
|
| PHOBoS, I was wondering what it would take to use this device with my USB MIDI keyboard? Could the Nano USB port be configured to either a programming port or a MIDI port? |
|
|
Back to top
|
|
|
PHOBoS
Joined: Jan 14, 2010
Posts: 5881
Location: Moon Base
Audio files: 709
|
| Posted: Tue Jan 12, 2021 3:43 pm Post subject:
|
|
|
not the nano but the arduino pro micro can do midi over USB, that would require some changes in the code of course.
Shouldn't even be that hard, it's just the midi reading section that needs to be replaced to get the midi note data from USB.
There is a USB MIDI library available to make things a lot easier.
also
 
_________________
"My perf, it's full of holes!"
http://phobos.000space.com/
SoundCloud BandCamp MixCloud Stickney Synthyards Captain Collider Twitch YouTube |
|
|
Back to top
|
|
|
Grumble

Joined: Nov 23, 2015
Posts: 1319
Location: Netherlands
Audio files: 30
|
| Posted: Wed Jan 13, 2021 7:16 am Post subject:
|
|
|
Some time ago I stumbled upon a project called HIDUINO (it is still there, just google) where a class-compliant USB-MIDI device from an Arduino UNO or Mega 2560 can be programmed so you need no drivers because it’s native to windows.
Just be sure to get an UNO with an ATMEGA8U2 or ATMEGA16U2.
_________________
my synth |
|
|
Back to top
|
|
|
|

 Forum index » DIY Hardware and Software » Arduino