| Author |
Message |
Hashtag Octothorpe
Joined: Jun 11, 2017
Posts: 57
Location: Grand Rapids MI
|
 Posted: Sat May 12, 2018 10:33 pm Post subject:
Hi! Goal: to build the most complex PCB-less synth ever Posted: Sat May 12, 2018 10:33 pm Post subject:
Hi! Goal: to build the most complex PCB-less synth ever |
  |
|
I'm here to say "HI!!!" and to introduce myself and my build technique. I'm kind of a point-to-point and deadbug ninja.
See, I can't afford PCBs, I'm too impatient and disorganized to make my own, and even perfboard and stripboard can be limiting.
Some of my circuits (like the Linkwitz-Riley crossover pictured) are intentionally beautiful. That circuit was easy to make pretty because it's many iterations of basically the same circuit.
Introducing myself: I'm Juanito, and ever since I was five waaay back in the late 70s, I've loved LOVED electronic music. My mom played a cassette of Wendy Carlos' Switched on Bach and the sounds mesmerized me.
Every once in a while, growing up in relative isolation in the jungle of Peru (missionaries) I'd hear a sound that resonated with me -- the beginning of Jungle Love by Steve Miller Band... that one part of Barracuda... Paul Hardcastle's Nineteen!!! The soundtrack to Tron. The vocoder in Mike Oldfield! Pink Floyd's On The Run, amIright???
Eventually I figured out that what I loved was synthesized sounds. And only after Napster and Kazaa widened my musical horizons did I discover dance music; House, Trance, Techno, Gabber, Goa, oh you guys (I thought in the early '00s) there are whole continents of genrae to discover that are deeply synthesized!!!
Only a couple years ago did it occur to me to try to build myself a synthesizer. I had already been building amps, Gainclone style, and was familiar with boardless circuit building. But how many amps does one really need? How many amplifiers can you listen to at once? My line-level crossovers let me bi-amp the highs and mids, and power the sub separately, so where to go from there?
A friend showed me his Korg Littlebits synth, and of course something simple like that has to be DIY'able, and like finding Oakenfold on Napster in '02, my horizons opened up wide.
I'm a self-taught electrical builder and designer, so I struggle with some of the esoterica of electronics -- how do you calculate the current-sinking ability of a transistor pair set up as a temperature-compensated current sink??? for instance -- but I'm making lots of progress.
So far I've got about 60 working modules in my synth. Since possibly this is the only corner of the world where people might actually care, I'll list a few here:
Voices copied from TR-808 schematics:
Kick
Snare
Hat
Clave/Rim Shot
Cowbell (LOL)
Maraca/Clap
Cymbal
Thomas Henry designs:
X-4046 (four)
VCF-1 (three)
AD/AR envelope generator (four)
TB-303 ladder diode filters (two)
"Equinox II" delay
Engineer's Thumb compressor (three)
Zak Wylde Overdrive (heh... this one is basically dedicated to dirtying up the kick drum)
Polyfusion 4-pole high pass VCF
Polyfusion 4-pole low pass VCF
Eight or ten VCAs based on the LM13700 datasheet notes
Eight-chip ping-pong PT2399 delay (OMG so much fun, but so noisy!)
Eight channel mixer with pan knobs for stereo!
LMNC's Arduino-based Big Button trigger sequencer
Five channel flashlight-switch 16-step trigger sequencer
Six channel gate sequencer (16-step section broken, other sections work okay)
A comparator, a demultiplexer thing, a noise source, a gated noise box for simple electronic snares... an 8-voice drum circuit that's supposed to do chimes and bongos but right now it just squeals (?????) An Arduino tap-tempo clock...
My technique is basically breadboarding (original sense, not with the solderless breadboards -- I've never had luck with those) but on thick card.
I glue paper shopping bag three layers thick, cut it to size to fit in my enclosure, which is almost always a tin can. I usually put a bare copper wire (stripped Ethernet cable wires) along the top and bottom edge of the card for the positive and negative power rails.
All the parts go on the top side of the card, with every single ground connection poking through the card to the other side. I mercilessly bend IC pins any which way makes the most sense, so sometimes my op amps will have half their legs sticking up in the air.
I keep the components very close together to keep the leads short and strong, so they'll stay where they're supposed to. It can be close, crowded work, but I rarely have problems with short circuits.
Where jumper wires are necessary, I use old IDE cables. The 80 conductor kind are perfect, because the insulation is easy to strip with your fingernails, and some cables even have insulation that'll shrink away from the conductor if you touch the end with a soldering iron.
Once the circuits are complete and tested, with the pots and switches working, I'll mount it inside a tin can. Tin can lids are soft enough to make holes in with an awl and reamed out with long needle-nosed pliers. The power leads go out the back (more Ethernet wires -- my personal convention is orange for +, green for -, white for ground) to be wired into the power distribution web/chaotic mess on the back of my synth.
A note about the cans: we have a can opener that cuts right along the outside lip of the crimp that holds the lid to the can. This leaves no sharp edge, and the lid can set securely back into the emptied can.
All the cans have brown paper glued around the top edge, with a bit of overlap keeping the lid secure in place. I've found that TitebondII glue works best for this, since it's very strong, grips quickly, and is cheap and easy to clean up.
The cans are glued together using more tabs of brown paper bag, all stuck inside this pretty large frame I built out of old pallets.
Oh..... I buy all my parts from Aliexpress. I've only gotten one batch of bad chips -- 100 CD40106 hex Schmitt inverters, and if you want to frustrate a newbie synth builder, give him or her some bum 40106 chips!!! Jeeez.
Okay, too long, didn't read? Here's some pictures:
Find me on Instagram as juanitohm
Youtube as Juanito Moore
| Description: |
| Three way Linkwitz-Riley crossover (high and mid are stereo) |
|
| Filesize: |
1.93 MB |
| Viewed: |
603 Time(s) |
| This image has been reduced to fit the page. Click on it to enlarge. |

|
| Description: |
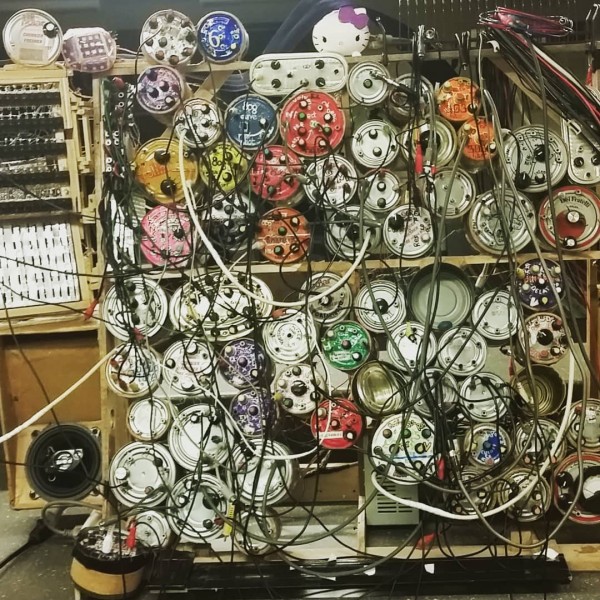
| Recent picture of my synth |
|
| Filesize: |
206.99 KB |
| Viewed: |
634 Time(s) |
| This image has been reduced to fit the page. Click on it to enlarge. |
|
| Description: |
| Building a 2-pole high pass filter based on the Polyfusion 4-pole. |
|
| Filesize: |
62.95 KB |
| Viewed: |
575 Time(s) |
| This image has been reduced to fit the page. Click on it to enlarge. |

|
|
|
|
Back to top
|
|
 |
Grumble

Joined: Nov 23, 2015
Posts: 1320
Location: Netherlands
Audio files: 30
|
| Posted: Sat May 12, 2018 11:14 pm Post subject:
|
|
|
This is GREAT! I love it!
Visited your YT channel and subscribed 
_________________
my synth |
|
|
Back to top
|
|
|
AlanP
Joined: Mar 11, 2014
Posts: 746
Location: New Zealand
Audio files: 41
|
| Posted: Sun May 13, 2018 1:26 am Post subject:
|
|
|
| That Linkwitz-Riley circuit is high art. |
|
|
Back to top
|
|
|
Grumble
Joined: Nov 23, 2015
Posts: 1320
Location: Netherlands
Audio files: 30
|
| Posted: Sun May 13, 2018 5:05 am Post subject:
|
|
|
| Quote: | | 16-step section broken....circuit that's supposed to do chimes and bongos but right now it just squeals (?????)... |
Looking at your YouTube uploads I wondered how you keep this synth up and running without pcb's for mechanical support, since modules in my synth sometimes (well... very occasionally  ) just stop while they are built on thru-hole perf-board... ) just stop while they are built on thru-hole perf-board...
_________________
my synth |
|
|
Back to top
|
|
|
blue hell
Site Admin

Joined: Apr 03, 2004
Posts: 24580
Location: The Netherlands, Enschede
Audio files: 308
G2 patch files: 320
|
| Posted: Sun May 13, 2018 5:36 am Post subject:
|
|
|
Oh, that is pretty cool all, heard some, sounds good :-)
_________________
Jan
also .. could someone please turn down the thermostat a bit.
 |
|
|
Back to top
|
|
|
PHOBoS

Joined: Jan 14, 2010
Posts: 5904
Location: Moon Base
Audio files: 709
|
| Posted: Sun May 13, 2018 7:54 am Post subject:
|
|
|
hey, a fellow dreadman who's also into flashing lights and beeping electronics 
amazing looking builds, inside an out. Reminds a bit of an insect hotel. I guess you have excellent shielding with those modules.
I just went through most of your related youtube videos and it sounds good too! (love the hello kitty  ) )
_________________
"My perf, it's full of holes!"
http://phobos.000space.com/
SoundCloud BandCamp MixCloud Stickney Synthyards Captain Collider Twitch YouTube |
|
|
Back to top
|
|
|
Hashtag Octothorpe
Joined: Jun 11, 2017
Posts: 57
Location: Grand Rapids MI
|
| Posted: Sun May 13, 2018 5:15 pm Post subject:
|
|
|
I do my building in an area with old fluorescent fixtures about 6 feet from my work surface. Hostile EMF environment!!! My unshielded circuits would pick up lots of stray voltage if they were at all sensitive. Cramming everything in grounded tin cans was a natural solution.
Initially I was going to have my modules independent, to string together Littlebits style. It became clear eventually that I'd need to create that framework thing to house my synth in a more permanent way.
The circuit "boards" (cards) are well-supported inside the tin cans. I'll use solid-core wire for some of the connections to the front panel jacks and pots, and a couple solid copper ground connections. My more recent strategy is to cut the cards just the right size to fit in the tin cans, that way they're even more secure.
When they need repairing, it's easy to crack open the brown paper around the rim of the tin can lid and pry the lid off the can, extracting the module guts with them. The paper can be re-glued with the TitebondII, and looks okay and has held up very well.
Surprisingly, this hasn't happened very often! I even had an op amp (probably an op amp?) burn up while I was playing (OH! that acrid smell of lessons learned) but I haven't figured out which module it was. One of the ones I never use, I guess! |
|
|
Back to top
|
|
|
|

 Forum index » Discussion » Introduce Yourself


