| Author |
Message |
PHOBoS

Joined: Jan 14, 2010
Posts: 5881
Location: Moon Base
Audio files: 709
|
 Posted: Wed Mar 28, 2012 12:49 pm Post subject:
PHOBoS DIY Synth schematics Posted: Wed Mar 28, 2012 12:49 pm Post subject:
PHOBoS DIY Synth schematics
Subject description: circuit pr0n! |
  |
|

This is a project I started on somewhere in September 2011 after I found the Elektor Oscillographics Circuit.
My initial idea was to use it to make a dronebox, with a small TV instead of an oscilloscope, and some extra modulation circuits.
But as I mentioned in the 2012 buid thread it got a bit out of hand and too complex to build as one synth. So I first finished
what became the Dronoscope and then started working on housing the other circuits. I'm not done yet, but I finished 2 cases
about a month ago and I'd like to share the schematics and some info. Most of them are existing circuits I found online
which I modified a bit or used as inspiration.
I set a couple of goals/limitations/rules for the circuits I wanted to build:
- powered by +/- 12V
- easy obtainable parts
- not too complex, that is a not too many components/jacks/pots/switches (ehmm well,. I tried)
- in and output range +/- 5Vpp [max]
I started out with some LFO's but since I haven't encased those yet I'll skip them for now.
So first up:
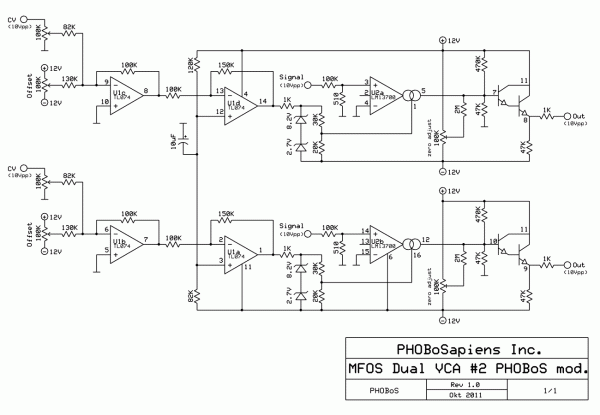
DUAL VCA

I used the MFOS DUAL VCA #2 and ditched the log response. Then changed the resistor values of the CV stage since there
is no need anymore to first have a gain of /50 followed by x50. And then adjusted some of the other values untill I was happy
with the signals I measured on my scope. I put the zenerdiodes in as a limiter in case the CV gets higher than +5V, which
easily happens because of the Offset control. This way the signal is controllable from 0-100% max.
I experimented with different values untill I had something that worked (8.2V + 2.7V) but found a variable zener circuit later
that I used from then on. So you might want to replace that part if you plan to build this one.
one of the reasons for building the VCA's was to use it in combination with
Ken Stone's Simple WaveFolder.

I added an extra input stage to use it with +/-5V signals (which also inverts the signal) and discarded the pulse out.
it's a very neat simple circuit, and if you haven't build it yet,.. do it. you won't regret it 
next up:
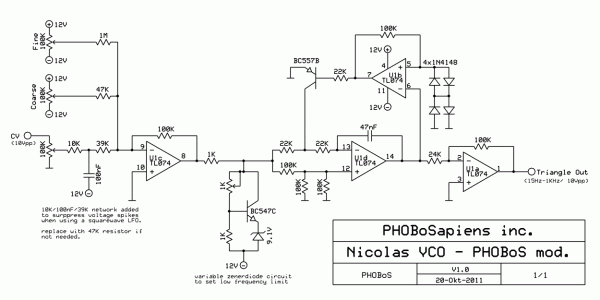
VCO

I had build Nicolas' Super simple V/Hz VCO succesfully before and since it's a pretty simple circuit (for a VCO) I decided
to use it for this synth aswell. The first change I made was to get the amplitude up to +/-5Vpp I tried a couple
of things and I think the 4 diodes are actually a leftover from those experiments. But the easiest thing to do was
just to add an extra output amp. The highest frequency is allready limited by the circuit itself so with the resistor
values I choose it doesn't matter if the CV get's above +5V, the frequency just doesn't get higher.
On the low end however the thing starts acting a bit weird and then stops, so; zenerdiode limiter to the rescue.
As you can see this time I used the variable zener diode circuit I found which makes it much easier to set the
correct limit.
and then there is the resistor capacitor network on the input. Allthough my LFO's didn't seem to have any spikes
according to my scope (I added some caps to surpress those), the squarewaves did seem to cause some peaks on the output
of the VCO. so I experimented a bit which some different cap/resistor placements untill they were gone.
the frequency range might seem a bit limited but remember it was originally designed for a dronebox.
I also designed a sinewaveshaper with some diodes and a vactrol VCA but didn't have enough panel space. So it will
probably end up in a seperate case.
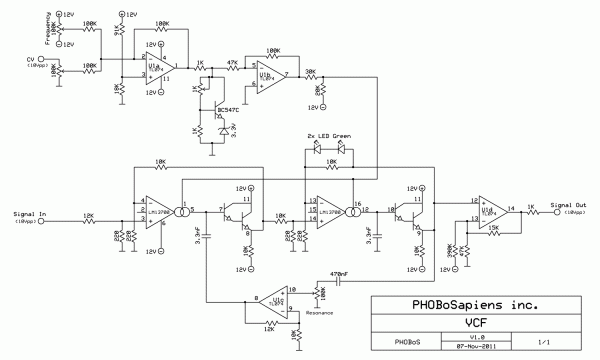
VCF

Some of you may recognize a korg MS20 filter in this one which is one of the designs I experimented with
and a couple of circuits based on that or similar too. As you can see there is another variable zener circuit
in there which has the same purpose as the zeners in the DUAL VCA.
I did want resonance controll but no tweeting self oscillation, so adjusted the values for that. But with
resonance set at max and a high amplitude input signal it still does oscillate sometimes, it also acts a bit weird with
resonance maxed and the filter turned down, but I decided to call that a bonus feature.
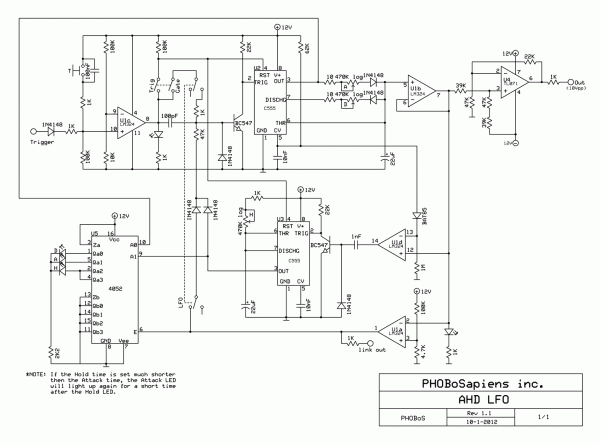
AHD LFO

ok, this one got a bit complex but it's one I'm very happy with. Actually if you ignore the bottom half and the switches
you will be left with a very basic 555 based AD envelope generator. It was based on Yusynth's ADSR but there's not
a lot left of that in the final design.
I wanted an envelope generator with a adjustbale sustain time independent of the gate input. I didn't care much
about the sustain level itself for this one. So basically a trapezoid envelope shaper.
I accomplished this by using a second 555 timer for the Hold function. This one gets triggered slightly before
the first 555 (Attack/Decay) reaches it's max output voltage and switches to Decay. (The BAT85 diode, 1M resistor
and U1d take care of this).
This second 555 keeps the trigger input of the 1st one low which prevents it from switching to Decay. But this didn't
immediately work as planned. The problem is that normally the treshold level of a 555 is set to 2/3's of the supply voltage.
So it charges the cap to that level, and then discharges it. But if you keep the trigger input low it will continue charging
and since the output voltage depends on the voltage over the cap it too wil keep rising. And off coure that's not what I wanted.
Luckily the treshold level is adjustable through pin 5  So that's why there is a 62K resistor attached to it which sets the So that's why there is a 62K resistor attached to it which sets the
treshold level higher.
I added some LED's to indicate each stage (A/H/D) which are turned off at the end of the cycle by a comparator based around U1a.
The most obvious way to do this for me was by using a mux but it does feel like a bit of a waste with one half unused. Maybe
someone else can come up with a use for it (A,H,D, GATE outputs ?)
If you set the Attack time very long and the Hold time very short you will see the Attack LED go back on after the Hold time has passed,
this is because the Hold Timer is triggered just before the maximum value is reached.
Now this is where the fun starts. Because the output of U1d switches at the end of the AHD cycle I can use it to retrigger,
which turns it into a completely adjustable Ramp/Triangle/Saw/Square/Trapezoid LFO 
but wait,.. there is more! I also added a switch to choose between gate or trigger mode. So you have 4 settings:
1: Trigger/LFO off - in this setting it will cycle through A/H/D independent of the trigger/gate time.
2: Gate/LFO Off - Attack/Hold time is dependent of the trigger/gate time. As soon as it goes low it will switch to Decay.
(If the gate time is longer then the Hold time the Attack LED will light up again)
3: Trigger/LFO on - this is basic LFO mode but with retrigger function (hard sync)
4: Gate/LFO on - in this mode it will only oscillate as long as the trigger/gate input is high.
I also added a Link out which makes it possible to daisy chain them when I build some more 
(but you can use it to trigger other things aswell).
I think that's it for the electronics, except for the power section. I decided to give each case it's own set of regulators.
less heat, more stable, I don't have to recalibrate things when using a different supply and I can also power it from my
+/-15V modular PSU.
The front is (laser)printed on cheap paper. I usually use very thin double adhesive tape to glue labels on fronts but after I
ordered them I received some self adhesive aluminium instead. Not what i needed but I'll keep it
I also ordered some different clear selfadhesive printable labels (one of them almost ruined my printer!  ) so I put that on the back ) so I put that on the back
instead and then used some woodglue (applied with a paintroller) to attach it to the MDF front.
On the Dronsocope I added some spray coating as a protective layer on the front label but that didn't work very well,
maybe I needed to add some more layers ?!
So I wanted to try using woodglue. I allready tried that on a previous build but applied with a brush which worked great but didn't
look very smooth. So this time I used a paintroller and that worked much better. it gives a bit of a textured finish and just as with
a spray coating it makes the black darker and the colors more vibrant. There is a little bit of a blueish hue if you look at it in
bright light and then you will also see some of the dust stuck in it, but I think it looks pretty good for a paper front.
(the white specs you see in the photo are mostly caused by light reflecting, there's not THAT much dust in it)
Well that's it for this case. The second one I build (ok I cheated I did the other one first) has a sequencer and a divider but I'll
get to that some other time. (you can take a peak here)
I hope this information is usefull. 
a BIG thanks to all the original circuit designers!

(I included a zip file with the schematics for easy download and in case the other ones get deleted)
edit: deleted the ZIP file and uploaded the schematics to the forum instead
edit: photos of finished synths (maybe some other images as well) are currently unavailable because my own website disappeared in a puff of smoke
| Description: |
| MFOS Dual VCA 2 (PHOBoS mod) |
|
| Filesize: |
71.25 KB |
| Viewed: |
2916 Time(s) |
| This image has been reduced to fit the page. Click on it to enlarge. |
|
| Description: |
| Ken Stone WaveFolder (PHOBoS mod) |
|
| Filesize: |
38.57 KB |
| Viewed: |
3005 Time(s) |
| This image has been reduced to fit the page. Click on it to enlarge. |

|
| Description: |
|
| Filesize: |
47.37 KB |
| Viewed: |
2222 Time(s) |
| This image has been reduced to fit the page. Click on it to enlarge. |
|
| Description: |
|
| Filesize: |
63.64 KB |
| Viewed: |
1981 Time(s) |
| This image has been reduced to fit the page. Click on it to enlarge. |
|
| Description: |
|
| Filesize: |
100.93 KB |
| Viewed: |
1754 Time(s) |
| This image has been reduced to fit the page. Click on it to enlarge. |
|
_________________
"My perf, it's full of holes!"
http://phobos.000space.com/
SoundCloud BandCamp MixCloud Stickney Synthyards Captain Collider Twitch YouTube
Last edited by PHOBoS on Fri May 02, 2025 9:41 am; edited 10 times in total |
|
|
Back to top
|
|
 |
ericcoleridge

Joined: Jan 16, 2007
Posts: 889
Location: NYC
|
| Posted: Wed Mar 28, 2012 1:49 pm Post subject:
|
|
|
| more beautiful work Phob. when I have more time, after I finish some other things, I'd really like to begin some video circuits, and I'd also love to reproduce your dronescope synth. I hope that there s documentation for it! |
|
|
Back to top
|
|
|
bubzy

Joined: Oct 27, 2010
Posts: 594
Location: United Kingdom
Audio files: 64
|
| Posted: Fri Mar 30, 2012 12:32 am Post subject:
|
|
|
hey phobos,
i think the textured look is nice, however, if you prefer a smooth finish, perhaps you could go over the glued surface with a aerosol lacquer, that should settle and leave a smooth surface.
just a thought 
_________________
_Richard_ |
|
|
Back to top
|
|
|
PHOBoS
Joined: Jan 14, 2010
Posts: 5881
Location: Moon Base
Audio files: 709
|
| Posted: Sat Mar 31, 2012 2:56 am Post subject:
|
|
|
| ericcoleridge wrote: | | more beautiful work Phob. when I have more time, after I finish some other things, I'd really like to begin some video circuits, and I'd also love to reproduce your dronescope synth. I hope that there s documentation for it! |
thanks there's not really much documentation for the dronoscope,
but there is not a lot too it. The construction was probably the hardest part.
Maybe I should make a seperate thread for it. 
for turning a TV into a scope you can start by reading this thread.
| bubzy wrote: | hey phobos,
i think the textured look is nice, however, if you prefer a smooth finish, perhaps you could go over the glued surface with a aerosol lacquer, that should settle and leave a smooth surface. |
Well, I tried that with the dronoscope, but it still scratches very easily, so maybe it needed more layers.
I could also apply some good lacquer with a paintroller too offcourse, but I think the woodglue is a good alternative and it dries a lot quicker.
(very fast actually). I never like the part where I have to wait for paint to dry.
btw the glue I'm using is the standard white stuff that dries transparent.
_________________
"My perf, it's full of holes!"
http://phobos.000space.com/
SoundCloud BandCamp MixCloud Stickney Synthyards Captain Collider Twitch YouTube |
|
|
Back to top
|
|
|
Banjo
Joined: Sep 27, 2009
Posts: 90
Location: Lawrence County, Mo. USA
Audio files: 2
|
| Posted: Sat Mar 31, 2012 4:16 am Post subject:
|
|
|
| It looks great! I think that some of your modules will be my next project. The last year has been a huge learning curve for me ans synth DIY, and I still really don't know half of what I am doing. Absolutely know clue. I have had build fever. Your project, and description of how you did certain things has given me some ideas and things to try! Now I have to look into getting some pictures into my posts as well as build more modules. |
|
|
Back to top
|
|
|
PHOBoS
Joined: Jan 14, 2010
Posts: 5881
Location: Moon Base
Audio files: 709
|
| Posted: Sun Apr 08, 2012 2:52 pm Post subject:
|
|
|
| Banjo wrote: | | It looks great! I think that some of your modules will be my next project. The last year has been a huge learning curve for me ans synth DIY, and I still really don't know half of what I am doing. Absolutely know clue. I have had build fever. Your project, and description of how you did certain things has given me some ideas and things to try! Now I have to look into getting some pictures into my posts as well as build more modules. |
that's great to hear. When I joined here 2 years ago I hardly didn't know anything about synths, just DIY.
But I learned a lot here, and this project was/is very helpfull to get a better understanding of how certain modules work.
_________________
"My perf, it's full of holes!"
http://phobos.000space.com/
SoundCloud BandCamp MixCloud Stickney Synthyards Captain Collider Twitch YouTube |
|
|
Back to top
|
|
|
PHOBoS
Joined: Jan 14, 2010
Posts: 5881
Location: Moon Base
Audio files: 709
|
Posted: Sun Apr 08, 2012 6:55 pm Post subject:
Mad Monkey Sequencer
Subject description: more circuit pr0n |
|
|

Mad Monkey Sequencer

I wanted a simple sequencer and to keep jacks and pots to a minimum I decided to go for 4 steps*. The first thing
that came to mind was a combination of a CD4029 + CD4052, because the CD4029 has some nice options and the 4052
can be used for some LED's aswell. So that's what I used. But offourse I can never keep things really simpe so
besides pots to set a fixed voltage for each step I decided I might aswell give it an option for an external
voltage. So it also functions as a sequential switch *it can be expanded to 8 or 16 steps
Off course this created a slight problem, CMOS doesn't like negative voltages and I couldn't power it from both
positive and negatve supply because 24V would destroy the chip. So I could either add some voltage regulators to
power the CMOS chips from +/-5V (or +/-6V) or shift the voltages so they would be positive only. Since I wanted
input buffers anyway I decided to go for the 2nd option.
So starting on the top right of the schematic we have the CV inputs for each step with attenuators,
the CV pots to set a fixed voltage, followed by the switches to select between the 2 and the input buffers
which shift (and invert) the voltage. Because I only needed -5V to +5V I had to add some resistors to
the CV pots. I noticed that the rest of the circuit caused some noise which resulted in a slight change in
frequency during each step. I managed to get rid of that by powering the circuit through some 10 ohm resistors
and extra buffer caps, while the CV pots are connected directly to the power. And I also placed a 100nF cap
across each CV pot.
After the input stage the voltages go through the CD4052 which is a dual 1 in/out to 4 in/out mux. 1 half is
used as a CV switch while the other half is used for gate outputs. Initially I just used it for indicator LED's
but while working on the front design I decided that it was usefull to have gates for each step (more on that later).
The circuit for it was taken, and slightly adjusted, from yusynths Octal Random Gates. (I hadn't thought about adding
the LED in series myself) The CV output from the mux goes to an output amp which shifts the level
back (and re-inverts it).
To get an actual sequence the mux has to be controlled which is done by the 4029 (a bin/dec counter only
used in binary mode). Instead of just using 2bits (= 4steps) I used 3 bits and added a rotary switch to
select between different 2 bit sequence patterns. I adjusted the (2x6) rotary switch so it can fully rotate,
which means you have the same pattern in opposite positions of the switch. (I added the switch connections in
the schematic so you don't have to trace back the wiring)
To get the 4029 to actually count it needs offcourse a CLK. It has an internal CLK generator (taken from
yusynth's Sampe & Hold) and a switch to select an external CLK signal.
I added a comparator with hysterysis so it's possible to use other signals instead of just Square/Pulse waves.
The output of it varies between +/- 12V (or close to) so there's a diode to get a 0-12V CLK followed by an XOR
used as an inverter because the comparator actualy inverts the signal. I also added a hold switch which only
stops the sequencer not the CLK output. (you can use the Int/Ext CLK switch to stop both if no external signal
is connected).
A nice feature of the 4029 is that it can count in both directions and besides the option for counting up or down
I added another comparator so you can control it with an external signal aswell. But there is one more thing,
or actually two. I also put in a semi random generator based around a CD4006 as used in yusynths Octal Random Gates
and other designs. One of the ouputs can be used to trigger the direction control of the 4029, this has the effect
that it will 'swing' between the steps, which reminded me off a monkey swinging between branches, hence the name
'Mad Monkey'.
But the 4029 also has an option for parallel inputs which can be routed directly to the outputs, so by adding
outputs of the random generator to these inputs it's possible to change completely random between steps. This
was a main reason for me to add the gate outputs.
I think that's pretty much it for the 'Mad Monkey Sequencer' circuit, which leaves the:
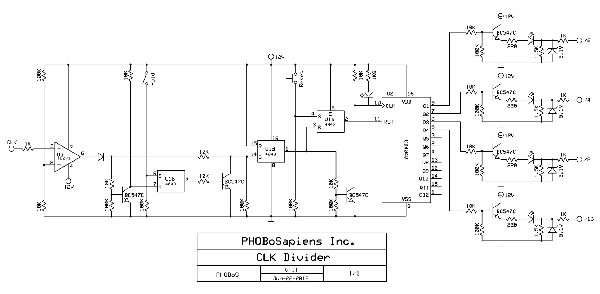
Divider
But there's not much to this circuit, and I don't have a schematic for it (might make one later). It's based around
a CD4040 and I used the same circuit as for the gate ouputs on the sequencer.
note: more info and an updated version below
other things I build that need to be housed and posted later are some LFO's, a PT2399 delay, comparator train,
CV controlled bass/treble/volume/balance ouput module, a S&H, the vactrol VCA sinewaveshaper, wavewiper
and some mixers. so stay tuned,..
| Description: |
|
| Filesize: |
144.9 KB |
| Viewed: |
2003 Time(s) |
| This image has been reduced to fit the page. Click on it to enlarge. |

|
_________________
"My perf, it's full of holes!"
http://phobos.000space.com/
SoundCloud BandCamp MixCloud Stickney Synthyards Captain Collider Twitch YouTube
Last edited by PHOBoS on Wed Sep 10, 2014 7:18 am; edited 3 times in total |
|
|
Back to top
|
|
|
AlasdairMoons

Joined: Dec 03, 2011
Posts: 105
Location: East-Belgium
|
|
|
Back to top
|
|
|
PHOBoS
Joined: Jan 14, 2010
Posts: 5881
Location: Moon Base
Audio files: 709
|
| Posted: Wed Jun 20, 2012 3:54 pm Post subject:
Divider revisited |
|
|
I finished two more boxes,. one is the same as the first one (LFO/AHD, VCO, 2x VCA, 2x Wavefolder, VCF)
the second one has 3 LFO's, a S&H and 2 3-input mixers. But more on that later.
First back to the divider. Allthough it was working something was still bugging me about it: the reset switch.
I just wired a switch to the reset pin of the 4040 with a resistor to GND and allthough this worked, it
sometimes skipped a couple of steps when I released the switch. After some close examination this only
seemed to happen if I released the switch when the CLK was low. And with that I mean the CLK input,
which gets inverted before going to the 4040 since it works on a high to low transistion.
Taking a better look at the datasheet revealed that this has to do with the internal circuit of the chip.
A high to low transistion on the reset pin while the CLK is high (I'm talking about the 4040 CLK input now)
causes to chip to increase one step. In combination with a bouncy switch this resulted in the skipping I got.
I solved this by adding a S/R flip flop (U1a). With the switch connected to the Set input, and the CLK signal
(before it gets inverted) to the Reset pin. So if I release the switch while the CLK is low it will hold until
it goes high again, works perfect
There was still one other similar kinda thing which bothered me a bit too (allthough not as much). The hold switch.
This was just a simple switch wired in series with the CLK signal, but downside of this was that if I closed
the (bouncy) switch while the CLk was high it again resulted in skipping a couple steps. So I used anothe S/R flip flop (U1b)
to solve this aswell (I had 3 left anyway). And if you wonder about what U1d does it is just wired as a buffer,
else the voltage wouldn't be high enough for the Reset input of U1a.
see updated schematic here
_________________
"My perf, it's full of holes!"
http://phobos.000space.com/
SoundCloud BandCamp MixCloud Stickney Synthyards Captain Collider Twitch YouTube
Last edited by PHOBoS on Fri Jun 22, 2012 7:09 am; edited 2 times in total |
|
|
Back to top
|
|
|
-minus-
Joined: Oct 26, 2008
Posts: 787
Audio files: 13
|
| Posted: Wed Jun 20, 2012 10:31 pm Post subject:
|
|
|
I must say, you have done a really great job with these. It seems to make sense putting the sockets on one side and the pots on the other. It just eliminates a lot of fiddling around for pots under layers of cables. The panels look good and the cases are neat. What are the cases made from. MDF board? I noticed the panels are recessed quite a bit too. I'm guessing this is to protect the knobs etc. I'm curious how deep your cases are? I'm working on getting my circuits behind panels and in several small cases at the moment. I'm wondering if they have a tendency to want to fall over when the leads are inserted.
Anyway, well done! They look really nice! |
|
|
Back to top
|
|
|
RingMad

Joined: Jan 15, 2011
Posts: 429
Location: Montreal, Canada
Audio files: 4
|
| Posted: Thu Jun 21, 2012 4:15 am Post subject:
|
|
|
| PHOBoS wrote: | there's not really much documentation for the dronoscope,
but there is not a lot too it. The construction was probably the hardest part.
Maybe I should make a seperate thread for it.
for turning a TV into a scope you can start by reading this thread |
Maybe you could post about it in the new subforum "Video synthesis and manipulation" [ http://electro-music.com/forum/forum-213.html ].
James
EDIT: completely re-written since I wrote the original post without doing enough research [hey, I'm supposed to be working!]. |
|
|
Back to top
|
|
|
PHOBoS
Joined: Jan 14, 2010
Posts: 5881
Location: Moon Base
Audio files: 709
|
| Posted: Thu Jun 21, 2012 8:54 am Post subject:
|
|
|
| -minus- wrote: | | I must say, you have done a really great job with these. It seems to make sense putting the sockets on one side and the pots on the other. It just eliminates a lot of fiddling around for pots under layers of cables. |
yep, when making modules for my (moonbase) modular I allready tried to put the jacks on one side,
in that case the bottom, so you don't have to go through a web of cables to find and turn a pot.
Allthough sometimes it does make more sense to place a jack next to a pot though, especially
if you haven't labeled anything . I planned on stacking these cases so putting the jacks on the
bottom of each case would still produce a web of patch cables. That's why I put them on the side,
and yes that works really well
And while I'm talking practical design here, I put the power in/outs on the front panel so I can place
the cases against a wall or even put them on their back with the front facing upwards.
| Quote: | | The panels look good and the cases are neat. What are the cases made from. MDF board? I noticed the panels are recessed quite a bit too. I'm guessing this is to protect the knobs etc. I'm curious how deep your cases are? |
it's all MDF, cheap and very easy to work with. The cases are made of 8mm and the front has
a thickness of 4mm. The recess is just a bit over 20mm and yes that's to protect the knobs.
With a cover on the front there is about a 2mm clearance between it and the knobs. so I can
store the cases with the fronts facing each other, or lay them flat on top of each other.
outside dimensions of the cases are 296mm x 226mm x 140mm
| Quote: | | I'm wondering if they have a tendency to want to fall over when the leads are inserted. |
well, the patch cables themselves won't cause it to fall over. But I have to hold it when I'm inserting or pulling
out a cable, but this is also because the kind of jacks I'm using. And I currently have it placed on top of a
smooth table so it slides. I do want to put some flat rubber feet underneath them but I'll have to
do some painting first.
If you use the more expensive metal jacks that have almost no (physical) resistance, or maybe banana's,
you can probably patch without a problem. Or just secure the cases somehow.
| Quote: | | Anyway, well done! They look really nice! |
thank you
_________________
"My perf, it's full of holes!"
http://phobos.000space.com/
SoundCloud BandCamp MixCloud Stickney Synthyards Captain Collider Twitch YouTube |
|
|
Back to top
|
|
|
PHOBoS
Joined: Jan 14, 2010
Posts: 5881
Location: Moon Base
Audio files: 709
|
|
|
Back to top
|
|
|
PHOBoS
Joined: Jan 14, 2010
Posts: 5881
Location: Moon Base
Audio files: 709
|
| Posted: Thu Jun 21, 2012 9:12 am Post subject:
|
|
|
Apparently I'm still not completely done with the divider 
I had been testing it with the internal LFO from the Mad Monkey Seq. since that is hardwired to the
divider (switchcontact of the input jack). But when I plugged it into the LFO's or gate outputs of the
sequencer it didn't work. The problem is pretty clear the LFO's have an output voltage of 10Vpp
(-/+ 5V) and the gates are also limited to 5V. The only signal that is higher is the CLK output of the
Mad Monkey Seq. (which means I have to change that too because I want 0/5V CLK & Gate signals).
Anyway i allready had an itch of putting a comparator at the input which would solve this problem too.
Or maybe just a simple transistor buffer, hmm
_________________
"My perf, it's full of holes!"
http://phobos.000space.com/
SoundCloud BandCamp MixCloud Stickney Synthyards Captain Collider Twitch YouTube |
|
|
Back to top
|
|
|
PHOBoS
Joined: Jan 14, 2010
Posts: 5881
Location: Moon Base
Audio files: 709
|
|
|
Back to top
|
|
|
PHOBoS
Joined: Jan 14, 2010
Posts: 5881
Location: Moon Base
Audio files: 709
|
Posted: Sun Jun 24, 2012 4:04 pm Post subject:
SynthBox 3
Subject description: 3 LFO's, 2 3-input mixers and a Sample & Hold |
|
|
Another Case, with 3 LFO's, 2 3-input mixers and a Sample & Hold

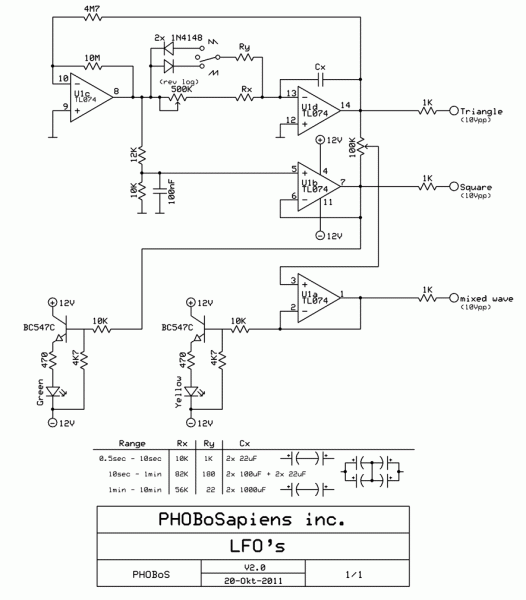
LFO's

The LFO's are actually what I started with made of a basic 2 opamp inverter/integrator configuration, with square
and triangle outputs, similar to the MFOS supersimple LFO. It has a switch to select between saw/triangle/inverse saw
and a 3rd output which you can mix between the square and triangle. Originally I made it with only one LED,
attached to the mixed output, but you can never have enough blinky lights, so I added one to the square out
aswell. I made 3 versions with different caps to get a total range of ± 0.5 sec. to 10 minutes. You could offcourse
use a switch to select different caps and have the full range in 1 LFO. The 100nF cap attached to the voltage divider
for the squarewave (non inverting input of U1b) is added to suppress voltage spikes.
note: inputs of U1c need to be swapped
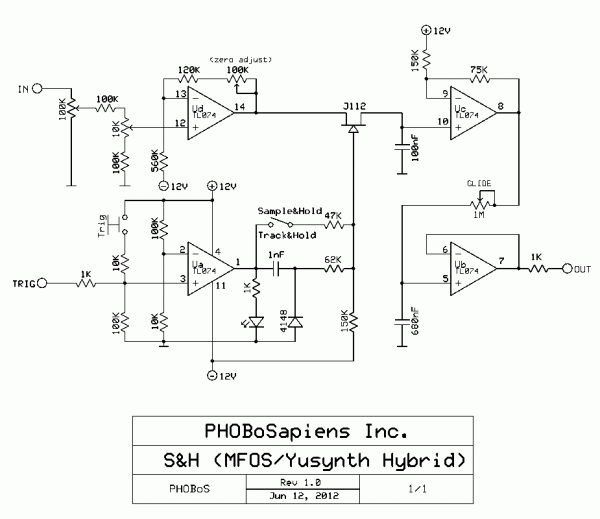
S&H

allthough I had allready made a Sample & Hold circuit (used in the squishy hamster patch) I wasn't really happy with
it. Sometimes it just seems to track instead of sample, so I decided to make a new one. The old one was based on the
Yusynth sample and Hold which is pretty straight forward and I think the problem might have been that it can't handle
negative voltages. I also tried the MFOS micro S&H which has an extra offset stage before and after the FET to solve
this problem, but that didn't work 100% either for me, probably because I used a different FET. So what I ended up with
is kind of a hybrid between the two. I had some room on the panel left for a switch so installed one for a track & hold
mode and for the same reason I added a trigger switch (usefull for calibration). The 10K and 100K pots attached to Ud are
(multi)trimpots for zero and gain adjustment, So what you put in is what you get out.
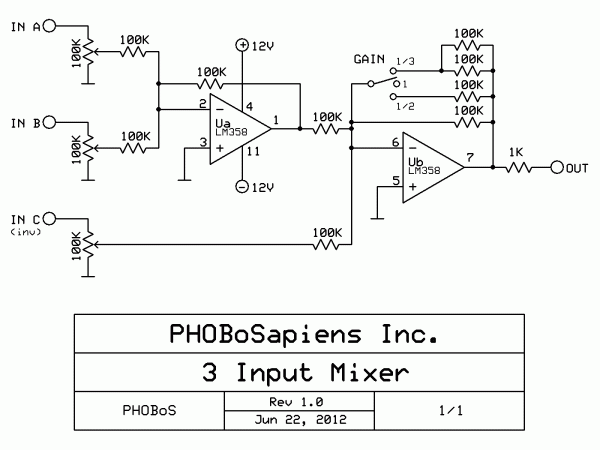
3-input Mixer

I had also allready made 2 mixers (and one other mixer with some waveplitting) but those have the jacks mounted on the PCB
very close together with a different spacing then what I'm currently using. (very usefull for a future module) So I also made
a new mixer design. I had enough room for 2 3-input mixers which is also very usefull in combination with the 3 LFO's.
To make it a little more interesting I added one inverted input and a gain switch. with the gain switch set to 1/2 (for 2 inputs)
or 1/3 (for 3 inputs) you can turn the level pots to 100% and still have a max output that is the same as the inputs. So 3 10Vpp
inputs with the switch set to 1/3 gives a mixed signal of 10Vpp . you could use a single resistor for the 2 parallel 100K resistors
if you want. (47K/49K9/51K)
and here's a diagram of how I hardwired everything together in this case using the switch contacts of the jacks.

as mentioned earlier I also made a another case like the first one but I ran into some problems with the wavefolder (solved) and the filter
which works but oscillates too easy, so I get back on that later. I also have a bunch more circuits which I will probably just build into
modules, but I will post that info here too. I still need to make a PSU for these cases so maybe I make a flat box or something
with a sloped panel to put underneath the others with some extra stuff i still have left. 
| Description: |
| LFO's [inputs of U1c need to be swapped] |
|
| Filesize: |
51.5 KB |
| Viewed: |
2118 Time(s) |
| This image has been reduced to fit the page. Click on it to enlarge. |
|
| Description: |
|
| Filesize: |
13.39 KB |
| Viewed: |
1483 Time(s) |
| This image has been reduced to fit the page. Click on it to enlarge. |
|
| Description: |
|
| Filesize: |
20.19 KB |
| Viewed: |
2050 Time(s) |
| This image has been reduced to fit the page. Click on it to enlarge. |
|
_________________
"My perf, it's full of holes!"
http://phobos.000space.com/
SoundCloud BandCamp MixCloud Stickney Synthyards Captain Collider Twitch YouTube
Last edited by PHOBoS on Wed Sep 10, 2014 8:47 am; edited 2 times in total |
|
|
Back to top
|
|
|
oculus
Joined: Oct 30, 2011
Posts: 35
Location: Iceland, Reykjavik
|
| Posted: Sun Sep 15, 2013 10:50 pm Post subject:
|
|
|
hi there thanks for sharing this, i just breadboarded the filter,
but did not get it to work, then i noticed that in the schematic the
U1b of the Tl074 is marked wrong i think.
because pin 5 should be + and pin 6 should be -
so do you know if i should change my connections
make everything that is supposed to be on pin5 go to 6 and vice versa ?
or is it just that the + symbol is at the wrong place on the schematic.
hope this isn´t to confusing.
thanks
kind regards
Oculus |
|
|
Back to top
|
|
|
PHOBoS
Joined: Jan 14, 2010
Posts: 5881
Location: Moon Base
Audio files: 709
|
| Posted: Mon Sep 16, 2013 12:49 am Post subject:
|
|
|
| oculus wrote: | hi there thanks for sharing this, i just breadboarded the filter,
but did not get it to work, then i noticed that in the schematic the
U1b of the Tl074 is marked wrong i think.
because pin 5 should be + and pin 6 should be -
so do you know if i should change my connections
make everything that is supposed to be on pin5 go to 6 and vice versa ?
or is it just that the + symbol is at the wrong place on the schematic.
hope this isn´t to confusing.
thanks
kind regards
Oculus |
you're correct,.. I must have switched the symbols but forgotten the pin numbers 
so the symbols are correct (+/-), the pin numbers are wrong.
(I knew I swapped inputs in the LFO schematic, maybe I'll update them both later today). thanks for noticing
and while you're breadboarding you might want to test this one too.
_________________
"My perf, it's full of holes!"
http://phobos.000space.com/
SoundCloud BandCamp MixCloud Stickney Synthyards Captain Collider Twitch YouTube |
|
|
Back to top
|
|
|
analog_backlash

Joined: Sep 04, 2012
Posts: 393
Location: Aldershot, UK
Audio files: 21
|
| Posted: Mon Sep 16, 2013 2:37 am Post subject:
|
|
|
Hi PHOBoS.
Almost all of the images on this post are missing when I look at it and if I click the little image icon which I can see, Google Chrome opens another tab for FileDen.com - is there somthing wrong here?
Gary |
|
|
Back to top
|
|
|
PHOBoS
Joined: Jan 14, 2010
Posts: 5881
Location: Moon Base
Audio files: 709
|
| Posted: Mon Sep 16, 2013 4:24 am Post subject:
|
|
|
I think fileden has moved or uses a different name,. but I had problems with it before and at some point my account had just completely dissapeared.
So yeah there is something wrong but not on your end. I'll see if I can upload them somewhere else. You can find them here too btw.
It would be nice if EM had an option to upload and then embed images instead of the attachement at the bottom.
_________________
"My perf, it's full of holes!"
http://phobos.000space.com/
SoundCloud BandCamp MixCloud Stickney Synthyards Captain Collider Twitch YouTube |
|
|
Back to top
|
|
|
analog_backlash
Joined: Sep 04, 2012
Posts: 393
Location: Aldershot, UK
Audio files: 21
|
| Posted: Mon Sep 16, 2013 5:51 am Post subject:
|
|
|
Thanks for that PHOBoS - I thought that it might be a "feature" of my computer as it does do strange things e.g. it locks up on the MFOS site in Google Chrome, but it works in Firefox (but very, very slowly). I must have a look at that again...
Gary |
|
|
Back to top
|
|
|
elmegil

Joined: Mar 20, 2012
Posts: 2179
Location: Chicago
Audio files: 16
|
| Posted: Mon Sep 16, 2013 6:07 am Post subject:
|
|
|
I have embedded images from E-M into posts other than the original one I attached them to.
You might try something like PM them to yourself, attach them there, and then embed the links in a public post?
Edit: Here we go trying that. Note that you have to use the actual IMAGE URL, not the link that you get for the attachment.
 |
|
|
Back to top
|
|
|
PHOBoS
Joined: Jan 14, 2010
Posts: 5881
Location: Moon Base
Audio files: 709
|
|
|
Back to top
|
|
|
elmegil
Joined: Mar 20, 2012
Posts: 2179
Location: Chicago
Audio files: 16
|
| Posted: Mon Sep 16, 2013 8:15 am Post subject:
|
|
|
| That was my knobcon rack |
|
|
Back to top
|
|
|
jurekprzezdziecki
Joined: Mar 22, 2016
Posts: 68
Location: warsaw
|
Posted: Thu Mar 31, 2016 3:02 am Post subject:
Re: PHOBoS DIY Synth schematics
Subject description: circuit pr0n! |
|
|
| PHOBoS wrote: |
VCO
I had build Nicolas' Super simple V/Hz VCO succesfully before and since it's a pretty simple circuit (for a VCO) I decided
to use it for this synth aswell. The first change I made was to get the amplitude up to +/-5Vpp I tried a couple
of things and I think the 4 diodes are actually a leftover from those experiments. But the easiest thing to do was
just to add an extra output amp. The highest frequency is allready limited by the circuit itself so with the resistor
values I choose it doesn't matter if the CV get's above +5V, the frequency just doesn't get higher.
On the low end however the thing starts acting a bit weird and then stops, so; zenerdiode limiter to the rescue.
As you can see this time I used the variable zener diode circuit I found which makes it much easier to set the
correct limit.
and then there is the resistor capacitor network on the input. Allthough my LFO's didn't seem to have any spikes
according to my scope (I added some caps to surpress those), the squarewaves did seem to cause some peaks on the output
of the VCO. so I experimented a bit which some different cap/resistor placements untill they were gone.
the frequency range might seem a bit limited but remember it was originally designed for a dronebox.
I also designed a sinewaveshaper with some diodes and a vactrol VCA but didn't have enough panel space. So it will
probably end up in a seperate case.
[/size] |
could you tell what zener diode (9.1V) you have used in the circuit?
i assume that there is no a real tracking 1V/oct in the circuit? is that CV input calibrated?
thanks J |
|
|
Back to top
|
|
|
|

 Forum index » DIY Hardware and Software