| Author |
Message |
Gothboy

Joined: Feb 21, 2006
Posts: 372
Location: Santa Monica, Ca.
Audio files: 2
|
 Posted: Thu Apr 26, 2007 12:29 pm Post subject:
I'm cleaning my D-50 and need help Posted: Thu Apr 26, 2007 12:29 pm Post subject:
I'm cleaning my D-50 and need help |
  |
|
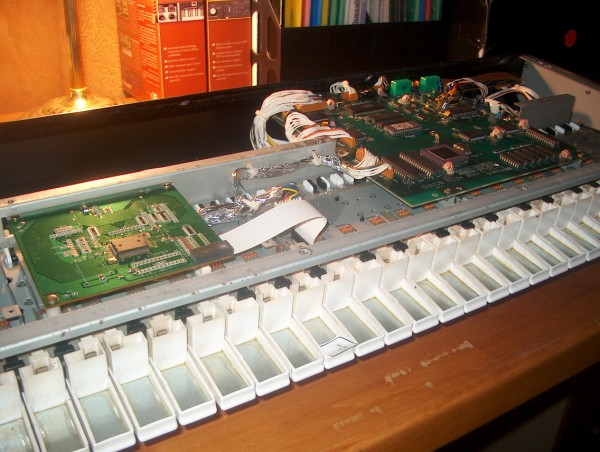
I have a Roland D-50 and it has one G key in the middle of the keyboard that makes no sound. I had the same problem with the lowest D but after spraying solvent cleaner between the keys I was able to get that one working again. I need to get at the rubber contact pad underneath this G key and clean it with some denatured alchohol. I've opened up the bottom and now have to remove the two computer cards to get to the keys. There's a small one on the left and the Roland D-50 Main board on the right(see photo). How do I remove these.....just like any computer board? 
Paging Dr. Krunkus!
| Description: |
|
| Filesize: |
542.64 KB |
| Viewed: |
953 Time(s) |
| This image has been reduced to fit the page. Click on it to enlarge. |
|
_________________
Apple Mac Pro 2019 3.2 GHz 16-Core Intel Xeon W
96 GB Ram
15.6 Sequoia
Novation SL49, Behringer 2600, Crave, Edge
Mophox4, Nord Lead 2,Modal electronics Argon 8m, Roland System 1, Novation Nova, Nord Micro modular, Korg Radias, Roland d-05, Yamaha A3000 sampler, Novation SL MK2 and Remote Zero controllers, Arturia Beatstep and SparkLE, Korg ER-1, Unosynth
"We are the music makers and we are the dreamers of dreams"
Dymaxion Vehicle Music at www.dymaxionvehicle.com/
Last edited by Gothboy on Tue Aug 28, 2007 2:35 pm; edited 1 time in total |
|
|
Back to top
|
|
 |
blue hell
Site Admin

Joined: Apr 03, 2004
Posts: 24500
Location: The Netherlands, Enschede
Audio files: 298
G2 patch files: 320
|
| Posted: Thu Apr 26, 2007 12:59 pm Post subject:
|
|
|
Are you sure you need to remove those boards ... to me it looks more like there is a contact PCB under the keys for which the keys have to be removed in order to reach it. Do the keys have springs to hold 'm at the back side ?
_________________
Jan
also .. could someone please turn down the thermostat a bit.
 |
|
|
Back to top
|
|
|
Gothboy
Joined: Feb 21, 2006
Posts: 372
Location: Santa Monica, Ca.
Audio files: 2
|
| Posted: Thu Apr 26, 2007 3:05 pm Post subject:
|
|
|
The whole metal part that you see there under the boards is the keyboard assembly. It's screwed to the chassis and there are no springs.
This is what I can tell so far. The board on the left....the small one...stays there but gets disconnected from the main board. It's actually attatched to the keyboard assembly. The main board is unscrewed and can be lifted up....but I'm not sure if all the cables to it are disconnected or not. AND, I don't know if I have to disattatch the cables that go to the power supply. 
Plus I've reached a new impasse......there are cables that reach up and over to the display that are bundled to the back of the keyboard assembly, preventing me from pulling it out(see photo) so I'm wondering if I have to completely remove the main board and then flip the keyboard assembly over while it stays attatched to work on the keys. Otherwise I'd have to cut the ties that bundle the cables.....which I don't want to do.
_________________
Apple Mac Pro 2019 3.2 GHz 16-Core Intel Xeon W
96 GB Ram
15.6 Sequoia
Novation SL49, Behringer 2600, Crave, Edge
Mophox4, Nord Lead 2,Modal electronics Argon 8m, Roland System 1, Novation Nova, Nord Micro modular, Korg Radias, Roland d-05, Yamaha A3000 sampler, Novation SL MK2 and Remote Zero controllers, Arturia Beatstep and SparkLE, Korg ER-1, Unosynth
"We are the music makers and we are the dreamers of dreams"
Dymaxion Vehicle Music at www.dymaxionvehicle.com/ |
|
|
Back to top
|
|
|
Uncle Krunkus
Moderator

Joined: Jul 11, 2005
Posts: 4761
Location: Sydney, Australia
Audio files: 52
G2 patch files: 1
|
| Posted: Fri Apr 27, 2007 2:05 am Post subject:
|
|
|
From memory I think we need to disconnect enough of the main board to move it out of the way. Then the entire keyboard assembly will come out from under it.
Don't worry, I'm going in tonight! 
_________________
What makes a space ours, is what we put there, and what we do there. |
|
|
Back to top
|
|
|
Uncle Krunkus
Moderator
Joined: Jul 11, 2005
Posts: 4761
Location: Sydney, Australia
Audio files: 52
G2 patch files: 1
|
| Posted: Fri Apr 27, 2007 2:17 am Post subject:
|
|
|
While I'm here, does anyone know the chances of reversing the Musitronics expansion, so I can go back to the original D50 configuration.
The expansion itself involves a small board which plugs into the socket for the original UV EPROM. The original EPROM then plugs into the board, which has another separate EPROM on it. There is one wire which is added from the new board to the old one. I assume this would have something to do with addressing the extra chip on the new board. Nothing has been cut on the original board.
If I just put the original EPROM straight into the original socket, and remove the address wire, will it revert back to the original setup? What are the chances that something will go wrong?
_________________
What makes a space ours, is what we put there, and what we do there. |
|
|
Back to top
|
|
|
blue hell
Site Admin
Joined: Apr 03, 2004
Posts: 24500
Location: The Netherlands, Enschede
Audio files: 298
G2 patch files: 320
|
| Posted: Fri Apr 27, 2007 5:13 am Post subject:
|
|
|
| Uncle Krunkus wrote: | | What are the chances that something will go wrong? |
If it is the way you wrote it's reversible - with the usual respect for the component pins of course etc.
Except maybe for the original EPROM socket which might have been stretched/bent out by the pins of the expansion board a bit more than good for it (depending on what type it is). If so, just buy a new socket (preferably the kind with the round/gold pins) and insert that one inbetween.
_________________
Jan
also .. could someone please turn down the thermostat a bit.
|
|
|
Back to top
|
|
|
Uncle Krunkus
Moderator
Joined: Jul 11, 2005
Posts: 4761
Location: Sydney, Australia
Audio files: 52
G2 patch files: 1
|
| Posted: Fri Apr 27, 2007 5:59 am Post subject:
|
|
|
Thanks Jan,
your nod of approval is actually very reassuring. 
I've just begun the process of cleaning the keys/switches. 
By comparison, getting rid of the expansion will be a piece of cake!
Photos following shortly.
_________________
What makes a space ours, is what we put there, and what we do there. |
|
|
Back to top
|
|
|
Gothboy
Joined: Feb 21, 2006
Posts: 372
Location: Santa Monica, Ca.
Audio files: 2
|
| Posted: Fri Apr 27, 2007 6:07 am Post subject:
|
|
|
| Uncle Krunkus wrote: | | From memory I think we need to disconnect enough of the main board to move it out of the way. Then the entire keyboard assembly will come out from under it. |
My problem isn't the removal of the board but the bundled cables that are strapped to the backside of the key assembly...preventing me from moving the key assembly out of the D-50(see the photo in the upper post).These cables are on the top right to the left of the Main board and one of them runs to the display buttons on the front....so you can't access the other end. This is the thing that perplexes me......is the keyboard assembly supposed to pull completely away from the main housing or just enough so it can be flipped over and worked on? Is it just this version of the D-50 that is like that?
AFAIK the whole board has to come out, that's what the instructions I have tell me. Mainly because you want that delicate Main board out of the way to prevent any damage to it.  Must be very careful with it and use a grounding wrist strap when you go in to move it. Must be very careful with it and use a grounding wrist strap when you go in to move it. 
I have a 4-page instruction in text form that a nice person from vintagesynth.com sent me last night. If you PM me I'll send them to you so we're working off the same page as it were.
Unfortunately it makes no mention of the bundled cables in question.  Take a look at these cables when you go in there and let me know what you think. Take a look at these cables when you go in there and let me know what you think.
_________________
Apple Mac Pro 2019 3.2 GHz 16-Core Intel Xeon W
96 GB Ram
15.6 Sequoia
Novation SL49, Behringer 2600, Crave, Edge
Mophox4, Nord Lead 2,Modal electronics Argon 8m, Roland System 1, Novation Nova, Nord Micro modular, Korg Radias, Roland d-05, Yamaha A3000 sampler, Novation SL MK2 and Remote Zero controllers, Arturia Beatstep and SparkLE, Korg ER-1, Unosynth
"We are the music makers and we are the dreamers of dreams"
Dymaxion Vehicle Music at www.dymaxionvehicle.com/ |
|
|
Back to top
|
|
|
Uncle Krunkus
Moderator
Joined: Jul 11, 2005
Posts: 4761
Location: Sydney, Australia
Audio files: 52
G2 patch files: 1
|
| Posted: Fri Apr 27, 2007 8:20 am Post subject:
|
|
|
Okay,
All the keys have been cleaned.
To sort those cable bundles out you'll need to cut 6 cable ties along the back. Not the far left one, it's actually part of a clip which will let go when you remove the screw that goes through it. Don't worry about cutting the other 6, I put a little black cross on the metalwork to remind me where to put one back, but they stay together fairly well anyway.
The rubber contacts under the keys need to go back the same way around, (this is the key to your velocity sense)
I actually removed the clear plastic strips which he talks about pushing out of the way. They don't hold the keys in (the springs do that) and they don't help stop dust. I think they are part of the manufacturing process, ie; they hold the keys in place until the springs get put on. Not needed, and heaps easier without them in the way. I won't throw them away just yet though.
I cleaned out heaps of dust and crap from mine. Don't forget to take the opportunity to clean the actual keys as well. It comes up looking new if you do.
I've got some photos if you want them to look over.
Got to get some sleep now. Took about 3 hours all up.
_________________
What makes a space ours, is what we put there, and what we do there. |
|
|
Back to top
|
|
|
Gothboy
Joined: Feb 21, 2006
Posts: 372
Location: Santa Monica, Ca.
Audio files: 2
|
| Posted: Fri Apr 27, 2007 3:00 pm Post subject:
|
|
|
WOW! That was fast. I had to submit a mix today and was then going to get to this cleaning. I hoped we could work side by side and was told it takes a long time to do. I guess I'll have to work at my own speed then......
So you actually cut the cable ties I was referring to? Did you re-bundle and attatch the cable ties that you cut when you put everything back together? I'll have to go to Radio shack to find some small white ties. I wouldn't mind seeing those photos.
_________________
Apple Mac Pro 2019 3.2 GHz 16-Core Intel Xeon W
96 GB Ram
15.6 Sequoia
Novation SL49, Behringer 2600, Crave, Edge
Mophox4, Nord Lead 2,Modal electronics Argon 8m, Roland System 1, Novation Nova, Nord Micro modular, Korg Radias, Roland d-05, Yamaha A3000 sampler, Novation SL MK2 and Remote Zero controllers, Arturia Beatstep and SparkLE, Korg ER-1, Unosynth
"We are the music makers and we are the dreamers of dreams"
Dymaxion Vehicle Music at www.dymaxionvehicle.com/ |
|
|
Back to top
|
|
|
Uncle Krunkus
Moderator
Joined: Jul 11, 2005
Posts: 4761
Location: Sydney, Australia
Audio files: 52
G2 patch files: 1
|
| Posted: Sat Apr 28, 2007 7:42 am Post subject:
|
|
|
Yeah, I knew I had three shifts on, so I did it last night. I thought three hours was a long time. It wasn't that hard though. Just take your time and be gentle. The only keys which could get mixed up, the G,A&D keys are labelled anyway. 
I actually only put back 2 of the six cable ties I cut. The other ones were under the main board. I s'pose I might go back in.
Hey Jan, I'm afraid your reassurance didn't cut it. When I fired it up, minus the expansion card, it was dead. The screen flashed and there was a pop in the headphones, but then the screen stayed blank, no sound. I wondered whether my lack of ESD precautions had finally caught up with me! But I decided to put the expansion back, and now it's running okay again. I think I'll leave it there, at least until I find out a bit more about it. (which I may never do now, depending on whether anyone from Musitronics still remembers how it works!  )(or if Musitronics still exists?) Maybe the original EPROM is rendered un-bootable by the process of initializing the expansion? Maybe I could get a copy of the original ROM from Roland etc? I need a new ROM for my GS6 anyway. I might look into it. )(or if Musitronics still exists?) Maybe the original EPROM is rendered un-bootable by the process of initializing the expansion? Maybe I could get a copy of the original ROM from Roland etc? I need a new ROM for my GS6 anyway. I might look into it.
BTW Photo's are coming soon.
_________________
What makes a space ours, is what we put there, and what we do there. |
|
|
Back to top
|
|
|
blue hell
Site Admin
Joined: Apr 03, 2004
Posts: 24500
Location: The Netherlands, Enschede
Audio files: 298
G2 patch files: 320
|
| Posted: Sat Apr 28, 2007 8:22 am Post subject:
|
|
|
| Uncle Krunkus wrote: | | Hey Jan, I'm afraid your reassurance didn't cut it. |
Sorry about that.
Unless a programmer is built in ... which is unusual but not impossible ... an application should not be able to write it's own EPROM.
Maybe it's not the original EPROM, or maybe traces were actually cut ?
Edit :
I found http://www.musitronics.de/german/produkte/d50_d550_mex.html in which it is explained that apart from the expansion it is also possible to install a "speed enhancement" option (Sped system). For that the original chrystal must be changed for a new one, probably a faster one (although the page doesn't ay that) and that might cause problems with wait states on the original EPROM.
_________________
Jan
also .. could someone please turn down the thermostat a bit.
|
|
|
Back to top
|
|
|
Uncle Krunkus
Moderator
Joined: Jul 11, 2005
Posts: 4761
Location: Sydney, Australia
Audio files: 52
G2 patch files: 1
|
| Posted: Sat Apr 28, 2007 3:35 pm Post subject:
|
|
|
That's okay Jan,
I still trust you.
I took a closeup photo which I'll post later tonight when I get back from work. The crystal hasn't changed, cos the value is the same as what's printed on the PCB overlay. I'm keen to investigate this a bit further before I close up.
_________________
What makes a space ours, is what we put there, and what we do there. |
|
|
Back to top
|
|
|
blue hell
Site Admin
Joined: Apr 03, 2004
Posts: 24500
Location: The Netherlands, Enschede
Audio files: 298
G2 patch files: 320
|
| Posted: Sat Apr 28, 2007 4:34 pm Post subject:
|
|
|
| Uncle Krunkus wrote: | | I still trust you. |
Thx .. but maybe I don't
Anyway, please let me know when you find out. I don't know the synth, but now I really want to know what's going on
_________________
Jan
also .. could someone please turn down the thermostat a bit.
|
|
|
Back to top
|
|
|
Uncle Krunkus
Moderator
Joined: Jul 11, 2005
Posts: 4761
Location: Sydney, Australia
Audio files: 52
G2 patch files: 1
|
|
|
Back to top
|
|
|
Uncle Krunkus
Moderator
Joined: Jul 11, 2005
Posts: 4761
Location: Sydney, Australia
Audio files: 52
G2 patch files: 1
|
|
|
Back to top
|
|
|
Uncle Krunkus
Moderator
Joined: Jul 11, 2005
Posts: 4761
Location: Sydney, Australia
Audio files: 52
G2 patch files: 1
|
|
|
Back to top
|
|
|
Uncle Krunkus
Moderator
Joined: Jul 11, 2005
Posts: 4761
Location: Sydney, Australia
Audio files: 52
G2 patch files: 1
|
|
|
Back to top
|
|
|
Uncle Krunkus
Moderator
Joined: Jul 11, 2005
Posts: 4761
Location: Sydney, Australia
Audio files: 52
G2 patch files: 1
|
|
|
Back to top
|
|
|
Uncle Krunkus
Moderator
Joined: Jul 11, 2005
Posts: 4761
Location: Sydney, Australia
Audio files: 52
G2 patch files: 1
|
|
|
Back to top
|
|
|
Uncle Krunkus
Moderator
Joined: Jul 11, 2005
Posts: 4761
Location: Sydney, Australia
Audio files: 52
G2 patch files: 1
|
|
|
Back to top
|
|
|
Uncle Krunkus
Moderator
Joined: Jul 11, 2005
Posts: 4761
Location: Sydney, Australia
Audio files: 52
G2 patch files: 1
|
| Posted: Sun Apr 29, 2007 4:41 am Post subject:
|
|
|
Well, I've just checked under the main board again, and there are no cut traces. The red wire connects to pin 27 of a HM62256LP-12 which is under the expansion board. I checked both backup batteries, and they both have 3V+. I also put back another two cable ties. I closed it all up, plugged the headphones in and had a good little tinkle.
I must say that the action of the keys both feels and sounds cleaner and more responsive. Seeing as how I didn't actually have any dead keys, like Gothboy has, I'd say that makes it a very worthwhile bit of maintenance to do. All you need is a D50, a few tools, a steady hand, 3 hours and an ESD wrist-strap.
_________________
What makes a space ours, is what we put there, and what we do there. |
|
|
Back to top
|
|
|
blue hell
Site Admin
Joined: Apr 03, 2004
Posts: 24500
Location: The Netherlands, Enschede
Audio files: 298
G2 patch files: 320
|
| Posted: Sun Apr 29, 2007 5:55 am Post subject:
|
|
|
| Uncle Krunkus wrote: | | The only connections to the main board are the original locations of the UV-EPROM pins. (On the board, pin 20 is hung out wider so it's connection changes.) And the red wire, which connects to a different chip on the main board. |
Interesting
You mean the EPROM pins go straight through to the original socket that is directly under it ? (except for the bent out pin 20 ( ! CE I guess, for a 27c512 EPROM ... not too readable but would make sense)).
The red wire seems to go to the reset circuit (around the 7705) ? I had expected a high addres line would be brought in to select between the EPROM and the RAM.
A pitty the ID's were filed off of the dils just above O.K.
What is the empty DIL 28 socket supposed to hold ?
_________________
Jan
also .. could someone please turn down the thermostat a bit.
|
|
|
Back to top
|
|
|
Uncle Krunkus
Moderator
Joined: Jul 11, 2005
Posts: 4761
Location: Sydney, Australia
Audio files: 52
G2 patch files: 1
|
| Posted: Sun Apr 29, 2007 6:44 am Post subject:
|
|
|
Yes, very interesting.
Yep, straight through except for pin 20.
Yeah, and the other end of the red wire on pin 27 of what I've worked out is a static RAM chip.
Yeah, what's the point in hiding the chips you use? I hate that.
And the empty 28 pin socket. I was hoping you were going to tell me about that one! ?
Oh well, maybe someone will give us both some enlightenment now that this thread is here.
_________________
What makes a space ours, is what we put there, and what we do there. |
|
|
Back to top
|
|
|
blue hell
Site Admin
Joined: Apr 03, 2004
Posts: 24500
Location: The Netherlands, Enschede
Audio files: 298
G2 patch files: 320
|
| Posted: Sun Apr 29, 2007 7:54 am Post subject:
|
|
|
Ok, and when putting the EPROM back into its original socket you did bend pin 20 back into place ?
_________________
Jan
also .. could someone please turn down the thermostat a bit.
|
|
|
Back to top
|
|
|
|

 Forum index » Instruments and Equipment » General Discussion


