| Author |
Message |
analogmonster

Joined: May 30, 2011
Posts: 100
Location: Germany
|
|
|
Back to top
|
|
 |
kkissinger
Stream Operator

Joined: Mar 28, 2006
Posts: 1472
Location: Kansas City, Mo USA
Audio files: 45
|
 Posted: Wed Jul 02, 2025 5:00 am Post subject:
Re: 8 CV to MIDI converters Posted: Wed Jul 02, 2025 5:00 am Post subject:
Re: 8 CV to MIDI converters
Subject description: Control MIDI equipment with analog sequencers |
  |
|
| analogmonster wrote: | Hello everyone,
So I decided to build this as a set of eight independent microcontroller controlled CV/GATE/CLOCK to MIDI converters.
Each converter consists of a pair of inputs (CV and CLOCK) and a corresponding CLOCK display LED. |
Wow, that is a beautiful build and very useful module, indeed! Thanks for the video.
_________________
-- Kevin
http://kevinkissinger.com |
|
|
Back to top
|
|
|
The Peasant

Joined: Nov 13, 2009
Posts: 114
Location: Sunny Alberta
Audio files: 1
|
Posted: Wed Jul 02, 2025 9:05 am Post subject:
Re: 8 CV to MIDI converters
Subject description: Control MIDI equipment with analog sequencers |
|
|
| analogmonster wrote: | So I decided to build this as a set of eight independent microcontroller controlled CV/GATE/CLOCK to MIDI converters.
Each converter consists of a pair of inputs (CV and CLOCK) and a corresponding CLOCK display LED.
|
Very nice, please keep us updated of your progress. Do you plan on making this available to others?
Take care,
Doug
_________________
The Electronic Peasant
www.electronicpeasant.com |
|
|
Back to top
|
|
|
analogmonster
Joined: May 30, 2011
Posts: 100
Location: Germany
|
Posted: Wed Jul 02, 2025 10:58 am Post subject:
Re: 8 CV to MIDI converters
Subject description: Control MIDI equipment with analog sequencers |
|
|
| The Peasant wrote: |
Very nice, please keep us updated of your progress.
|
Yes, I do. I've already started with the implementation of the next function, which will make the module being able to act as stand-alone MIDI sequencer additionally. When finished it can be selected by the top row switches.
| The Peasant wrote: |
Do you plan on making this available to others?
|
Yes, I provide circuit diagrams, gerber files and the software for free and programmed microcontrollers and / or pcbs for cost rate to everyone who is interested. Just send me an email ( carsten[at]analog-monster[dot]de, mail address can be found on my web site as well )
_________________
Analogmonster: https://www.analog-monster.de/index_en.html
YouTube: https://www.youtube.com/user/TheAnalogmonster
SoundCloud: https://soundcloud.com/analogmonster-1 |
|
|
Back to top
|
|
|
analogmonster
Joined: May 30, 2011
Posts: 100
Location: Germany
|
|
|
Back to top
|
|
|
analogmonster
Joined: May 30, 2011
Posts: 100
Location: Germany
|
|
|
Back to top
|
|
|
The Peasant
Joined: Nov 13, 2009
Posts: 114
Location: Sunny Alberta
Audio files: 1
|
|
|
Back to top
|
|
|
analogmonster
Joined: May 30, 2011
Posts: 100
Location: Germany
|
Posted: Fri Jul 11, 2025 5:47 am Post subject:
Formant++;
Subject description: UCVM - repair of a veteran |
|
|
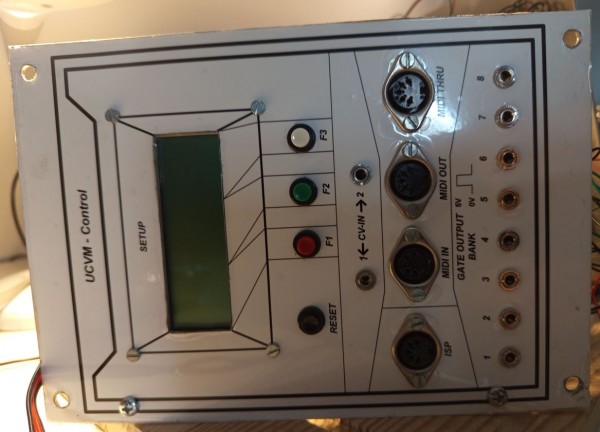
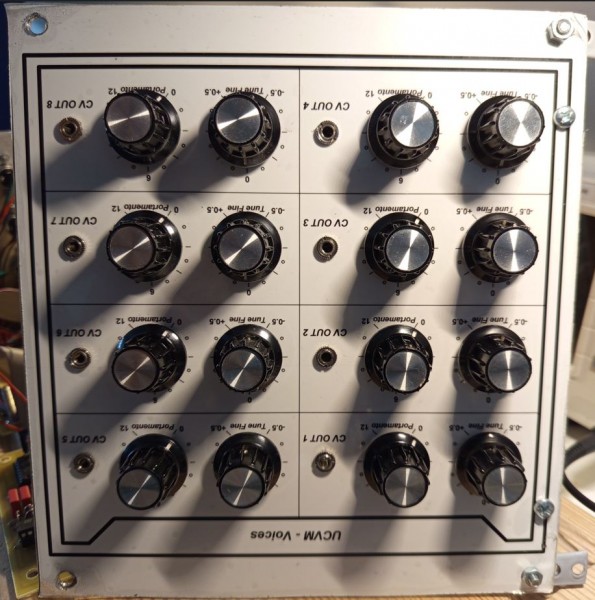
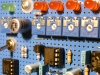
My first microcontroller based module, an 8 channel MIDI2CV/GATE - interface (UCVM) from 2004 did not boot any more. Reason was a dead ISP connector.
So I did what I was afraid of, I opened it after several years and entered the guts.
Enjoy the pictures.
| Description: |
|
| Filesize: |
93.62 KB |
| Viewed: |
152 Time(s) |
| This image has been reduced to fit the page. Click on it to enlarge. |
|
| Description: |
|
| Filesize: |
129.88 KB |
| Viewed: |
149 Time(s) |
| This image has been reduced to fit the page. Click on it to enlarge. |
|
| Description: |
|
| Filesize: |
198.27 KB |
| Viewed: |
139 Time(s) |
| This image has been reduced to fit the page. Click on it to enlarge. |

|
| Description: |
|
| Filesize: |
99.34 KB |
| Viewed: |
139 Time(s) |
| This image has been reduced to fit the page. Click on it to enlarge. |

|
| Description: |
|
| Filesize: |
131.34 KB |
| Viewed: |
139 Time(s) |
| This image has been reduced to fit the page. Click on it to enlarge. |

|
_________________
Analogmonster: https://www.analog-monster.de/index_en.html
YouTube: https://www.youtube.com/user/TheAnalogmonster
SoundCloud: https://soundcloud.com/analogmonster-1 |
|
|
Back to top
|
|
|
PHOBoS
Joined: Jan 14, 2010
Posts: 5947
Location: Moon Base
Audio files: 709
|
|
|
Back to top
|
|
|
kkissinger
Stream Operator
Joined: Mar 28, 2006
Posts: 1472
Location: Kansas City, Mo USA
Audio files: 45
|
| Posted: Fri Jul 18, 2025 9:37 am Post subject:
Power Supply Bus and CAN Channel Project |
|
|
Years ago, when I began expanding my synthesizer system, I needed to add an additional power supply and the associated wiring in the new cabinet. Wanting to ensure reliability, I chose to use larger 18 AWG wiring and robust TE connectors. This became the new standard for all added modules, and I built distribution cables to supply power accordingly.
Over time, however, I became less satisfied with the loose cable runs — they weren’t as secure as I’d like, were vulnerable to vibration, and didn’t look particularly neat. Still, redesigning the bus system was one of those "I’ll get around to it later" projects.
As I started adding microprocessor-based modules, I wanted to integrate a CAN bus to support global inter-module functions. That provided the push I needed. I realized I could use my 3D printer to create custom channel segments that support both the existing TE power connectors and new Molex CAN connectors.
The snap-in feature of the TE connectors made it relatively easy to design 3D-printed mounting holes to accommodate them securely. Since my printer's bed is only around 12" wide, I chose to print 3" channel segments (matching the Aries 3" module width), then arrange them end-to-end to form a continuous channel along the cabinet.
This is still a work in progress, but I recently completed the first cabinet channel and took a photo to show a before-and-after comparison — the top cabinet still has the original loose power cables, while the bottom cabinet uses the new channel. I’ve also included a picture of a few channel segments as they come off the 3D printer. For efficiency, I print them three at a time per batch.
| Description: |
| Power supply buss installation in progress to compare old and new |
|
| Filesize: |
2.03 MB |
| Viewed: |
184 Time(s) |
| This image has been reduced to fit the page. Click on it to enlarge. |

|
| Description: |
| Channel pieces from the 3d printer |
|
| Filesize: |
1.54 MB |
| Viewed: |
133 Time(s) |
| This image has been reduced to fit the page. Click on it to enlarge. |

|
_________________
-- Kevin
http://kevinkissinger.com |
|
|
Back to top
|
|
|
Grumble
Joined: Nov 23, 2015
Posts: 1320
Location: Netherlands
Audio files: 30
|
|
|
Back to top
|
|
|
analogmonster
Joined: May 30, 2011
Posts: 100
Location: Germany
|
|
|
Back to top
|
|
|
kkissinger
Stream Operator
Joined: Mar 28, 2006
Posts: 1472
Location: Kansas City, Mo USA
Audio files: 45
|
Posted: Sat Jul 19, 2025 2:19 pm Post subject:
Re: Formant++;
Subject description: UCVM - repair of a veteran |
|
|
| analogmonster wrote: | My first microcontroller based module, an 8 channel MIDI2CV/GATE - interface (UCVM) from 2004 did not boot any more. Reason was a dead ISP connector.
So I did what I was afraid of, I opened it after several years and entered the guts. |
Good troubleshooting! Seems that problems are caused by loose connections more often than not. Rare when it is some exotic problem!
_________________
-- Kevin
http://kevinkissinger.com |
|
|
Back to top
|
|
|
kkissinger
Stream Operator
Joined: Mar 28, 2006
Posts: 1472
Location: Kansas City, Mo USA
Audio files: 45
|
| Posted: Sat Jul 19, 2025 2:21 pm Post subject:
|
|
|
| Grumble wrote: | | I've made what I call a DRONER... |
That's a fine application for an Arduino-based device and a cool-looking case for it. Thanks for the video!
_________________
-- Kevin
http://kevinkissinger.com |
|
|
Back to top
|
|
|
PHOBoS
Joined: Jan 14, 2010
Posts: 5947
Location: Moon Base
Audio files: 709
|
|
|
Back to top
|
|
|
Grumble
Joined: Nov 23, 2015
Posts: 1320
Location: Netherlands
Audio files: 30
|
| Posted: Sun Jul 20, 2025 1:28 pm Post subject:
|
|
|
Thanks!
I wasn't happy with the software and have been tweaking today.
Much better functionality now.
_________________
my synth |
|
|
Back to top
|
|
|
The Peasant
Joined: Nov 13, 2009
Posts: 114
Location: Sunny Alberta
Audio files: 1
|
| Posted: Sun Aug 10, 2025 8:57 pm Post subject:
|
|
|
I have completed the VCF module, 14 tubes in this one. Working on a video now.
Take care,
Doug
| Description: |
|
| Filesize: |
491.1 KB |
| Viewed: |
135 Time(s) |
| This image has been reduced to fit the page. Click on it to enlarge. |

|
| Description: |
|
| Filesize: |
802.2 KB |
| Viewed: |
135 Time(s) |
| This image has been reduced to fit the page. Click on it to enlarge. |

|
_________________
The Electronic Peasant
www.electronicpeasant.com |
|
|
Back to top
|
|
|
kkissinger
Stream Operator
Joined: Mar 28, 2006
Posts: 1472
Location: Kansas City, Mo USA
Audio files: 45
|
| Posted: Tue Aug 12, 2025 5:02 am Post subject:
|
|
|
| The Peasant wrote: | I have completed the VCF module, 14 tubes in this one. Working on a video now.
Take care,
Doug |
Indeed -- definitely want to hear your filter. 14 tubes? Wow. I don't think old TVs had that many tubes!
_________________
-- Kevin
http://kevinkissinger.com |
|
|
Back to top
|
|
|
Grumble
Joined: Nov 23, 2015
Posts: 1320
Location: Netherlands
Audio files: 30
|
| Posted: Tue Aug 12, 2025 7:21 am Post subject:
|
|
|
Great, I love tube stuff.
Although I learned electronics during the tube periode/start of transistor era (think oc71 etc.) I never build anything using tubes….
_________________
my synth |
|
|
Back to top
|
|
|
kkissinger
Stream Operator
Joined: Mar 28, 2006
Posts: 1472
Location: Kansas City, Mo USA
Audio files: 45
|
Posted: Thu Aug 14, 2025 7:40 pm Post subject:
Fix for Aries AR-334 Sequencer Reset Behavior
Subject description: A single component change solved a long-standing problem |
|
|
Well, I don't have a photo for this fix. However, I enjoy finding ways to make vintage modules work "better than new".
I recently solved a long-standing quirk in my vintage Aries AR-334 sequencer. When it received simultaneous clock and reset signals, it would jump to step #2 instead of starting cleanly at step #1.
Digging into the circuit, I found that the clock-in path included a 0.1 µF capacitor to ground in parallel with a 39 kΩ resistor. This RC combination slightly delayed the clock pulse compared to the reset pulse. When clock and reset arrived at the same time, the reset would trigger first, then the delayed clock edge would immediately advance the sequencer to the second step.
The fix was straightforward: I removed the 0.1 µF capacitor, leaving the 39 kΩ resistor in place. With the capacitor gone, the clock signal is no longer delayed, and the sequencer now resets and starts properly on step #1, matching the behavior of my other sequencers and clock dividers.
This will allow me to fully integrate the vintage Aries sequencer with my Klee and other sequencers (particularly Wren sequencers and the Elektron Octatrack sequencer).
_________________
-- Kevin
http://kevinkissinger.com |
|
|
Back to top
|
|
|
mosc
Site Admin

Joined: Jan 31, 2003
Posts: 18316
Location: Durham, NC
Audio files: 235
G2 patch files: 60
|
| Posted: Fri Aug 15, 2025 11:31 am Post subject:
|
|
|
I second the request hear a 14 tube filter 
_________________
--Howard
my music and other stuff |
|
|
Back to top
|
|
|
Cynosure
Site Admin

Joined: Dec 11, 2010
Posts: 1029
Location: Toronto, Ontario - Canada
Audio files: 82
|
|
|
Back to top
|
|
|
Grumble
Joined: Nov 23, 2015
Posts: 1320
Location: Netherlands
Audio files: 30
|
|
|
Back to top
|
|
|
Cynosure
Site Admin
Joined: Dec 11, 2010
Posts: 1029
Location: Toronto, Ontario - Canada
Audio files: 82
|
| Posted: Thu Aug 21, 2025 5:59 am Post subject:
|
|
|
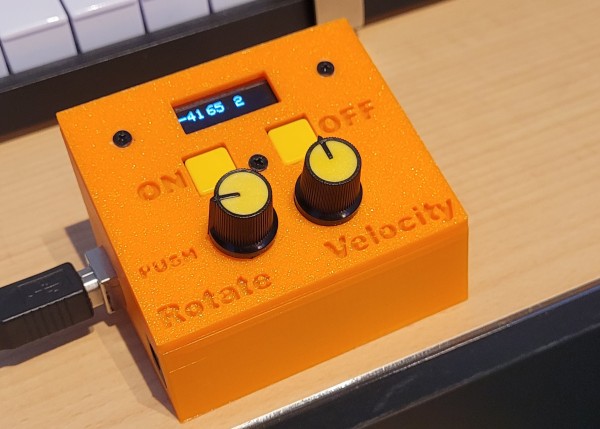
| Grumble wrote: | Your buttond reminds me of a device I made for a brother of mine: It works like a bass guitar and the buttons are arranged accordingly.
With the black and red buttons one can set the octave for the lowest snare ( the yellow buttons). |
That's awesome! A very unique layout. Nice work 
_________________
JacobWatters.com |
|
|
Back to top
|
|
|
kkissinger
Stream Operator
Joined: Mar 28, 2006
Posts: 1472
Location: Kansas City, Mo USA
Audio files: 45
|
| Posted: Fri Aug 22, 2025 5:25 am Post subject:
|
|
|
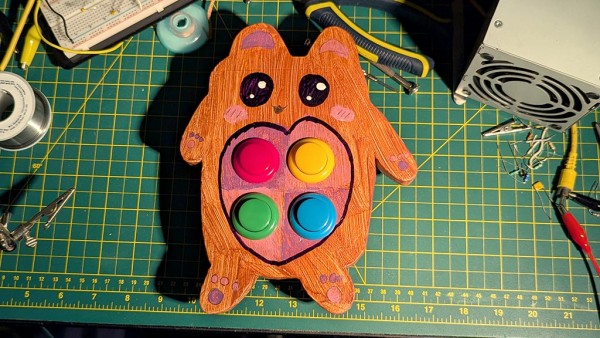
| Cynosure wrote: | | My daughter drew the shape and painted it. I cut it out and added the electronics. |
That is delightful! I can see that she really enjoys it.
_________________
-- Kevin
http://kevinkissinger.com |
|
|
Back to top
|
|
|
|

 Forum index » DIY Hardware and Software