| Author |
Message |
Photon

Joined: Mar 22, 2005
Posts: 363
Location: Boston
Audio files: 1
|
 Posted: Wed May 07, 2008 10:21 am Post subject:
brass etching technique Posted: Wed May 07, 2008 10:21 am Post subject:
brass etching technique |
  |
|
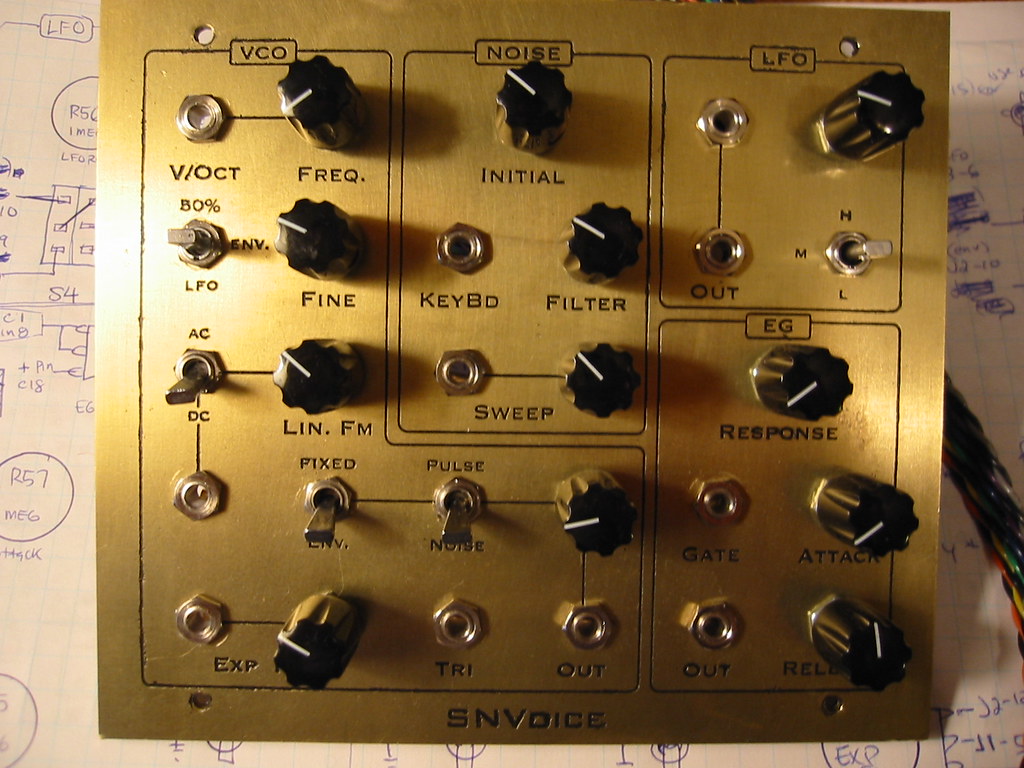
I've been making my panels out of brass. Brass is more expensive than aluminum. It weighs quite a bit more and is harder to work with. However it has some other properties that I thought were very attractive for my purposes:
1.) It can be etched using a fairly simple set-up, using readily available chemicals
2.) It can be soldered
3.) It looks cool, in a 'Jules Verne' sort of way.
I've been asked to describe the process that I use in some detail and I'm happy to do that. However, I do have access to some equipment and tools at work that make that job a lot easier (ie. full machine shop access). If I had to do this totally at home, I might have chosen a different approach. That isn't to say that it couldn't be done at home.
The panels are fairly cheap to make (worked out to be about $2. per panel). The real cost is time. There is a lot of hand work in each panel.
I buy the brass in a sheet that is usually about 3 foot sq. depending on what my supplier has in stock at the time. I cut this using a band-saw with the appropriate metal cutting blade. I cut it into 6 x 36 inch strips (my panels are 5.25 height, FRAC) then I can cut them to the appropriate width as needed.
To do the graphics I start with a sketch. Once I have a design that I like, I lay out the panel in a CAD program with all the panel controls (pots, switches, etc) in place to make sure that nothing interferes. Then I shut off the layer with the controls and export it to Adobe Illustrator. In Illustrator I layout the lettering and any other graphics.
This file is mirrored and the color is inverted and exported as a .jpeg. I print this 100% and photocopy it onto press-n-peel film. I iron the image onto the brass after carefully de-burring and degreasing the panel. I also touch up any imperfections in the toner with enamel paint.
The idea is that the toner acts as a resist. Any open area will be etched.
Brass is 70% copper. I use a solution of Copper Sulfate Pentahydrate to provide the copper ions for the etch bath. This chemical is available in crystal form from garden centers, where its sold as a weed killer. I should mention at this point that Copper in this form is TOXIC. I dissolve the crystals in water until the solution is saturated. I store it an plastic jug and have been using it over and over. Consult local authorities about proper disposal in your area.
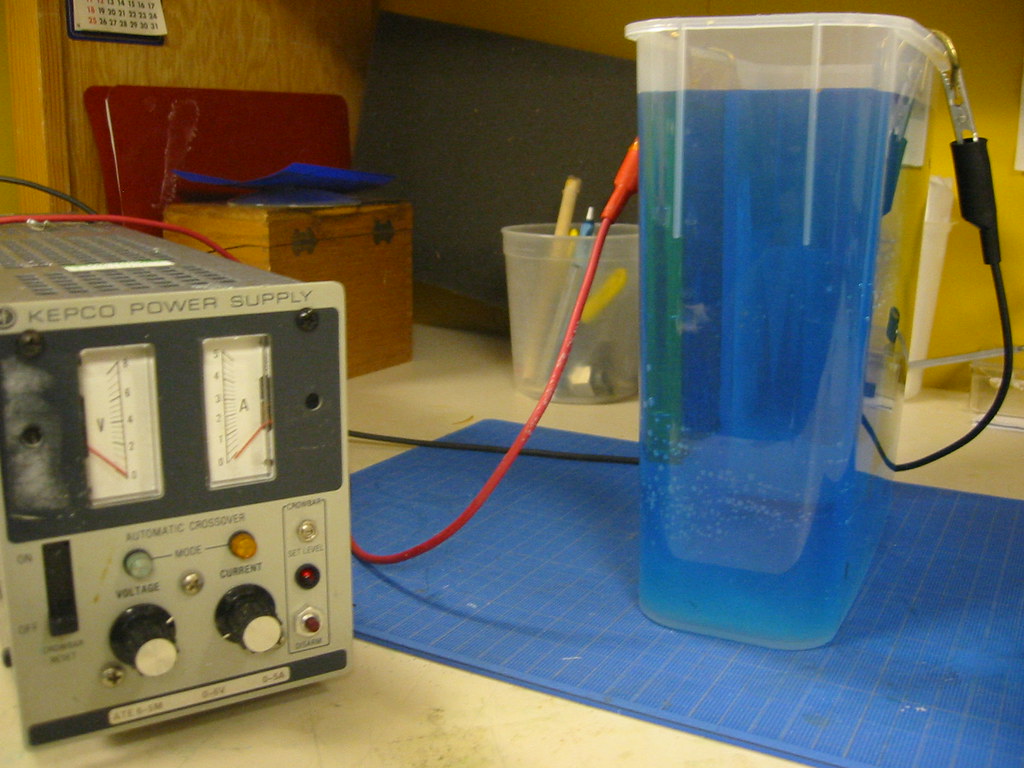
The etch set up itself is fairly straight forward. I use a plastic storage container that is narrow in one dimension (you want the plates fairly close to each other. A brass frame was constructed out of .125" brass rod to support the panel to be etched . this is the anode. The cathode is made similarly, but has a brass panel soldered permanently in place. A DC current supply is handy, but I suppose a battery could also be used. See pictures below.

Any exposed part of the panel that you don't want etched should be masked with tape.
The positive lead from the supply attaches to the panel to be etched and the negative to the cathode. The bath is filled with the CuS solution and the power is turned on. I generally etch things in the 4v/1A range. The resistivity of the bath will make a difference. Its worked from day one, so I never tried optimize it.
Once the panel is etched, 30 minutes to 1 hour depending on exposed surface area, I remove it from the bath and clean it up. At this point I machine the panel to its final dimensions and drill the holes. The graphics are filled in with a rub on paint stick. A final coat of spray on lacquer keeps the panel from oxidizing.
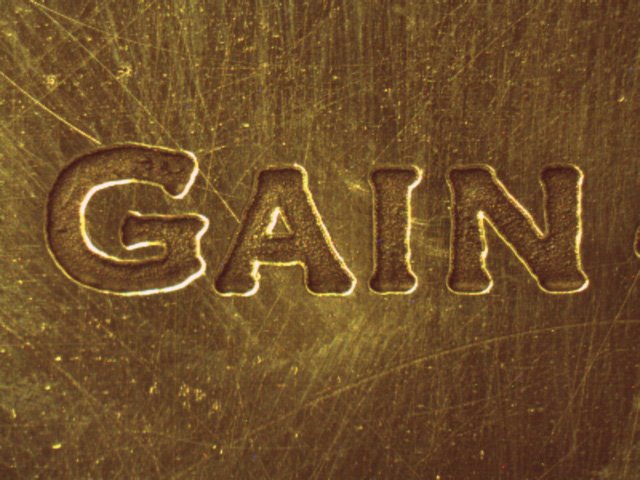
Here's a close-up of my mixer panel showing the etch depth and the level of resolution. The photo was taken prior to filling in the letters with black paint. This particular panel etched for 1 hour (4v/1A). The letters are 14 points tall (about 3mm)
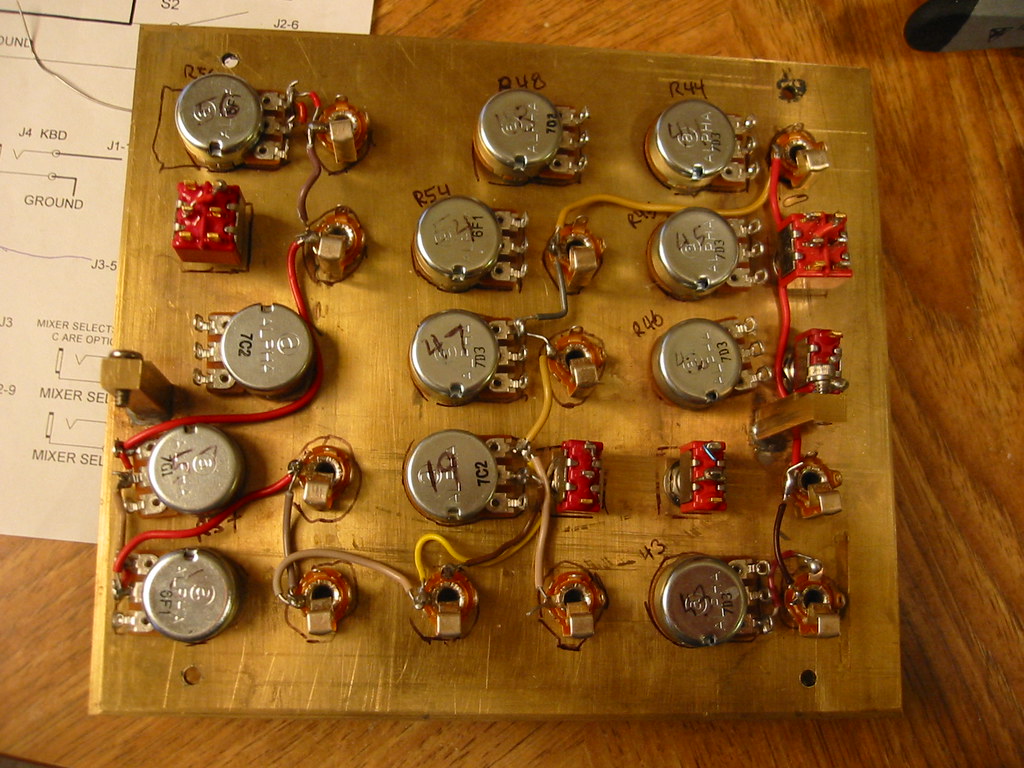
Another benefit to brass is that it can be soldered to. Here you can see the stand-offs for the PCB are soldered directly to the panel.
Last edited by Photon on Wed May 07, 2008 1:48 pm; edited 4 times in total |
|
|
Back to top
|
|
 |
numbernone
Joined: Aug 16, 2006
Posts: 477
Location: new york city
|
| Posted: Wed May 07, 2008 11:42 am Post subject:
|
|
|
| JUST WOW |
|
|
Back to top
|
|
|
toybox

Joined: Aug 03, 2005
Posts: 176
Location: chicago/peru,illinois usa
|
| Posted: Wed May 07, 2008 2:27 pm Post subject:
|
|
|
Iv always have thought you had the most beautiful panels been trying to etch
aluminum but the laser printer i was using was shit!! but yesterday i got my hands on a new printer so im ready to give it a new try 
_________________
mY MusIc
http://www.myspace.com/toyboxbastard |
|
|
Back to top
|
|
|
State Machine
Janitor


Joined: Apr 17, 2006
Posts: 2810
Location: New York
Audio files: 24
|
| Posted: Wed May 07, 2008 5:00 pm Post subject:
|
|
|
Peter,
Thanks for that explanation. I am impressed with the resolution of etching process. The lettering comes out quite good.
Folks, I have seen his panels in person and they really do come out nice !!
I would imagine that you had to crank the iron up a few degrees to get that solder to melt around those posts when attaching them to the front panel. 
Now, too bad you could not etch aluminum the same way. It's much lighter . I am not to bright when it comes to material sciences and maybe there could be a way.
Bill |
|
|
Back to top
|
|
|
Photon
Joined: Mar 22, 2005
Posts: 363
Location: Boston
Audio files: 1
|
| Posted: Wed May 07, 2008 5:04 pm Post subject:
|
|
|
| State Machine wrote: |
I would imagine that you had to crank the iron up a few degrees to get that solder to melt around those posts when attaching them to the front panel. |
I use a torch
Thanks everyone for the kind words. Let me know if anything needs clarification. |
|
|
Back to top
|
|
|
blue hell
Site Admin

Joined: Apr 03, 2004
Posts: 24669
Location: The Netherlands, Enschede
Audio files: 330
G2 patch files: 320
|
| Posted: Wed May 07, 2008 5:26 pm Post subject:
|
|
|
I think this makes for very nice panels indeed!
Was wondering, do you protect the back side of the panels against etching?
_________________
Jan
also .. could someone please turn down the thermostat a bit.

9 3 4 .. erm .. not 13 then? .. hmm, ah eight! .. yeah yeah as in 8647 .. 47 is an 88 .. pwew .. numbles! |
|
|
Back to top
|
|
|
Photon
Joined: Mar 22, 2005
Posts: 363
Location: Boston
Audio files: 1
|
| Posted: Wed May 07, 2008 5:35 pm Post subject:
|
|
|
| Blue Hell wrote: | I think this makes for very nice panels indeed!
Was wondering, do you protect the back side of the panels against etching? |
thanks. Yes, I use duct tape. |
|
|
Back to top
|
|
|
toybox
Joined: Aug 03, 2005
Posts: 176
Location: chicago/peru,illinois usa
|
| Posted: Wed May 07, 2008 5:37 pm Post subject:
|
|
|
I thought i seen aluminum etched with a salt water solution the same way.But i was going to try ferric chloride?
_________________
mY MusIc
http://www.myspace.com/toyboxbastard |
|
|
Back to top
|
|
|
toppobrillo

Joined: Dec 10, 2005
Posts: 766
Location: oakland, ca
G2 patch files: 1
|
| Posted: Wed May 07, 2008 11:16 pm Post subject:
|
|
|
| your panels look great! i tried some electro-etching of aluminum with salt-water and an old computer supply- not immersing the panel but using a steel plate with salt-water soaked flannel piece- i seems to work but very very slowly. im sure theres a better electrolyte for aluminum. |
|
|
Back to top
|
|
|
Luka

Joined: Jun 29, 2007
Posts: 1003
Location: Melb.
|
| Posted: Sun Oct 12, 2008 5:21 pm Post subject:
|
|
|
hey photon
im about to start etching aluminium plates and i have a couple of questions about your process
1. is this power supply ok?
ebay link - please dont outbid me folks 
"POWERTECH PLUS MP-3096 13.8VDC DC LAB POWER SUPPLY IN BOX
REGULATED
COMPACT
LIGHTWEIGHT
SHORT CIRCUIT PROTECTION
OVERLOAD PROTECTION
OUTPUT VOLTAGE 13.8VDC
RATED OUTPUT 5 AMPS
SURGE CURRENT 7 AMPS
VOLTAGE REGULATION <5%
RIPPLE VOLTAGE 100MV"

2. you said you etch your panel and then take it back into the shop and neaten up the panel. if i have aluminium panels already cut to size is it going to be tricky to get a clean finish especially around the edges?
_________________
problemchild
melbourne australia
http://cycleofproblems.blogspot.com/
http://www.last.fm/user/prblmchild |
|
|
Back to top
|
|
|
Appliancide*

Joined: Jul 04, 2007
Posts: 126
Location: Paul lives in a 1920’s film
|
| Posted: Sun Oct 12, 2008 9:38 pm Post subject:
|
|
|
Thanks for the post! I have been considering this technique ever since I saw one of your posts showing some of your panels. The difficulty factor make's me think twice....but then I look at those amazing panels....
Thankfully(?) I have yet to populate a single board so I will have a while to mull this over. |
|
|
Back to top
|
|
|
SineSurfer
Joined: Jan 19, 2007
Posts: 45
Location: Mexico
|
| Posted: Sun Oct 12, 2008 9:59 pm Post subject:
|
|
|
for those curious about etching aluminum panels:

my midibox sid

those leds are 3mm

my best result so far!(5mm leds here)
It's done like with pcb etching bath, but using muriatic acid(hydrochloric acid) + oxygenated water (hydrogen peroxide) in 2:1 mix for a couple of minutes(exposed aluminum makes a lot of bubbles) rinse with running water, spray paint the panel(black paint on my panels), sandpaper away the paint outside the grooves and voila!
Be very careful with the acid mix, wear googles and gloves and DON'T smell the fumes... pretty toxic.
The best thing is that the same mix can be reused on new panels so there is no waste to get rid of
Disclaimer: YMMV, and I'm not responsible if you do something stupid for not being careful enough, if you have any doubt DON'T attempt this
btw. sometime i'll try to etch brass the same way, I love Photon panels!
_________________
Freddy, riding the wave!
http://www.hakkenmusic.blogspot.com |
|
|
Back to top
|
|
|
Luka
Joined: Jun 29, 2007
Posts: 1003
Location: Melb.
|
|
|
Back to top
|
|
|
SineSurfer
Joined: Jan 19, 2007
Posts: 45
Location: Mexico
|
| Posted: Sun Oct 12, 2008 11:03 pm Post subject:
|
|
|
hi Luka, just enough pnp blue to transfer the labels, the rest is covered with scotch tape, I guess any plastic tape will work but you'll want to use one that is easy to remove afterwards, also, if there are any spots without enough or missing toner, you should cover it with tape too, or if it's too small use a sharpie pen, a couple of passes to make the ink thicker as eventually the acid will eat it.
_________________
Freddy, riding the wave!
http://www.hakkenmusic.blogspot.com |
|
|
Back to top
|
|
|
Luka
Joined: Jun 29, 2007
Posts: 1003
Location: Melb.
|
|
|
Back to top
|
|
|
Photon
Joined: Mar 22, 2005
Posts: 363
Location: Boston
Audio files: 1
|
| Posted: Mon Oct 13, 2008 7:29 am Post subject:
|
|
|
Hey Luka
I don't have any experience etching aluminum, so I don't know what would be required for a power supply. That certainly looks like it would do it. I would make sure that the output is variable. You probably don't need the full 13V. Also, I'm not sure what would be the best electrolyte to use. I think I've heard people using table salt. It's cool that you're going to give this a try. Good luck (and be careful).
If your panels are cut to the final size before etching, you might want to pre-drill the mounting holes (for attaching the panel to the rack). That way if your control art is slightly skewed, it won't effect how the panel fits on the rack...know what I'm saying?
I agree that a purely chemical etching approach might be a good way to go, if you have a source for obtaining the chemicals and you feel comfortable using them.
SineSurfer-Those panels look GREAT. Nice work. What is the concentration on the HCL and H2O2. Are they laboratory grade or you getting them from the hardware store? |
|
|
Back to top
|
|
|
SineSurfer
Joined: Jan 19, 2007
Posts: 45
Location: Mexico
|
| Posted: Mon Oct 13, 2008 9:08 am Post subject:
|
|
|
hi Photon, mix would be:
2 parts HCL as it comes from the hardware store
1 part H2O2, the bottles I can get easily on the pharmacy are labeled as 11 vol, a fellow says 30vol would be better.
just make enough to fill your container up until covering the panel, I use one of those rectangular plastic food containers big enough to lay the panel horizontal.
with this mix you can have the panel etched in 3 minutes or less., the etch depth is small though, like 0.5 mm, giving it more time will increase depth but not sure if the toner will resist well for too long, sharpie ink won't.
_________________
Freddy, riding the wave!
http://www.hakkenmusic.blogspot.com |
|
|
Back to top
|
|
|
Luka
Joined: Jun 29, 2007
Posts: 1003
Location: Melb.
|
| Posted: Tue Oct 14, 2008 4:50 am Post subject:
|
|
|
good point on the mounting holes photon
any other good toner transfer methods other than pnp blue? seriously if i have to use that stuff im going to have to get a loan from the bank! i heard poeple using normal magazine paper? what should i look for?
glossy, flat?
no print, print?
thick paper, thin paper?
any ideas?
_________________
problemchild
melbourne australia
http://cycleofproblems.blogspot.com/
http://www.last.fm/user/prblmchild |
|
|
Back to top
|
|
|
Photon
Joined: Mar 22, 2005
Posts: 363
Location: Boston
Audio files: 1
|
| Posted: Tue Oct 14, 2008 6:17 am Post subject:
|
|
|
I've tried glossy photo paper without much luck. Give it try maybe you'll have better luck than me. There are a lot of variables you can play with (density of toner, iron temperature, etc.)
PNP Blue is expensive, but its the bomb. I have a 95% success rate with it. |
|
|
Back to top
|
|
|
Luka
Joined: Jun 29, 2007
Posts: 1003
Location: Melb.
|
| Posted: Tue Oct 14, 2008 6:29 am Post subject:
|
|
|
did some reseach and any magazine paper is fine!
awesome
and i found a great variable regulated psu and an aluminium mordant
Copper sulfate 1 Kilogram
NaCl (sodium chloride -- table salt) 1 Kilogram
NaHSO4 (sodium bisulfate as SaniFlush) 25 grams
H2O (water -- depending on strength of bath) 10-20 Liter
Ill post some details on my progress once i get some alumium and the psu
_________________
problemchild
melbourne australia
http://cycleofproblems.blogspot.com/
http://www.last.fm/user/prblmchild |
|
|
Back to top
|
|
|
Photon
Joined: Mar 22, 2005
Posts: 363
Location: Boston
Audio files: 1
|
| Posted: Tue Oct 14, 2008 7:13 am Post subject:
|
|
|
| Great! Keep us posted. |
|
|
Back to top
|
|
|
Luka
Joined: Jun 29, 2007
Posts: 1003
Location: Melb.
|
| Posted: Sat Oct 18, 2008 7:56 pm Post subject:
|
|
|
progress!
i just bought a power supply

$70
next is to buy a laser printer
hopefully it will cost under $100
and then ill start doing some tests on paper that i can use for transfers
it is going to be interesting as i have designs for my klee do etch and they are really large. i might start off small
_________________
problemchild
melbourne australia
http://cycleofproblems.blogspot.com/
http://www.last.fm/user/prblmchild |
|
|
Back to top
|
|
|
budzz89
Joined: Apr 18, 2009
Posts: 1
Location: ohio
|
| Posted: Sat Apr 18, 2009 7:02 am Post subject:
|
|
|
| SineSurfer wrote: | for those curious about etching aluminum panels:
my midibox sid
those leds are 3mm
my best result so far!(5mm leds here)
It's done like with pcb etching bath, but using muriatic acid(hydrochloric acid) + oxygenated water (hydrogen peroxide) in 2:1 mix for a couple of minutes(exposed aluminum makes a lot of bubbles) rinse with running water, spray paint the panel(black paint on my panels), sandpaper away the paint outside the grooves and voila!
Be very careful with the acid mix, wear googles and gloves and DON'T smell the fumes... pretty toxic.
The best thing is that the same mix can be reused on new panels so there is no waste to get rid of
Disclaimer: YMMV, and I'm not responsible if you do something stupid for not being careful enough, if you have any doubt DON'T attempt this
btw. sometime i'll try to etch brass the same way, I love Photon panels! |
well said about this aluminum, i new things i actually i learn now
_________________
blanchard grinding |
|
|
Back to top
|
|
|
RSFC
Joined: Sep 02, 2010
Posts: 63
Location: space lab
|
| Posted: Fri Dec 10, 2010 9:12 am Post subject:
|
|
|
For aluminum I have been using saline sulphate. It's cheap, easy, no electricity less toxic than ferric chloride and muriatic acid.
Results:


 |
|
|
Back to top
|
|
|
Danno Gee Ray
Joined: Sep 25, 2005
Posts: 1351
Location: Telford, PA USA
|
| Posted: Fri Dec 10, 2010 7:17 pm Post subject:
|
|
|
| Where do you get your saline sulphate? |
|
|
Back to top
|
|
|
|

 Forum index » DIY Hardware and Software
