| Author |
Message |
slo

Joined: Feb 18, 2007
Posts: 204
Location: Victoria, BC
Audio files: 1
|
 Posted: Wed Jun 23, 2010 9:01 pm Post subject: Posted: Wed Jun 23, 2010 9:01 pm Post subject:
|
  |
|
Thanks guys, I will give Bill's suggestion a try, though they might not ship to Canada.
George |
|
|
Back to top
|
|
 |
State Machine
Janitor


Joined: Apr 17, 2006
Posts: 2810
Location: New York
Audio files: 24
|
| Posted: Thu Jun 24, 2010 4:56 am Post subject:
|
|
|
| Quote: | | Roger that. The Kobicons do have a ground lug that is connected to the panel / frame. My bad. |
Quite alright Dan  We watch each other back We watch each other back
Slo, OK, let us know if they do or don't ship to Canada. I like these panel jacks and might get some for stock purposes. In turn, I can just send you a couple in the post.
Bill |
|
|
Back to top
|
|
|
State Machine
Janitor
Joined: Apr 17, 2006
Posts: 2810
Location: New York
Audio files: 24
|
| Posted: Thu Jun 24, 2010 6:31 am Post subject:
|
|
|
Goerge,
Here is the replay from 3D about shipping to Canada:
| Quote: | | We don't currently ship to Canada. We'd have to charge an extra $25 on top of the order. If that is something you'd be ok with, we may be able to accomodate you. Please advise. |
Sound like not an option for you but they have some neat stuff I like so maybe I can just order some stuff and add some of those nifty jacks also .... Let me know ...
Bill |
|
|
Back to top
|
|
|
slo
Joined: Feb 18, 2007
Posts: 204
Location: Victoria, BC
Audio files: 1
|
| Posted: Thu Jun 24, 2010 6:58 am Post subject:
|
|
|
| Quote: | | I can just order some stuff and add some of those nifty jacks also .... Let me know ... |
If you can do it that way it would be great, very kind! I do like the look of these jacks and they are the only ones I've found.
George |
|
|
Back to top
|
|
|
State Machine
Janitor
Joined: Apr 17, 2006
Posts: 2810
Location: New York
Audio files: 24
|
| Posted: Thu Jun 24, 2010 9:35 am Post subject:
|
|
|
| Quote: | If you can do it that way it would be great, very kind! I do like the look of these jacks and they are the only ones I've found.
George |
Slo
OK, I just ordered a few plus some other items Just PM your adress and I will put two of these jacks in the post for you ... free of charge  I know you have bought stuff from me so it's cool I know you have bought stuff from me so it's cool 
Bill |
|
|
Back to top
|
|
|
slo
Joined: Feb 18, 2007
Posts: 204
Location: Victoria, BC
Audio files: 1
|
| Posted: Tue Jul 27, 2010 8:57 pm Post subject:
|
|
|
Got everything I need for the panel now, thanks Bill, nice isolated jack. Going on vacation so it will be awhile before I can finish it. Will post pics when the Appendage is done. Spotted a typo on my Appendage panel, Slide Amount should be Glide Amount, doing a mock panel first so no biggie.
George |
|
|
Back to top
|
|
|
slo
Joined: Feb 18, 2007
Posts: 204
Location: Victoria, BC
Audio files: 1
|
| Posted: Mon Aug 16, 2010 8:56 pm Post subject:
|
|
|
Which Appendage Build Procedure are we on now ?, I'm confused by the numbering. I'm using 1_188. I see there are others around. I have some typo's to report, just trying to work my way through the calibration procedure.
George |
|
|
Back to top
|
|
|
Scott Stites
Janitor

Joined: Dec 23, 2005
Posts: 4127
Location: Mount Hope, KS USA
Audio files: 96
|
| Posted: Sat Aug 21, 2010 9:28 am Post subject:
|
|
|
Hey Slo,
Can you post or send those corrections to me? I'll update the manual.
Cheerios,
Scott
_________________
My Site |
|
|
Back to top
|
|
|
slo
Joined: Feb 18, 2007
Posts: 204
Location: Victoria, BC
Audio files: 1
|
| Posted: Sat Aug 21, 2010 12:32 pm Post subject:
|
|
|
Hi Scott, not sure if they are typos/errors, I've been working from version 1_188, they may have been corrected already, but here goes.
1. Fig 6-2 Inverted Initial output labled J102, should be J112
2. Use of LED cathode to check analog ground in dual ground setup p.44
3. Table 8-18, has 10k in header should be 330k
4. Fig 8-26 caption should read C42-C44
5. Calibration 1 TP8 shown in fig. 9-1, TP9 is used in text
The build went very well with little debugging to be done. Thanks for an amazing project and docs!
I will post some pics very soon
George |
|
|
Back to top
|
|
|
State Machine
Janitor
Joined: Apr 17, 2006
Posts: 2810
Location: New York
Audio files: 24
|
| Posted: Sat Aug 21, 2010 4:53 pm Post subject:
|
|
|
| Quote: | The build went very well with little debugging to be done. Thanks for an amazing project and docs!
I will post some pics very soon |
Would like to see more Appendage builds since I know lots of folks bought kits. looking forward to this Slo. I am curious to see some unique panel layouts for this project.
Thanks for the feedback on the documentation.
Bill |
|
|
Back to top
|
|
|
Scott Stites
Janitor
Joined: Dec 23, 2005
Posts: 4127
Location: Mount Hope, KS USA
Audio files: 96
|
| Posted: Mon Aug 23, 2010 10:28 am Post subject:
|
|
|
Yea, verily, thank you for the notes, Slo. I'll update the manual as soon as I can get to it.
_________________
My Site |
|
|
Back to top
|
|
|
startwav

Joined: Nov 05, 2008
Posts: 3
Location: new jersey
|
| Posted: Thu Sep 02, 2010 7:11 pm Post subject:
|
|
|
hey there,
finally building this monster!
i have everything in place but i'm having trouble locating any poly .002UF 1% caps...or anything similar
anyone have any thoughts? |
|
|
Back to top
|
|
|
magman
Joined: Feb 04, 2009
Posts: 363
Location: Liverpool, UK
|
|
|
Back to top
|
|
|
slo
Joined: Feb 18, 2007
Posts: 204
Location: Victoria, BC
Audio files: 1
|
| Posted: Sat Sep 18, 2010 7:26 am Post subject:
|
|
|
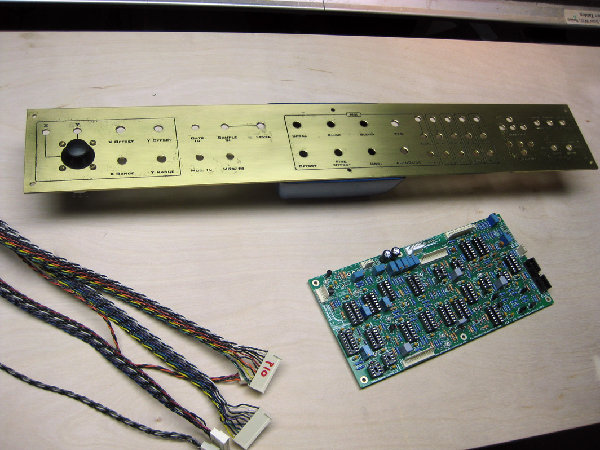
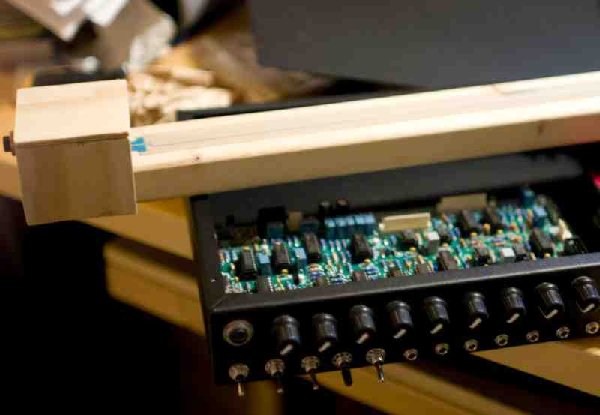
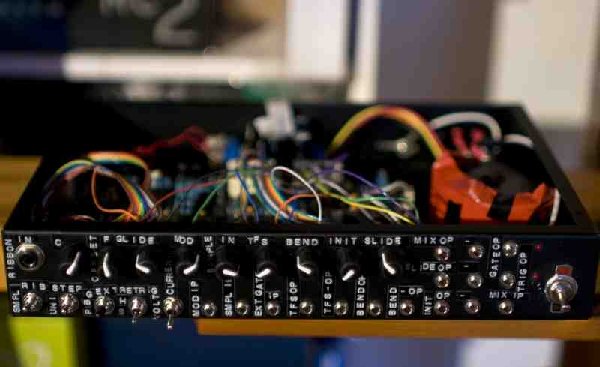
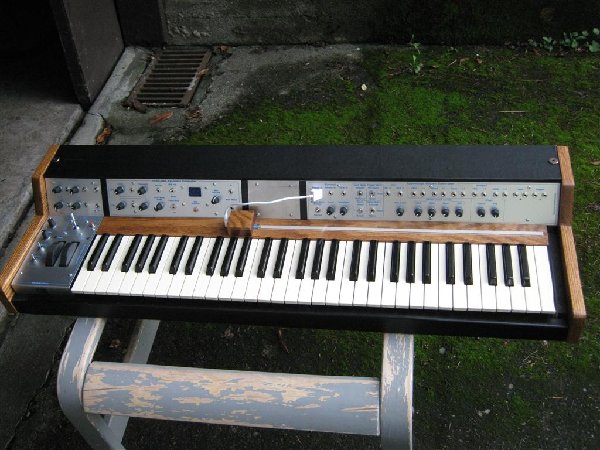
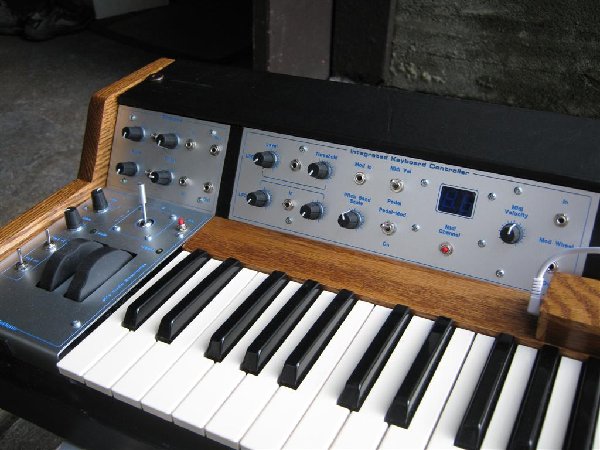
Here's some pics of my over the top controller, finally finished. Based on an IKC keyboard controller, it also has a Choices joystick controller from Flight of Harmony, and the Appendage Ribbon Controller. The ribbon is detachable from the keyboard. The IKC controls are spread over 3 panels, with the outputs and the Choices manual gate/trigger jacks on a rear panel. All three sections are fully operational, and the wheels also are working. The smallcenter panel is blank for the time being. The only thing that bugs me at the moment is the clunky ribbon connector housing, but that can wait 'cause I'm having fun with the Appendage.
Flight of Harmony
http://www.flightofharmony.com/
Pittch Bend circuit
http://www.electro-music.com/forum/viewtopic.php?highlight=pitch+bend+circuit&t=34895
IKC Keyboard Controller
http://www.electro-music.com/forum/viewtopic.php?highlight=ikc&t=29746
George
| Description: |
|
| Filesize: |
125.52 KB |
| Viewed: |
1113 Time(s) |
| This image has been reduced to fit the page. Click on it to enlarge. |
|
| Description: |
|
| Filesize: |
98.63 KB |
| Viewed: |
1124 Time(s) |
| This image has been reduced to fit the page. Click on it to enlarge. |

|
| Description: |
|
| Filesize: |
105.04 KB |
| Viewed: |
1042 Time(s) |
| This image has been reduced to fit the page. Click on it to enlarge. |
|
|
|
|
Back to top
|
|
|
adambee7
Joined: Apr 04, 2009
Posts: 420
Location: united kingdom
|
| Posted: Sat Sep 18, 2010 5:21 pm Post subject:
|
|
|
| thats exactly the keyboard i had in my head for mine. with softpot slightly to the right. beautiful job man. |
|
|
Back to top
|
|
|
philpeery
Joined: Nov 08, 2006
Posts: 137
Location: new jersey, usa
|
| Posted: Sat Sep 18, 2010 7:34 pm Post subject:
|
|
|
Hey Slo!
AWESOME job on this! I have my IKC board about 80% loaded, and have been seriously vexed about how to package my keyboard up. you have given me some real inspiration! Your inclusion of the Appendage is a great idea! I have a 500mm and a 1000mm softpot, I will have to figure out which one to use. Nice to see that you put yours together with a 5 octave keybed. I have a korg poly61 that I got for 10 bucks because I wanted the 6 SSM2056 EG chips, now I know what to do with the keyboard too!
Thanks for posting these pics!
Regards,
Phil |
|
|
Back to top
|
|
|
slo
Joined: Feb 18, 2007
Posts: 204
Location: Victoria, BC
Audio files: 1
|
| Posted: Sat Sep 18, 2010 9:00 pm Post subject:
|
|
|
Thanks for the kudo's. A nice side benefit with having the 500mm ribbon above the keys is that with a little Appendage knob twiddling you can get close to a chromatic scale using the keys as guides.
George |
|
|
Back to top
|
|
|
adambee7
Joined: Apr 04, 2009
Posts: 420
Location: united kingdom
|
| Posted: Sun Sep 19, 2010 12:43 am Post subject:
|
|
|
| oh right, didn't know that. bonus. i was just going to have keyboard markings above soft pot:D |
|
|
Back to top
|
|
|
rokuez

Joined: Feb 23, 2007
Posts: 33
Location: West LA
|
| Posted: Sun Sep 19, 2010 1:24 am Post subject:
|
|
|
saw this from matrix synth great controller!!
_________________
Emulator Forum www.eiiiforum.com |
|
|
Back to top
|
|
|
andrewF

Joined: Dec 29, 2006
Posts: 1176
Location: australia
Audio files: 4
|
| Posted: Tue Sep 28, 2010 2:18 am Post subject:
|
|
|
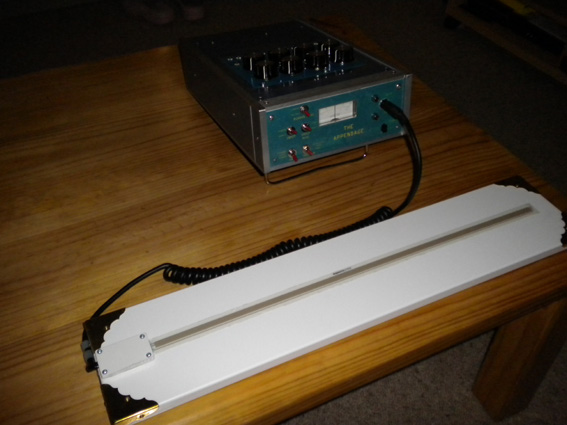
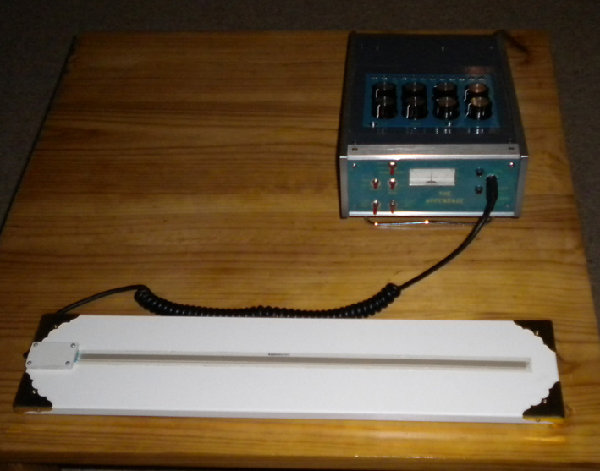
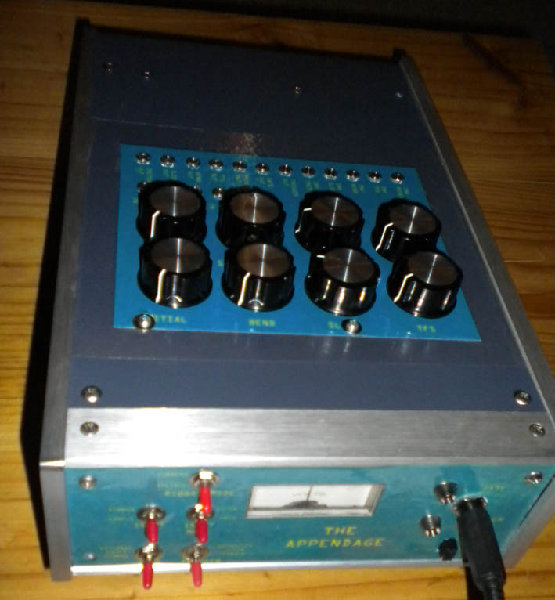
Took longer than expected but so far seems to be quite the 'tool' 
awesome manual guys, Well Done!!
The case is some recycled lab gear, voltmeter works but currently not hooked up to anything, guess it will be used for the 'mixed' output, tho offset may be more useful.
| Description: |
|
| Filesize: |
108.66 KB |
| Viewed: |
76326 Time(s) |
|
| Description: |
|
| Filesize: |
135.42 KB |
| Viewed: |
1025 Time(s) |
| This image has been reduced to fit the page. Click on it to enlarge. |
|
| Description: |
|
| Filesize: |
102.92 KB |
| Viewed: |
1130 Time(s) |
| This image has been reduced to fit the page. Click on it to enlarge. |
|
|
|
|
Back to top
|
|
|
Scot Solida
Joined: Oct 24, 2009
Posts: 100
Location: Hutchinson Kansas
|
| Posted: Wed Oct 13, 2010 2:59 pm Post subject:
|
|
|
I have, at long last, finally finished my Appendage build - though I haven't calibrated it yet.

It was a pretty massive project, and one of the most complex I have attempted thus far. The build was easy. Scott and Bill did a terrific job putting this project together and Scott's manual was clear and easy to follow.
As you can see, I built mine in the Synthesizers.com format, and crammed the lot behind a four-space panel, which I screen-printed myself. It only barely fits and it took some juggling to get all of the panel hardware to fit. I almost opted for smaller knobs. I didn't have any of the Moog style knobs I usually use for my modules on hand, so I used some Rat Shack knobs we had lying around. I'll probably replace those. Though you can't see it in this pic, I mounted the PCB parallel to the front panel on some kludged standoffs. It is almost exactly the same length as the Dotcom panel is wide, so it was a close fit.
The ribbon itself is housed in a Walking Stick enclosure (those things are beautiful). I routed out the space for the jack and wiring with a dremel and then filled the two knob holes with wooden plugs, stained to match the rest. There is a textured covering over the Softpot itself, like the stuff used on a Micromoog ribbon. I got that from ribboncontrollers.com, too. I owe my thanks to them and to both Scott and Bill for making this project happen!
Next up: The Klee (assuming I survive the calibration of the Appendage!)  |
|
|
Back to top
|
|
|
adambee7
Joined: Apr 04, 2009
Posts: 420
Location: united kingdom
|
| Posted: Wed Oct 13, 2010 6:57 pm Post subject:
|
|
|
| thats what i'm looking for is a protective covering for the softpot. lovely stick and build man. |
|
|
Back to top
|
|
|
Scot Solida
Joined: Oct 24, 2009
Posts: 100
Location: Hutchinson Kansas
|
| Posted: Wed Oct 13, 2010 7:21 pm Post subject:
|
|
|
| adambee7 wrote: | | thats what i'm looking for is a protective covering for the softpot. lovely stick and build man. |
Thanks... I take no credit for the stick itself. That came from http://www.psionicsoundworks.com/. I just took a Dremel to it to make it work with the Appendage...
The covering works very well. It seems not to hinder the Softpot's performance at all.
I'm on step 4 of the calibration process at this very moment. I've enlisted my 14-year-old son to help (he's smarter about electronics than I'll ever be). |
|
|
Back to top
|
|
|
Photon

Joined: Mar 22, 2005
Posts: 363
Location: Boston
Audio files: 1
|
|
|
Back to top
|
|
|
softfin

Joined: Oct 11, 2006
Posts: 271
Location: Far in the north
Audio files: 1
|
|
|
Back to top
|
|
|
|

 Forum index » DIY Hardware and Software