| Author |
Message |
-minus-
Joined: Oct 26, 2008
Posts: 787
Audio files: 13
|
|
|
Back to top
|
|
 |
LektroiD

Joined: Aug 23, 2008
Posts: 1019
Location: Scottish Borders
Audio files: 2
G2 patch files: 2
|
 Posted: Wed Nov 17, 2010 9:04 pm Post subject:
Re: TR-808 Snare Stripboard Posted: Wed Nov 17, 2010 9:04 pm Post subject:
Re: TR-808 Snare Stripboard |
  |
|
| -minus- wrote: | | I may have missed something... you never know. |
Your stripboard layout, prehaps? 
I'd love to have a go at this once it's online 
_________________
LektroiD |
|
|
Back to top
|
|
|
-minus-
Joined: Oct 26, 2008
Posts: 787
Audio files: 13
|
| Posted: Wed Nov 17, 2010 9:15 pm Post subject:
|
|
|
sorry about that!  The images came up huge so I resized them.... they should be there now! The images came up huge so I resized them.... they should be there now!  |
|
|
Back to top
|
|
|
Uncle Krunkus
Moderator

Joined: Jul 11, 2005
Posts: 4761
Location: Sydney, Australia
Audio files: 52
G2 patch files: 1
|
| Posted: Thu Nov 18, 2010 1:28 am Post subject:
|
|
|
That's a nice looking layout minus.
Well done.
_________________
What makes a space ours, is what we put there, and what we do there. |
|
|
Back to top
|
|
|
-minus-
Joined: Oct 26, 2008
Posts: 787
Audio files: 13
|
| Posted: Thu Nov 18, 2010 1:46 am Post subject:
|
|
|
Thanks Krunkus!  This stripboard obsession is all your fault! It all started with your WSG.... You know, stripboarders are a dying breed. Everyone seems to prefer perfboard (or should i say, perfer ). If this circuit tests ok, I might work my way through the rest of the voices. This stripboard obsession is all your fault! It all started with your WSG.... You know, stripboarders are a dying breed. Everyone seems to prefer perfboard (or should i say, perfer ). If this circuit tests ok, I might work my way through the rest of the voices. |
|
|
Back to top
|
|
|
v-un-v
Janitor


Joined: May 16, 2005
Posts: 8932
Location: Birmingham, England, UK
Audio files: 11
G2 patch files: 1
|
| Posted: Thu Nov 18, 2010 2:32 am Post subject:
|
|
|
Yes! Gorgeous artwork!! 
A mistake I often made in the past, coming largely from a graphic perspective, is that I got the artwork spot on, but my engineering skills left a lot to be desired (ie, they are shit!! )
_________________
ACHTUNG!
ALLES TURISTEN UND NONTEKNISCHEN LOOKENPEEPERS!
DAS KOMPUTERMASCHINE IST NICHT FÜR DER GEFINGERPOKEN UND MITTENGRABEN! ODERWISE IST EASY TO SCHNAPPEN DER SPRINGENWERK, BLOWENFUSEN UND POPPENCORKEN MIT SPITZENSPARKSEN.
IST NICHT FÜR GEWERKEN BEI DUMMKOPFEN. DER RUBBERNECKEN SIGHTSEEREN KEEPEN DAS COTTONPICKEN HÄNDER IN DAS POCKETS MUSS.
ZO RELAXEN UND WATSCHEN DER BLINKENLICHTEN. |
|
|
Back to top
|
|
|
-minus-
Joined: Oct 26, 2008
Posts: 787
Audio files: 13
|
| Posted: Thu Nov 18, 2010 2:40 am Post subject:
|
|
|
| v-un-v wrote: | Yes! Gorgeous artwork!!
A mistake I often made in the past, coming largely from a graphic perspective, is that I got the artwork spot on, but my engineering skills left a lot to be desired (ie, they are shit!! ) |
Nooooooooo..... Don't say that! It's so true! For example: I've spent so much time in the past on worrying about perfect hand drawn letter forms, only to realise I've made a spelling mistake!  Yeah, my engineering skills are still *cough cough* developing. But I can turn my hand at most things in time. I just wish I had all the components here to build this tonight. But I have a bus to catch in the morning and a nine hour journey ahead of me... and I'll be away for 10 days. I WILL be returning with components and constructing this the day I return! ... in the meantime, I'll be quietly 'shitting it' hoping that it's right! Yeah, my engineering skills are still *cough cough* developing. But I can turn my hand at most things in time. I just wish I had all the components here to build this tonight. But I have a bus to catch in the morning and a nine hour journey ahead of me... and I'll be away for 10 days. I WILL be returning with components and constructing this the day I return! ... in the meantime, I'll be quietly 'shitting it' hoping that it's right! |
|
|
Back to top
|
|
|
LektroiD
Joined: Aug 23, 2008
Posts: 1019
Location: Scottish Borders
Audio files: 2
G2 patch files: 2
|
| Posted: Thu Nov 18, 2010 11:11 am Post subject:
|
|
|
Looking forward to piecing this baby together. Love the artwork.
_________________
LektroiD |
|
|
Back to top
|
|
|
v-un-v
Janitor
Joined: May 16, 2005
Posts: 8932
Location: Birmingham, England, UK
Audio files: 11
G2 patch files: 1
|
| Posted: Thu Nov 18, 2010 12:48 pm Post subject:
|
|
|
I could put that component layout on a t-shirt it's that gorgeous!!
_________________
ACHTUNG!
ALLES TURISTEN UND NONTEKNISCHEN LOOKENPEEPERS!
DAS KOMPUTERMASCHINE IST NICHT FÜR DER GEFINGERPOKEN UND MITTENGRABEN! ODERWISE IST EASY TO SCHNAPPEN DER SPRINGENWERK, BLOWENFUSEN UND POPPENCORKEN MIT SPITZENSPARKSEN.
IST NICHT FÜR GEWERKEN BEI DUMMKOPFEN. DER RUBBERNECKEN SIGHTSEEREN KEEPEN DAS COTTONPICKEN HÄNDER IN DAS POCKETS MUSS.
ZO RELAXEN UND WATSCHEN DER BLINKENLICHTEN. |
|
|
Back to top
|
|
|
v-un-v
Janitor
Joined: May 16, 2005
Posts: 8932
Location: Birmingham, England, UK
Audio files: 11
G2 patch files: 1
|
| Posted: Thu Nov 18, 2010 12:50 pm Post subject:
|
|
|
How did you do that artwork? Illustrator? 
_________________
ACHTUNG!
ALLES TURISTEN UND NONTEKNISCHEN LOOKENPEEPERS!
DAS KOMPUTERMASCHINE IST NICHT FÜR DER GEFINGERPOKEN UND MITTENGRABEN! ODERWISE IST EASY TO SCHNAPPEN DER SPRINGENWERK, BLOWENFUSEN UND POPPENCORKEN MIT SPITZENSPARKSEN.
IST NICHT FÜR GEWERKEN BEI DUMMKOPFEN. DER RUBBERNECKEN SIGHTSEEREN KEEPEN DAS COTTONPICKEN HÄNDER IN DAS POCKETS MUSS.
ZO RELAXEN UND WATSCHEN DER BLINKENLICHTEN. |
|
|
Back to top
|
|
|
-minus-
Joined: Oct 26, 2008
Posts: 787
Audio files: 13
|
| Posted: Thu Nov 18, 2010 1:12 pm Post subject:
|
|
|
yep it's Illustrator.... on a mac I might add!
I love Illustrator! I use it for just about everything now... to the point where I am forgetting how to use photoshop. The gradient mesh tool is great too! The level of photorealism obtainable with that is amazing!!! And it's vector too. I'm an old fart really when it come to computers. I was trained some time ago with technical pens, airbrushes and Letraset! But I'm gradually learning the 'new way'! I'm glad you like it! Once the components are drawn its really just a copy and paste job. |
|
|
Back to top
|
|
|
-minus-
Joined: Oct 26, 2008
Posts: 787
Audio files: 13
|
| Posted: Mon Nov 29, 2010 1:13 am Post subject:
|
|
|
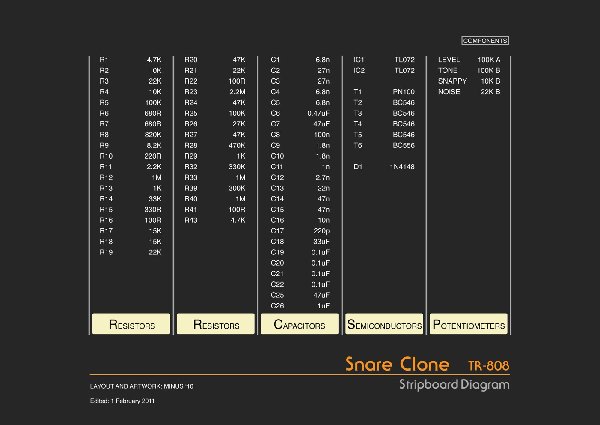
| I'm gathering components for this still. I thought originally that I'd find the capacitor values in MKT's, hence the diagram has been drawn with MKT's in mind. I am going to have to use some greencaps for some of them, but I imagine they should still fit the crowded layout. I'll have this built this weekend and will hopefully confirm this circuit then.... |
|
|
Back to top
|
|
|
v-un-v
Janitor
Joined: May 16, 2005
Posts: 8932
Location: Birmingham, England, UK
Audio files: 11
G2 patch files: 1
|
| Posted: Mon Nov 29, 2010 3:40 am Post subject:
|
|
|
Looking forward to what you find & hear! 
_________________
ACHTUNG!
ALLES TURISTEN UND NONTEKNISCHEN LOOKENPEEPERS!
DAS KOMPUTERMASCHINE IST NICHT FÜR DER GEFINGERPOKEN UND MITTENGRABEN! ODERWISE IST EASY TO SCHNAPPEN DER SPRINGENWERK, BLOWENFUSEN UND POPPENCORKEN MIT SPITZENSPARKSEN.
IST NICHT FÜR GEWERKEN BEI DUMMKOPFEN. DER RUBBERNECKEN SIGHTSEEREN KEEPEN DAS COTTONPICKEN HÄNDER IN DAS POCKETS MUSS.
ZO RELAXEN UND WATSCHEN DER BLINKENLICHTEN. |
|
|
Back to top
|
|
|
-minus-
Joined: Oct 26, 2008
Posts: 787
Audio files: 13
|
| Posted: Thu Dec 02, 2010 9:45 am Post subject:
|
|
|
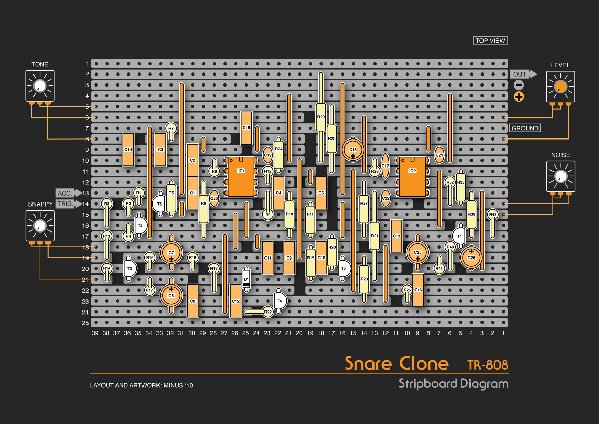
I've just got home tonight, and it may be 3:30AM here but the board will be finished by sunrise... hopefully... Already I see a couple of things missing in the above diagrams.
To the millions of solderers stuck and wondering what value R15 and R17 are ....
R15= 330R
R17= 15K
I seem to have missed these in the component list! I'll update the list shortly and label that page as being revised. I'm still hopeful that in the next few hours I'll be posting sound clips and a dodgy low res 2 mega pixel phone photo of the board... Well, that's the plan anyway!
EDIT: C5 = 6.8nF
Last edited by -minus- on Fri Dec 03, 2010 2:14 am; edited 1 time in total |
|
|
Back to top
|
|
|
JRock
Joined: Mar 05, 2010
Posts: 87
Location: Bucks County, PA
Audio files: 1
|
| Posted: Thu Dec 02, 2010 8:17 pm Post subject:
|
|
|
| That's nice! Looking forward to watching how this turns out |
|
|
Back to top
|
|
|
-minus-
Joined: Oct 26, 2008
Posts: 787
Audio files: 13
|
| Posted: Fri Dec 03, 2010 6:18 am Post subject:
|
|
|
OK! With a few minor hiccups, I have the snare functioning. I'm still having some triggering issues here though. I'm not able to trigger at the designated trigger point, but I seem to be able to trigger this from R14 (stripboard track 21) or R13 (stripboard track 19). Also I think I'll test and perhaps add Eric Archer's diode-cap-resistor network to make triggering independent of pulse width. This may mean an extra tiny board to the one I have but I'll post another top view diagram with this included soon.
Also... I'm notorious for getting pots wired the wrong way around! I need to fix these up on the diagram... sorry about that. It's like the old adage of the toast always falling butter side down! I always get this wrong...
I'll do some quick recordings of it now.... I'll post again soon... |
|
|
Back to top
|
|
|
-minus-
Joined: Oct 26, 2008
Posts: 787
Audio files: 13
|
|
|
Back to top
|
|
|
-minus-
Joined: Oct 26, 2008
Posts: 787
Audio files: 13
|
| Posted: Sat Dec 04, 2010 12:19 am Post subject:
|
|
|
Still trying to work out this triggering problem.... 
I thought I might have got the 556 transistor (T6) the wrong way around. As far as I can work out, this transistor has the same CBE pin layout as the 546. If this is the case, the diagram above has this orientated incorrectly. I have soldered a replacement the correct way around, but this has not solved the trigger issue. I'm still triggering from R14 (track 20 on the stripboard).
I have just looked at Eric Archers site and read this about his perf version:
If you are planning on triggering the circuit from a logic signal, the easiest way is to tie ACCENT to +12V (+15V), and connect the logic signal to TRIGGER.
You'll have to make the trigger pulse short (like 5ms) or you'llhear a double-trigger on the negative edge of the pulse.
Or you can add my diode-cap-resistor network (described elsewhere) that makes triggering independent of pulse width.
When I tie ACCENT to +9V I get a constant loud HISSSSSSS. I have also tried the Krunkus suggestion with the ACCENT pot from the 808 kick drum stripboard thread. It seems that this doesn't work either. So I'm a bit at a loss at the moment what to do. The problem is in this triggering section of the board. It triggers ok from the R14 point, with the ACCENT point untied to the +9V rail. I'd just like to get this working in the manner it should.
Any suggestions anyone?  |
|
|
Back to top
|
|
|
-minus-
Joined: Oct 26, 2008
Posts: 787
Audio files: 13
|
| Posted: Tue Dec 07, 2010 12:42 pm Post subject:
|
|
|
Now I'm thinking the T6 BC556 is actually the right way around. I'm looking at the stripboard version of the kick drum, and judging by that, I think the above diagram is correct...
As to why this isn't working as it should, I really can't fathom this out! I'll keep looking at this and hope something obvious jumps out at me.... but I can't see what. |
|
|
Back to top
|
|
|
RF

Joined: Mar 23, 2007
Posts: 1502
Location: Northern Minnesota, USA
Audio files: 28
|
| Posted: Tue Dec 07, 2010 1:46 pm Post subject:
|
|
|
Just a random thought w/out looking at it today - but have you tried a + and - 12 volt supply...or have you made allowance for using 9 volts with some component changes?
That may not be it - but it's a variable from the original, isn't it?
Good luck
bruce
_________________
www.sdiy.org/rfeng
"I want to make these sounds that go wooo-wooo-ah-woo-woo.”
(Herb Deutsch to Bob Moog ~1963) |
|
|
Back to top
|
|
|
-minus-
Joined: Oct 26, 2008
Posts: 787
Audio files: 13
|
| Posted: Tue Dec 07, 2010 3:21 pm Post subject:
|
|
|
No, I have not tried a +/- 12V supply. I guess I am going off the fact that the kick drum module runs of the two 9V batteries, so I assumed this would work in a similar manner. Thing is, I can get this to trigger elsewhere on the board... just not from the designated trigger point. It's kind of ok as it is, it's just bugging me that I cant figure out why this won't work as intended.
I've jumped onto some other soldering jobs in the meantime. I'll have to come back to this one. I'm sure there is a simple explanation somewhere. |
|
|
Back to top
|
|
|
Team Toothpaste
Joined: May 06, 2010
Posts: 25
Location: London
|
| Posted: Sat Dec 18, 2010 6:38 am Post subject:
|
|
|
hi, minus. firstly, great work and thanks for this. i saw eric's clones a while ago and knew i'd have to make them at some point. i'm pretty new to this stuff and i'm definitely more comfortable with stripboard so thanks.
when you said
| -minus- wrote: | Still trying to work out this triggering problem....
I thought I might have got the 556 transistor (T6) the wrong way around. As far as I can work out, this transistor has the same CBE pin layout as the 546. |
i was just thinking though that i'm sure when looking at transistors recently (for the 808 kick actually) that the 556 was a pnp and the 546 was npn. having only worked with cmos ics up until now i'm not sure how significant this is, but it was my understanding that they are not interchangeable. i'm happy to be corrected though. |
|
|
Back to top
|
|
|
-minus-
Joined: Oct 26, 2008
Posts: 787
Audio files: 13
|
| Posted: Sat Dec 18, 2010 7:36 am Post subject:
|
|
|
Yes they are different. The BC546 is a NPN transistor, and the BC 556 is a PNP transistor. They both have the same designators (is that the correct term?). What I mean is, if you hold the flat side facing you, the legs are from left to right: Collector, Base, Emitter. They are different though. You can't just use one or the other wherever you want. I was just noting that the legs are the same... in the same order. Anyway, that 556 was correct in the diagram.
I pretty much went off the data Eric posted on his site. I followed his schematics and drew this off what he had, as well as checking the roland originals for this particular voice.
As to solving the riddle, I have yet to work this out. I will get back to this! I have been able to trigger from further along the line from the specified point, but not from the point it should work from. It's getting a bit late in the year to have this solved, but I will be coming back to it in January... I haven't given up on it yet! |
|
|
Back to top
|
|
|
Team Toothpaste
Joined: May 06, 2010
Posts: 25
Location: London
|
| Posted: Sat Dec 18, 2010 7:50 am Post subject:
|
|
|
ah i see what you mean. good luck with this. looking forward to building this one now, but as you say it's getting a bit near to that hectic christmas/newyears/my birthday kinda time so i probably wont start on this until january. once i get started i'll post my progress on this thread if that's alright.
seasons greetings and all that |
|
|
Back to top
|
|
|
6079smith
Joined: Jan 18, 2007
Posts: 95
Location: Mark of the Dane
Audio files: 4
|
| Posted: Thu Jan 13, 2011 10:18 am Post subject:
|
|
|
| If anyone's interested, I can confirm this works just fine... a couple of minor things on the layout and BOM (f. ex. the pinout of the 2n3704 isn't quite right) but aside from that it's fine. I'd recommend a Ken Stone gate to trigger converter in front of it (and every other percussion module) - it'll trigger from almost anything. Nice work! |
|
|
Back to top
|
|
|
|

 Forum index » DIY Hardware and Software » The layout factory