| Author |
Message |
goldenMaster
Joined: Dec 26, 2009
Posts: 9
Location: seattle, wa
|
 Posted: Sun May 27, 2012 8:06 pm Post subject:
g2 knobs (encoders) problem.. help? Posted: Sun May 27, 2012 8:06 pm Post subject:
g2 knobs (encoders) problem.. help? |
  |
|
One of the encoders (the first, to the very left) on my g2 has started to bug out--the values don't change, or change very slowly when I turn it. Before I crack it open and try messing around with it, I was wondering if anyone else has had this problem and there is a quick solution. I was able to easily fix a suck key a while back by just cleaning out the inside of the keyboard.
From the look of the board, I'm not sure if it's so easy to get at the insides of the encoders to clean them.
Also, my mod wheel has been acting funny... when I turn it too close to the maximum value, it kind of wobbles and switches to the minimum value!
I guess I've been gigging with the g2 too much...  |
|
|
Back to top
|
|
 |
Estarriol
Joined: Aug 09, 2011
Posts: 41
Location: Moscow
|
| Posted: Tue May 29, 2012 9:10 am Post subject:
|
|
|
Well, dying G2 encoder #1 is normal, it gets used too much. You can NOT disassemble it without soldering it from pcb board -- even if you cut the 4 plastic holder buttons off, you just can not take the bottom off because it is soldered to the pins. So, to repair OR change it you will have to solder.
But good news: if you do it right, you will get your encoder easily replaceable. All you have to do is:
1. order ECW0J-C24-EE0024L or ECW0J-C24-BE0036 at Mouser (I use the latter, because it is more similar to original one).
2. get jumper wires like this: http://www.dealextreme.com/p/single-port-female-to-female-jumper-wire-set-50-pack-20cm-length-55454
3. take a mighty soldering iron
All you have to do is:
1) take off the cap and unscrew the encoder holding nut
2) take the iron and unsolder the pins RIGHT ON THE ENCODER, do not even go close to the PCB. Use vacuum solder remover to get rid of the solder, you will need the pins clean. You will need a mighty iron because you have to get all the solder all through the encoder plate hot and melting, and this is kinda hard if you have 25W iron or something like that. Maybe someone correct me, but I could not unsolder pins from any Bourns encoders I have with 25W iron...
3) So you made pins going from the PCB clear, remove the encoder, and if the pins are clean and smooth, just install any of the beforementioned encoders and connect them with the cables.
There may be some underwater stones: the main idea is do not harm the pcb, so if the soldering iron is too much, it will warm not only the encoder soldering, but all the pins up to the PCB... I think this hardly can happen if you're fast because those pins will tend to get cold fast enough... so be cautios.
Hope it helped. |
|
|
Back to top
|
|
|
goldenMaster
Joined: Dec 26, 2009
Posts: 9
Location: seattle, wa
|
| Posted: Tue May 29, 2012 3:01 pm Post subject:
|
|
|
| Thank you!! That was an extremely helpful post. I don't have a powerful soldering iron, but I have a few friends with electronics skills--so this should be an easy fix, with your instructions and some help from one of them! Thanks so much! |
|
|
Back to top
|
|
|
Estarriol
Joined: Aug 09, 2011
Posts: 41
Location: Moscow
|
| Posted: Thu Oct 04, 2012 12:30 am Post subject:
|
|
|
| It recently occured to me that I've misleaded you. Probably you should just CUT the encoder pins as high as possible, so you'll have the pins clear and ready to have cables put on. Soldering is not so covinient and those efforts are no use. Hope you've figured it out by yourself by now. |
|
|
Back to top
|
|
|
JeremyFlagelo
Joined: Mar 02, 2009
Posts: 12
Location: argentina
G2 patch files: 1
|
| Posted: Thu Sep 15, 2016 4:42 am Post subject:
|
|
|
| Estarriol wrote: | Well, dying G2 encoder #1 is normal, it gets used too much. You can NOT disassemble it without soldering it from pcb board -- even if you cut the 4 plastic holder buttons off, you just can not take the bottom off because it is soldered to the pins. So, to repair OR change it you will have to solder.
But good news: if you do it right, you will get your encoder easily replaceable. All you have to do is:
1. order ECW0J-C24-EE0024L or ECW0J-C24-BE0036 at Mouser (I use the latter, because it is more similar to original one).
2. get jumper wires like this: http://www.dealextreme.com/p/single-port-female-to-female-jumper-wire-set-50-pack-20cm-length-55454
3. take a mighty soldering iron
All you have to do is:
1) take off the cap and unscrew the encoder holding nut
2) take the iron and unsolder the pins RIGHT ON THE ENCODER, do not even go close to the PCB. Use vacuum solder remover to get rid of the solder, you will need the pins clean. You will need a mighty iron because you have to get all the solder all through the encoder plate hot and melting, and this is kinda hard if you have 25W iron or something like that. Maybe someone correct me, but I could not unsolder pins from any Bourns encoders I have with 25W iron...
3) So you made pins going from the PCB clear, remove the encoder, and if the pins are clean and smooth, just install any of the beforementioned encoders and connect them with the cables.
There may be some underwater stones: the main idea is do not harm the pcb, so if the soldering iron is too much, it will warm not only the encoder soldering, but all the pins up to the PCB... I think this hardly can happen if you're fast because those pins will tend to get cold fast enough... so be cautios.
Hope it helped. |
its works? http://www.mouser.es/ProductDetail/Bourns/ECW0J-C24-BE0036/?qs=JHNMkstJfpwUaf0K4RZT2Q%3d%3d |
|
|
Back to top
|
|
|
Estarriol
Joined: Aug 09, 2011
Posts: 41
Location: Moscow
|
| Posted: Thu Sep 15, 2016 8:51 am Post subject:
|
|
|
| Yes, it does. You can do better than I, though: just cut the pins of the existing encoder with small cutters, then put the cables on them and the new encoder can be rotated so it wouldnt interfere with its pins. |
|
|
Back to top
|
|
|
JeremyFlagelo
Joined: Mar 02, 2009
Posts: 12
Location: argentina
G2 patch files: 1
|
| Posted: Thu Sep 15, 2016 9:10 pm Post subject:
|
|
|
| Estarriol wrote: | | Yes, it does. You can do better than I, though: just cut the pins of the existing encoder with small cutters, then put the cables on them and the new encoder can be rotated so it wouldnt interfere with its pins. |
thanks for the info !
i can't find it on stock .
i find only 24ppr encoders. no 36 ppr .  |
|
|
Back to top
|
|
|
Electromagnetic Wave

Joined: Apr 28, 2013
Posts: 305
Location: Kebek
G2 patch files: 38
|
| Posted: Fri Oct 14, 2016 1:14 pm Post subject:
|
|
|
| Quote: | | or change very slowly when I turn it. |
| Quote: | | Also, my mod wheel has been acting funny... when I turn it too close to the maximum value, it kind of wobbles and switches to the minimum value! |
I have this problem with my G2 too now. I will try to replace the wheel and encoders myself.
Recently I got 2 G2. 1 is version 1.5 and the other is version 1.4. I noticed the encoders do not have the same feeling on booth version. On v1.4 I hear and feel on my finger a 'click' when I turn the knob on every value. v1.5 seem more smooth when I turn it and I don't hear nothing.
What about the new encoders (replacement) ? Do you feel the 'click' when you move the knob. Someone know what I'm talking about ? Because I want all my knobs to react the same way. I will probably take 10 of them to be sure I have some back up. Thanks ! |
|
|
Back to top
|
|
|
Electromagnetic Wave
Joined: Apr 28, 2013
Posts: 305
Location: Kebek
G2 patch files: 38
|
| Posted: Sat Jul 17, 2021 4:44 pm Post subject:
|
|
|
Hi!
Back, few years later. I just replaced the mod wheel potentiometer (10k), everything went well. It's a pretty straightforward repair. The mod wheel works like a new one!
Now I have to change an encoder. I have the spare part. This is not the original model (it is no longer available on Mouser) but it is the one recommended here on the forum and also elsewhere > "ECW0J-C24-BE0036"
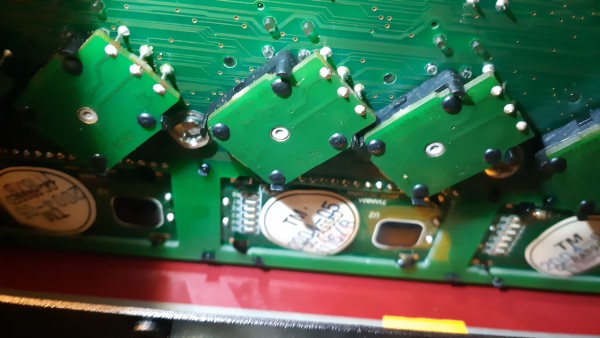
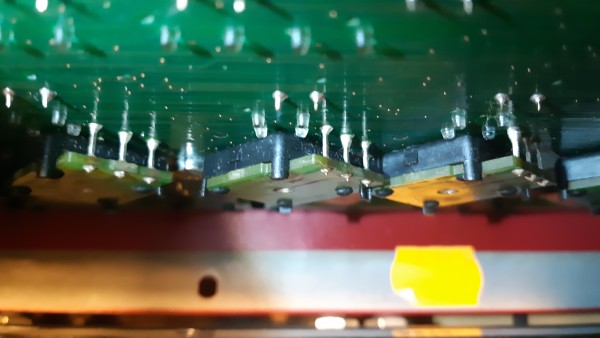
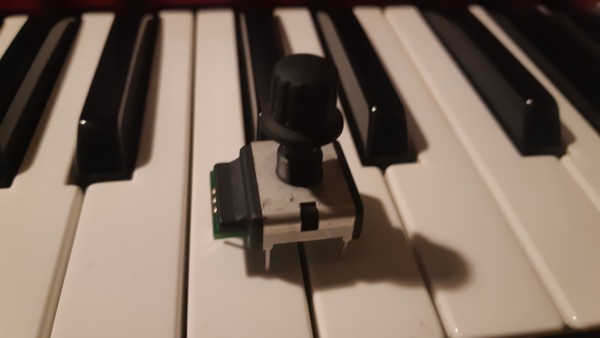
Before to start the repair, I looked inside the G2 and noticed a difference between the original and the one I ordered. There is a piece of metal with legs on the one I ordered.
I add photos with the original knobs (not covered with metal) and with the new one "ECW0J-C24-BE0036". It can also help others
My question: Do you think it is better to remove the entire piece of metal from the potentiometer before making the modification or cutting the legs?
Cheers!
| Description: |
|
| Filesize: |
2.8 MB |
| Viewed: |
318 Time(s) |
| This image has been reduced to fit the page. Click on it to enlarge. |
|
| Description: |
|
| Filesize: |
2.3 MB |
| Viewed: |
302 Time(s) |
| This image has been reduced to fit the page. Click on it to enlarge. |
|
| Description: |
|
| Filesize: |
2.62 MB |
| Viewed: |
297 Time(s) |
| This image has been reduced to fit the page. Click on it to enlarge. |
|
| Description: |
|
| Filesize: |
2.62 MB |
| Viewed: |
318 Time(s) |
| This image has been reduced to fit the page. Click on it to enlarge. |

|
Last edited by Electromagnetic Wave on Sat Jul 17, 2021 5:15 pm; edited 1 time in total |
|
|
Back to top
|
|
|
blue hell
Site Admin

Joined: Apr 03, 2004
Posts: 24675
Location: The Netherlands, Enschede
Audio files: 330
G2 patch files: 320
|
| Posted: Sat Jul 17, 2021 5:12 pm Post subject:
|
|
|
Pwew .. hard to tell with everything in my hands ...
I would want to alter as little as possible, so would not want to remove the metal ... for mechanical stability .. there seem to be some plastic thingies holding the original(s) in place ... I'd want something to hold the new one(s) as well .. there are some holes it seems, maybe those can be used ... for one of the metal enclusure pins ... the actual orientation would not matter for a rotary .. so maybe one? housing pin can be left (and cut of the rest ...) and glued into the hole .. or something ...
Some quick and wild thoughts only, from seeing the images .. (I dont even have a G2 keys to check  ) )
But wish you good luck!
_________________
Jan
also .. could someone please turn down the thermostat a bit.

9 3 4 .. erm .. not 13 then? .. hmm, ah eight! .. yeah yeah as in 8647 .. 47 is an 88 .. pwew .. numbles! |
|
|
Back to top
|
|
|
Electromagnetic Wave
Joined: Apr 28, 2013
Posts: 305
Location: Kebek
G2 patch files: 38
|
| Posted: Sat Jul 17, 2021 7:42 pm Post subject:
|
|
|
Thanks Blue Hell! Your advice is useful and I will think a little more before starting this repair
probably Estarriol is no longer here but maybe you (or someone) can help me understand which side he's referring to:
| Quote: | | Probably you should just CUT the encoder pins as high as possible |
So he is refering to the 3 pins I think. But I'm not sure which side he means?
| Quote: | | so you'll have the pins clear and ready to have cables put on |
cables = jumper wire as mentionned before?
Based on Estarriol's latest advice: no desoldering on the PCB if I understood correctly?
I tried to find traces of someone who could have repaired the encoders of an NL3. I think it's the same type of encoder. I've found nothing. I am surprised. |
|
|
Back to top
|
|
|
blue hell
Site Admin
Joined: Apr 03, 2004
Posts: 24675
Location: The Netherlands, Enschede
Audio files: 330
G2 patch files: 320
|
| Posted: Tue Jul 20, 2021 9:09 am Post subject:
|
|
|
Yeah well, this is what I meant .. not having it in my hands and view ...
_________________
Jan
also .. could someone please turn down the thermostat a bit.
9 3 4 .. erm .. not 13 then? .. hmm, ah eight! .. yeah yeah as in 8647 .. 47 is an 88 .. pwew .. numbles! |
|
|
Back to top
|
|
|
Electromagnetic Wave
Joined: Apr 28, 2013
Posts: 305
Location: Kebek
G2 patch files: 38
|
| Posted: Sun Jul 25, 2021 3:04 pm Post subject:
|
|
|
| Can it be useful if I take more pictures? I can disassemble the board to take pictures on the upper part of the pcb. I need to complete another project before starting this repair. But when I'm ready I'll take pictures and share them. |
|
|
Back to top
|
|
|
Burp

Joined: Dec 18, 2006
Posts: 80
Location: NL
G2 patch files: 7
|
| Posted: Tue Jul 27, 2021 3:40 am Post subject:
|
|
|
Much appreciated to see pictures of the repair. Hopefully i don't need them soon, but as a place of knowledge to keep our G2's in shape every documented repair is very welcome.
_________________
if you don't know where you're going, you will allways arrive |
|
|
Back to top
|
|
|
Electromagnetic Wave
Joined: Apr 28, 2013
Posts: 305
Location: Kebek
G2 patch files: 38
|
| Posted: Mon Oct 04, 2021 5:58 pm Post subject:
|
|
|
| Normally I will NOT use Deox in the G2. But because this knob was 10% working and I bought a new one to replace it, I decided to try Deox first, then wow... the knob (old potentiometer) is working back at 95%. Now 1 time on 5 when I turn it very very fast the value stop at 124 instead of 127. But in the past the knob was not reacting or turned completely crazy when I tried to change the value. This potentiometer was not working well when I received the G2 and the situation is degraded over time until I used the Deox. It has never worked as well as it does now !! So I will wait before to replace it. |
|
|
Back to top
|
|
|
3phase

Joined: Jul 27, 2004
Posts: 1189
Location: Berlin
Audio files: 13
G2 patch files: 141
|
| Posted: Fri Dec 10, 2021 10:07 am Post subject:
|
|
|
its mostly grease from the shaft that wanders down to the contacts that disables this kind of encoders.. so mostly you actually refurbish them by propperly cleaning them out..
too bad the g2 has plastic encoders.. them are not so easy to open for cleaning and regreasing. my g2 s are still ok.. but i guess i could refurbish them.. look like a build where the plastic looks coul be replaced by metall clamps, fine screws or bold melting with the soldring iron.
well possible to find a fitting part.. the one of the picture above dont looks right.. |
|
|
Back to top
|
|
|
Electromagnetic Wave
Joined: Apr 28, 2013
Posts: 305
Location: Kebek
G2 patch files: 38
|
| Posted: Fri Dec 10, 2021 5:18 pm Post subject:
|
|
|
you mean part number "ECW0J-C24-BE0036" dont looks right? This is the what members suggest to use since the original one (made for Clavia only) is not available anymore. Would it be better to find the original part? or something else?
The Deox seems to have done a good job as the encoder has since returned to 100% functionality. I wasn't expecting this result. I had good results in the past using Deox for itching mixer knobs. But not for this type of problem with the G2. But what you mention with the grease makes sense. The problem seems 100% fixed (we'll see for how long). Now from 0 to 127, all is well, running fast or not. Note: that when I dismantled the old potentiometer for the "mod whell" I tried the Deox then after I connected the old potentiometer (10k) to a voltmeter to see how it reacted. Even after using the Deox I noticed value jumps with the old potentiometer. |
|
|
Back to top
|
|
|
3phase
Joined: Jul 27, 2004
Posts: 1189
Location: Berlin
Audio files: 13
G2 patch files: 141
|
| Posted: Sat Dec 11, 2021 8:28 am Post subject:
|
|
|
| i didnt had the problem yet.. since its just grease spill on metal parts deox can do the job. but especially on old encoders you sometimes have tge grease spill hardened and really need to brush the surface.. or optical encoders might need to clean the strobe wheel.. sofar i only once needed to buy a new encoder bit refurbished many. especially old metal types are easy. i guess they use plastic theese days to force old encoders into trash |
|
|
Back to top
|
|
|
jdd
Joined: Dec 01, 2015
Posts: 13
Location: Portland Oregon USA
G2 patch files: 3
|
| Posted: Fri Sep 08, 2023 10:50 am Post subject:
Deox |
|
|
I just want to add to this. It's 2023 now, so my G2 is 19 years old. I was feeling quite pessimistic about the main encoder. Last night I took it apart, made one spray of Deoxit D5 into the top of the main encoder. Let it rest 20 minutes. Turned the board over, and also tried to put one spray into the bottom of the encoder. Left it upside down and let that rest for a while also. Then reassembled it.
It's remarkably better now. Quite usable. |
|
|
Back to top
|
|
|
Electromagnetic Wave
Joined: Apr 28, 2013
Posts: 305
Location: Kebek
G2 patch files: 38
|
| Posted: Sun Dec 10, 2023 12:57 am Post subject:
|
|
|
| quick update: soon 2024! I did not added more DeOx since Oct 04, 2021 and the G2 knob is still working good!! |
|
|
Back to top
|
|
|
|

 Forum index » Clavia Nord Modular » Nord Modular G2 Discussion
