| Author |
Message |
Inventor
Stream Operator

Joined: Oct 13, 2007
Posts: 6221
Location: near Austin, Tx, USA
Audio files: 267
|
 Posted: Sun Mar 21, 2010 5:00 am Post subject: Posted: Sun Mar 21, 2010 5:00 am Post subject:
|
  |
|
I presume this will be a wooden Klee? Another fun build from wmonk!
Les
_________________
"Let's make noise for peace." - Kijjaz |
|
|
Back to top
|
|
 |
Skrog Productions

Joined: Jan 07, 2009
Posts: 1220
Location: Scottish Borders
Audio files: 159
|
| Posted: Sun Mar 21, 2010 7:26 am Post subject:
|
|
|
| great panel design Thomas |
|
|
Back to top
|
|
|
kkissinger
Stream Operator

Joined: Mar 28, 2006
Posts: 1454
Location: Kansas City, Mo USA
Audio files: 45
|
| Posted: Wed Mar 31, 2010 7:45 am Post subject:
|
|
|
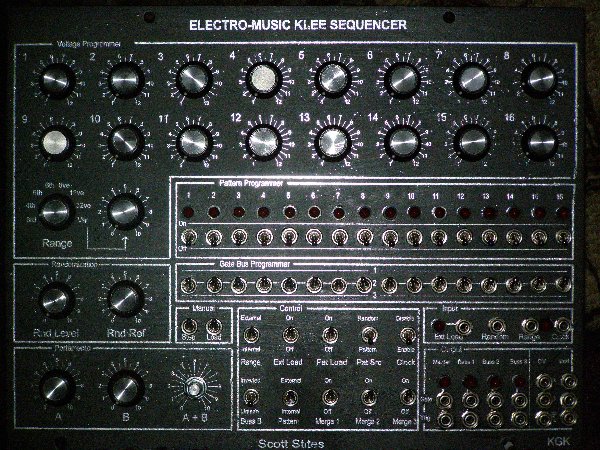
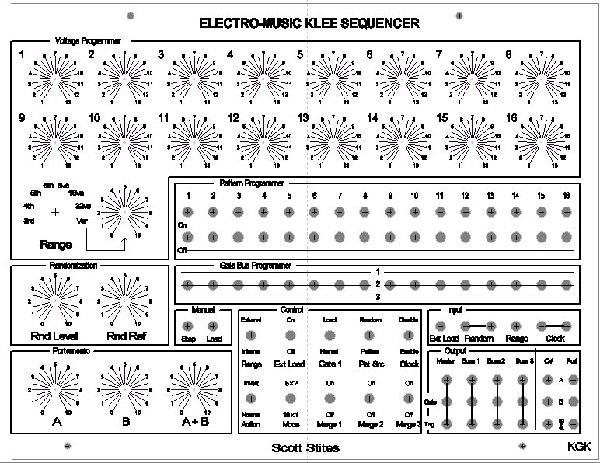
I finally designed my panel. I looked through many panels and this one caught my eye:
http://electro-music.com/forum/topic-21954.html&postorder=asc&highlight=klee+sequencer&start=298
This panel creates a separate section for the voltage programmers, the pattern programmer, and the gate bus switches.
I extended the concept and managed a design that fits nicely into a quadruple sized Aries panel (12" wide, 9" high).
When I get home this evening, I will post a pic.
I'm currently in the throes of wiring it up. I have all the strap wiring in place and am building the cables now. I hope to have it up and running within the week.
I'm really excited at the prospect of having a Klee Sequencer --
since I finished a pair of MFOS Voltage Quantizers, I've had a great time with my existing Aries Sequencer which is a very basic 8x2 design with no bells or whistles.
By far the most time-consuming part of the Klee Sequencer build has been to design a front panel. Thus, the thought of building a second one isn't so daunting to me now that I have a design.
It took an evening to drill my panel, though -- 107 parts -- **whew!**
And -- after I had it all drilled and labeled, I discovered that I left the clock LED off of the panel (I also mislabeled the 8x2/16x1 selector). Well, I managed to drill another hole for the clock LED -- ugh, what a stupid thing to forget! Probably the result of working too late with the onset of fatigue.
The mislabel was a cut and paste that I must have forgotten to change. It is a cosmetic issue that I'll fix later.
_________________
-- Kevin
http://kevinkissinger.com |
|
|
Back to top
|
|
|
EdisonRex
Site Admin

Joined: Mar 07, 2007
Posts: 4579
Location: London, UK
Audio files: 172
|
| Posted: Wed Mar 31, 2010 2:27 pm Post subject:
|
|
|
I forgot the random reference LED from my panel. Amazing how long one looks at the panel when one is designing it too... and still miss it completely.
Anyway, I look forward to hearing what you do with it.
_________________
Garret: It's so retro.
EGM: What does retro mean to you?
Parker: Like, old and outdated.
Home,My Studio,and another view |
|
|
Back to top
|
|
|
psioniclabs
Joined: Feb 04, 2009
Posts: 23
Location: Louisville, KY
|
| Posted: Wed Mar 31, 2010 3:45 pm Post subject:
|
|
|
Figured this is a good place to show off my panel rather than the troubleshooting thread I had it tucked away in. 


 |
|
|
Back to top
|
|
|
Danno Gee Ray
Joined: Sep 25, 2005
Posts: 1351
Location: Telford, PA USA
|
| Posted: Wed Mar 31, 2010 4:04 pm Post subject:
|
|
|
| Most Sick !! |
|
|
Back to top
|
|
|
Sound
Joined: Jun 06, 2006
Posts: 842
Audio files: 1
|
| Posted: Wed Mar 31, 2010 4:05 pm Post subject:
|
|
|
psioniclabs, the job that you did is just amazing, sincerely congratulations.
Actually Im thinking in a future mod my klee with new features, and I was thinking in also make a PCB for hold the front panel components, do you have reference numbers of potentiometers and switches? |
|
|
Back to top
|
|
|
Sound
Joined: Jun 06, 2006
Posts: 842
Audio files: 1
|
| Posted: Wed Mar 31, 2010 4:06 pm Post subject:
|
|
|
| Ops! they are pots with led? |
|
|
Back to top
|
|
|
kkissinger
Stream Operator
Joined: Mar 28, 2006
Posts: 1454
Location: Kansas City, Mo USA
Audio files: 45
|
|
|
Back to top
|
|
|
psioniclabs
Joined: Feb 04, 2009
Posts: 23
Location: Louisville, KY
|
|
|
Back to top
|
|
|
Sound
Joined: Jun 06, 2006
Posts: 842
Audio files: 1
|
| Posted: Thu Apr 01, 2010 2:26 pm Post subject:
|
|
|
Thanks very much for your reply psionicslabs. Do you have the link to that blog?
Last edited by Sound on Thu Apr 01, 2010 2:30 pm; edited 1 time in total |
|
|
Back to top
|
|
|
Sound
Joined: Jun 06, 2006
Posts: 842
Audio files: 1
|
| Posted: Thu Apr 01, 2010 2:29 pm Post subject:
|
|
|
kkisinger you designg is pretty elegant.
What is the material? steel painted? how do you print the labels? |
|
|
Back to top
|
|
|
kkissinger
Stream Operator
Joined: Mar 28, 2006
Posts: 1454
Location: Kansas City, Mo USA
Audio files: 45
|
| Posted: Thu Apr 01, 2010 9:28 pm Post subject:
|
|
|
| Sound wrote: | kkisinger you designg is pretty elegant.
What is the material? steel painted? how do you print the labels? |
Thank you, Sound.
The panels are 1/16" aluminum painted satin black. I used Front Designer software to design the panels and used DecalProFX to create the actual decals.
_________________
-- Kevin
http://kevinkissinger.com |
|
|
Back to top
|
|
|
fonik

Joined: Jun 07, 2006
Posts: 3950
Location: Germany
Audio files: 23
|
| Posted: Mon Jun 07, 2010 10:40 am Post subject:
|
|
|
i still have a 2nd set of klee2 PCBs in the drawer and i toy with the idea of building myself a eurorack module from it despite my backlog)! currently i shrunk it to 60HP using pushbuttons with built in LEDs (as seen on my LPG with gate controlled mode). i would replace the manual range selection switch by a voltage controlled switch.
what do you think? ideas?

_________________

cheers,
matthias
____________
Big Boss at fonitronik
Tech Buddy at Random*Source |
|
|
Back to top
|
|
|
kkissinger
Stream Operator
Joined: Mar 28, 2006
Posts: 1454
Location: Kansas City, Mo USA
Audio files: 45
|
| Posted: Mon Jun 07, 2010 10:59 am Post subject:
|
|
|
| fonik wrote: | | what do you think? ideas? |
Very efficient design.
Perhaps if you went with narrow knobs (such as are used on mixing consoles) so that you gain a little more clearance for turning the knobs.
In general, I have (thus far) designed for a little more horizontal clearance than vertical clearance because when I grab the knobs, my fingers are on the left and right side of the knob.
To combine the switches with LEDs is a great idea -- and certainly a space-saver!
_________________
-- Kevin
http://kevinkissinger.com |
|
|
Back to top
|
|
|
marmad
Joined: May 21, 2010
Posts: 7
Location: Netherlands
|
| Posted: Tue Jun 08, 2010 9:25 am Post subject:
|
|
|
Matthias - beautiful panel design. I would concur with kkissinger's idea about smaller knobs for a little more space between.
One other thing you might include (if it's important for you) is a switch for synchronous/asynchronous loading (although I'm not sure how it would fit into your design). I'm coming up with a simple mod for the Klee2 PCBs to provide that functionality if you're interested. |
|
|
Back to top
|
|
|
fonik
Joined: Jun 07, 2006
Posts: 3950
Location: Germany
Audio files: 23
|
| Posted: Tue Jun 08, 2010 1:29 pm Post subject:
|
|
|
thanks, marmad.
i think state machine offers a nice little project for synced loading. however, i am used to control my sequencers with dividers to keep/get them in sync. so no need for me.
good idea about the knobs! i wanted to keep it in a 16th row for clarity, so smaller knobs would be good. additional i thought about using slide switches for the gate buss. they need more space behind the front panel, but to the front end they are not in the way as toggles would be...
_________________
cheers,
matthias
____________
Big Boss at fonitronik
Tech Buddy at Random*Source |
|
|
Back to top
|
|
|
TheAncientOne

Joined: Dec 26, 2006
Posts: 144
Location: United Kingdom
|
| Posted: Thu Jun 10, 2010 6:20 am Post subject:
|
|
|
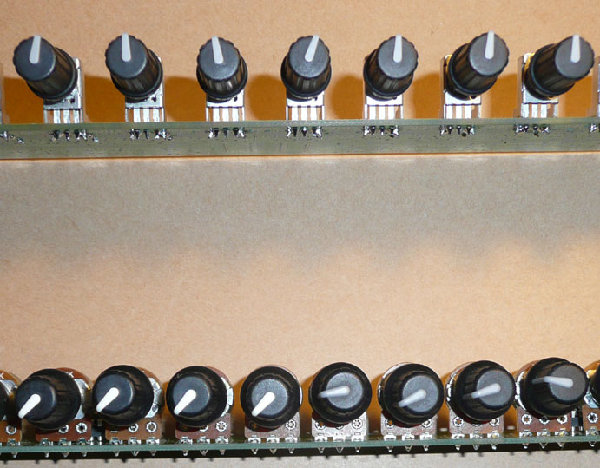
On the topic of knob sizes, here are two sequencer knob strips I'm working on. Both design for 19 inch rack mount panels.
Bottom one is part of a P3, designed to use the 16mm ReAn soft touch knobs a lot of us use. OK to twiddle, but a bit restricted.
Top one is a section of a 'Milton', (I'm currently shaking a few bugs out of he rather idiosyncratic design to make the LEDs work better). Pots are slightly wider spaced, and I got some ReAn P400s from Mouser. Much easier to use. I'm not sure if Mouser stock these in spline fit - they ones I got were for 'D' shaft knobs. The 'Milton' parts I got came with some Panasonic PCB mount pots. A big thank you to Tom Arnold for the kit, and to Cynthia Webster for advice on how to upgrade the LED and output drivers.
There is a little mentioned factor to think about here though: the 'gearing' effect of knob diameter vs fingers. Small knobs are harder to get fine settings with. Having started out in life with old valve, (tube), based test equipment, where a small knob was typically 20mm/0.75" diameter, and the main controls likely to be over 35mm / 1.5", I can certainly see the advantage in a big, wide spaced panel. Not many of us have the sort of space Raymond Scott had though, or would want to do all that walking up and down the synth. Good quality mixer style knobs are certainly a good idea in multiple arrays.
Some of you may have detected a slight sequencer fetish going on here......
| Description: |
|
| Filesize: |
88.27 KB |
| Viewed: |
751 Time(s) |
| This image has been reduced to fit the page. Click on it to enlarge. |
|
_________________
Mike |
|
|
Back to top
|
|
|
kkissinger
Stream Operator
Joined: Mar 28, 2006
Posts: 1454
Location: Kansas City, Mo USA
Audio files: 45
|
|
|
Back to top
|
|
|
arnoid

Joined: Aug 23, 2009
Posts: 57
Location: Belgium
|
| Posted: Wed Jan 05, 2011 3:51 am Post subject:
|
|
|
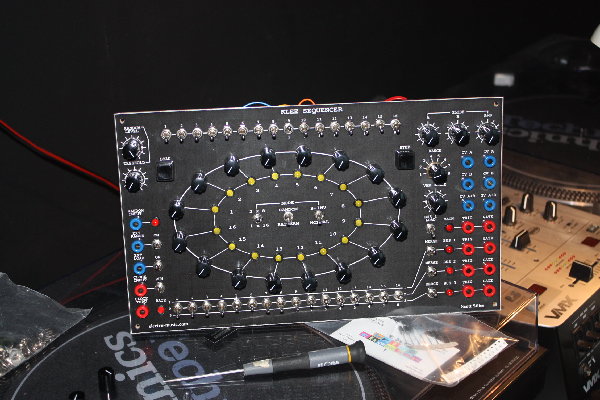
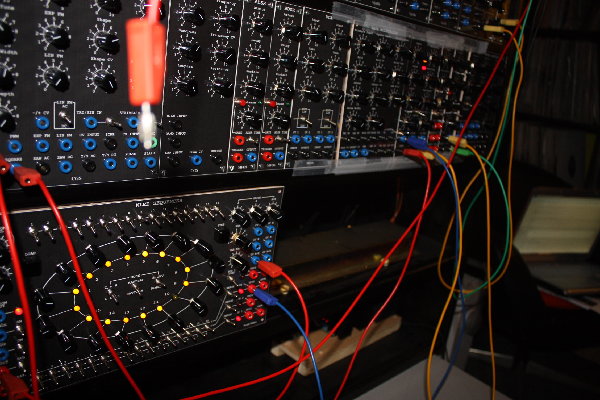
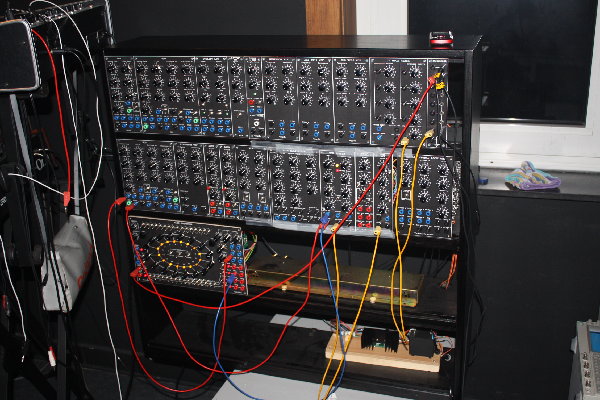
Finished my klee sequencer on the 28 of december 2010 and it worked directly though some switches where reversed (wire's) but that was an easy fix  . .
Verry powerful and versitale sequencer / tool !! I'm verry happy with it, the construction time was certainly worth the effort
The module is 4U (serge) like the rest of my modules.
I based my design on Thomas white's design but made a more compact version.
Don't look to the ugly tape on the other new modules I still have to screw them into the rack...
| Description: |
|
| Filesize: |
737.14 KB |
| Viewed: |
1629 Time(s) |
| This image has been reduced to fit the page. Click on it to enlarge. |
|
| Description: |
|
| Filesize: |
700.07 KB |
| Viewed: |
1569 Time(s) |
| This image has been reduced to fit the page. Click on it to enlarge. |
|
| Description: |
|
| Filesize: |
828.18 KB |
| Viewed: |
1602 Time(s) |
| This image has been reduced to fit the page. Click on it to enlarge. |
|
| Description: |
|
| Filesize: |
723.91 KB |
| Viewed: |
1671 Time(s) |
| This image has been reduced to fit the page. Click on it to enlarge. |
|
|
|
|
Back to top
|
|
|
haxster
Joined: Feb 01, 2006
Posts: 246
Location: MONTEREY PARK, CA 91754
G2 patch files: 2
|
| Posted: Wed Apr 13, 2011 12:17 am Post subject:
|
|
|
I am gearing up to make myself a Euro format Klee. I made a Front Control Panel PCB. I haven't ordered it yet. It's made to match the connectors for the Klee set. I don't know how I'm gonna mount the Actual Klee boards yet. Piggy back most likely. It is about 52HP wide

 [/img][/url] [/img][/url] |
|
|
Back to top
|
|
|
sneakthief

Joined: Jul 24, 2006
Posts: 569
Location: Berlin
|
|
|
Back to top
|
|
|
The Bad Producer

Joined: Mar 08, 2009
Posts: 282
Location: The Manhole
|
|
|
Back to top
|
|
|
mig27
Joined: Mar 09, 2011
Posts: 21
Location: Berlin
|
| Posted: Thu Jun 23, 2011 2:59 am Post subject:
Slide pots: Which lever length? |
|
|
Hey everyone,
I'm about to order Bourns LED slide pots for my Klee and was wondering which lever length is recommended if I mount them à la Krunkus.
There are 3 versions available: 10, 15 and 19mm.
I guess the latter?
Thanks!
Michael |
|
|
Back to top
|
|
|
State Machine
Janitor


Joined: Apr 17, 2006
Posts: 2810
Location: New York
Audio files: 24
|
| Posted: Tue Jun 28, 2011 4:42 pm Post subject:
|
|
|
| Quote: | There are 3 versions available: 10, 15 and 19mm.
I guess the latter? |
Yup, will give you the best resolution.
I just stopped in to see the latest panels and stuff and man, I am impressed with all this great work !!!
Bill |
|
|
Back to top
|
|
|
|

 Forum index » DIY Hardware and Software » Klee sequencer