Four pages back you can see my first Son of Storm Tide Flanger build - but I recently built another one for someone else, and took the opportunity to tweak the panel a little. I moved the pots around, so that the ones I was using the most were all at the top, and added the v/oct tracking knob I completely forgot on the first one.
is the panel realy that brownish? how did you do it? looks awesome! _________________
cheers,
matthias
____________
Big Boss at fonitronik
Tech Buddy at Random*Source
not finished yet, but i thought to share it anyways. i bought a mixer rackcase to house the next modules i build.
the lower 4U panel already holds my on-beat divider, the attenuverter, and the breakdown stepped filter (consisting of 8 multimode filters).
_________________
cheers,
matthias
____________
Big Boss at fonitronik
Tech Buddy at Random*Source
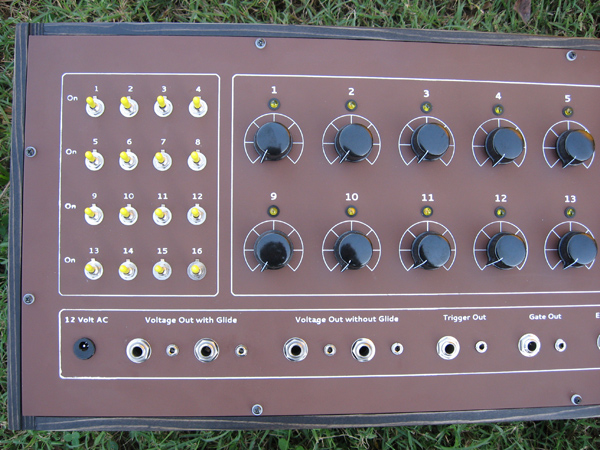
Yes it is a rust brown color. It is enamel paint. I am learning silk screening and finger joining wood. I got a sheet of AL, cut it to size, 3 coats primer, 6 coats paint, then silk screened the text. The box is ebony stain. Thanks for the nice comments.
not finished yet, but i thought to share it anyways. i bought a mixer rackcase to house the next modules i build.
the lower 4U panel already holds my on-beat divider, the attenuverter, and the breakdown stepped filter (consisting of 8 multimode filters).
Joined: Nov 08, 2006 Posts: 137 Location: new jersey, usa
Posted: Thu Oct 21, 2010 5:56 pm Post subject:
Hey Delayed!
Great job on the silk screening! The rust brown color is very cool! Can you tell us some more details on how you did the screen printing? What kind of ink did you use? Did you have the screen made and coated with emulsion for you? I am thinking of trying this as well, hope you can give some guidance!
Hi,
Nothing fancy because I am cheap. I am using normal quart/gallon enamel paint you get at any home store for the text and enamel spray paint for the primer and main color. I found that you really need plenty of coats of primer or the nuts will chip the paint easy. I leave it a day between coats for the primer and main color and 2-3 days for the text to dry.
Made my own screen with Speedball emulsion (I picked speedball because you can get 40-50% coupons from different hobby stores. It makes it the cheapest option. Nazdar it suppose to be the better brand to use for paint and emulsion) and got used screens off ebay and craiglist. You need over 200 for the text 300+ is better for the screens. I used light bulbs for the first panels I made. That works fine for sizes under 8x10. Over that you need another lamp/bulb for each 8x10 area. It takes lots of trial and error to figure out the burning of the screen. I got lucky and found a UV light table on craigstlist for this one. Which worked better than the hanging lights because this is almost 30 inches long. But as long as you are working under 8x10 a photobulb works fine.
This process takes a lot of time and effort for a single print. Silk screening is not really made for this. The set up fee on the cheap side is about 100+ dollars buying mostly used items. But on the other side I have lots of time at the moment and like learning new things. A print this size would have been 100s of dollars to get one made from the normal places that people use. This method also gives you nice results, (better with more practice) and a chance to pick out mostly any colors you want. The little things like tape, wood, hinges, cleaners, towels, squeegee add up the cost. Since you are in NJ I would think that you could find used items easy on the cheap to try it out.
Hopefully that helps a bit. There are lots of videos on the web for printing tees and posters but little about metal. The method is the same, just a change in the paint/clean up items.
"Can you tell us some more details on how you did the screen printing? What kind of ink did you use? Did you have the screen made and coated with emulsion for you? I am thinking of trying this as well, hope you can give some guidance! "
Joined: Mar 28, 2006 Posts: 1472 Location: Kansas City, Mo USA
Audio files: 45
Posted: Sat Oct 23, 2010 5:58 pm Post subject:
Just finished some CGS wave shapers Subject description: The CGS38 and CGS29
When I decided to order PCBs from CGS, I made a relatively large order to save on shipping costs. I included the CGS38 and CGS29 PCBs.
While designing the panels, I discovered that the CGS29 was too large to fit on one 9x3 panel and that the CGS38 would only use about half of a panel. Thus, I decided to design a double-width module containing both PCBs and all of the functions.
The result is to have four wave-processing functions on one 6"x9" panel.
These are all fun modules -- the most flexible is the Wave Multiplier (the left half of the panel) however all the modules will be useful.
PA220047_a.JPG
Description:
The front panel. The CGS38 is the Saw Shifter/Wave Multiplier section. All other functions are from the CGS29.
Filesize:
1.07 MB
Viewed:
259 Time(s)
This image has been reduced to fit the page. Click on it to enlarge.
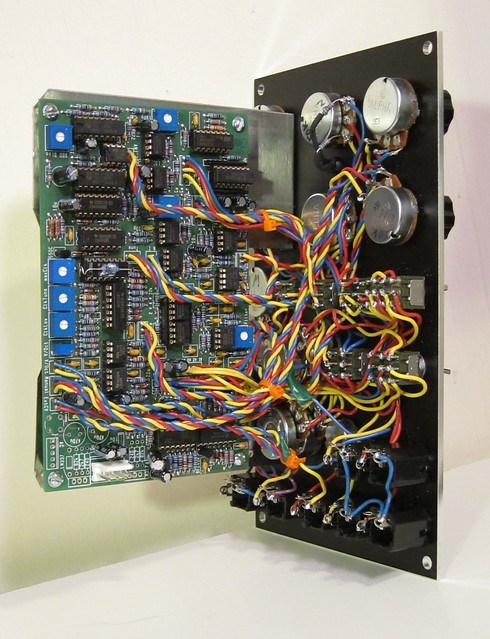
PA220049a.JPG
Description:
This view of the back shows the two PCBs -- the CGS29 is the larger one in front and you can see the edge of the smaller CGS38 board behind the large board.
Filesize:
927.55 KB
Viewed:
253 Time(s)
This image has been reduced to fit the page. Click on it to enlarge.
Official website for the designer here and my build report here.
I know it's very much the antithesis of the extremely clean (visually) modular synth stuff that makes up most of this thread, so sorry if it offends anyone! The truth is that I build nice electronics as my day job, so for my own stuff I just want to make it NOW instead of taking the time to make it really nice-looking. But I think this box has a certain appeal of its own...
Joined: Mar 28, 2006 Posts: 1472 Location: Kansas City, Mo USA
Audio files: 45
Posted: Sat Oct 23, 2010 6:45 pm Post subject:
Taylor wrote:
I know it's very much the antithesis of the extremely clean (visually) modular synth stuff that makes up most of this thread, so sorry if it offends anyone!
Well, of course, no offense! In fact, I'd never heard of the WTPA project and clicked through to the website. Appreciate you sharing this.
There are many different approaches to synth-building and I enjoy it all.
Once I decided to "back burner" my current build (which is focused on expanding the original Aries synth) I want to do some Lunetta-based building -- which is certainly a different approach.
I'm also interested to learn about programmable chips (I am a systems programmer by day). Thus, I appreciate your post and those of other people. _________________ -- Kevin http://kevinkissinger.com
BTW i finished a VC RingMod with a new panel running on 12V yesterday, using a SMD board:
_________________
cheers,
matthias
____________
Big Boss at fonitronik
Tech Buddy at Random*Source
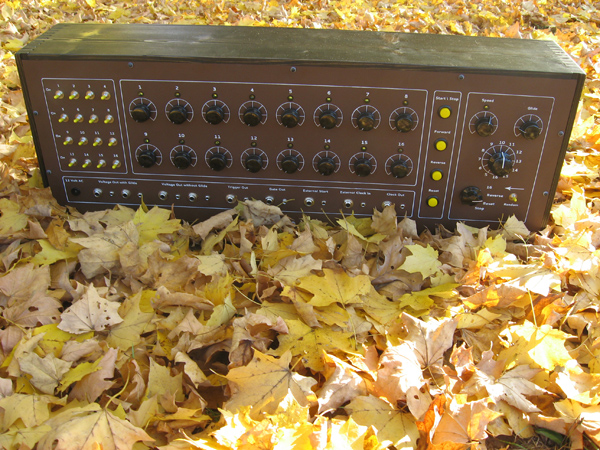
Update on my progress.. Thanks to my friend Robbie for the incredible craftsmanship on the cabinet. If anyone is looking for a cabinet of this quality, please feel free to PM me and I'll pass on the contact details.
ModularCabinet.jpg
Description:
Filesize:
969.29 KB
Viewed:
3398 Time(s)
This image has been reduced to fit the page. Click on it to enlarge.
Joined: Jan 17, 2010 Posts: 193 Location: ithaca, new york
Posted: Wed Oct 27, 2010 6:38 am Post subject:
Very nice Frequency Central, i'm going to try out your "parity" modulation on a super mu-tron biphase (modular biphase with selectable # of phase and regen stages, and odd/even regen, kind of a stripped down Scott Stites multiphase) i have on the breadboard, i quite like the sounds you are getting on the DIYstompboxes thread, fading between odd and even regen really puts it over the top.
thanks! I had no idea what you meant with the oto biscuit reference. I just googled it... I was expecting a biscuit tin! I can see the similarity though!
Joined: Feb 04, 2010 Posts: 393 Location: Providence, RI
Posted: Tue Nov 02, 2010 7:37 am Post subject:
Finally completed my MFOS combo mini-controller and v/oct calibrator. Padauk, bloodwood and ebony carcase with a custom MFOS glass marble as a knob. For the full build blog, see my sig below.
You cannot post new topics in this forum You cannot reply to topics in this forum You cannot edit your posts in this forum You cannot delete your posts in this forum You cannot vote in polls in this forum You cannot attach files in this forum You can download files in this forum

 Forum index » DIY Hardware and Software