| Author |
Message |
PHOBoS

Joined: Jan 14, 2010
Posts: 5947
Location: Moon Base
Audio files: 709
|
|
|
Back to top
|
|
 |
PHOBoS
Joined: Jan 14, 2010
Posts: 5947
Location: Moon Base
Audio files: 709
|
 Posted: Thu Feb 28, 2013 11:45 am Post subject:
Lun-A-Key Posted: Thu Feb 28, 2013 11:45 am Post subject:
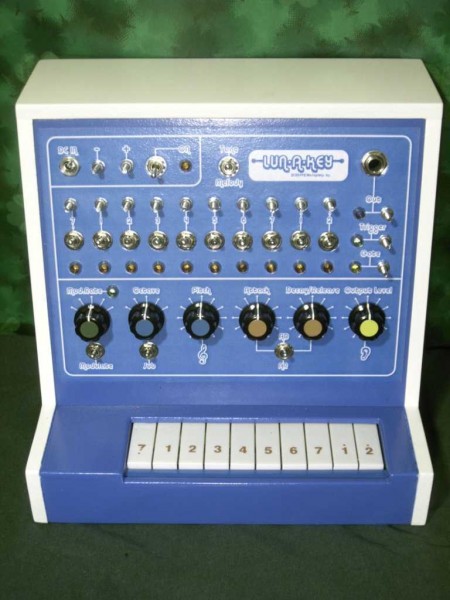
Lun-A-Key
Subject description: Power & SND Bufer + teaser demo |
  |
|
Some small bits, 3V power supply and the buffer to convert the keyboard output to a CMOS level.
AD/AR will follow. I just did some tests, and I think the 'problem' is not that it doesn't retrigger just that it doesn't dicharge the cap first, which is actually fine with me.
And here's a little teaser demo with some added reverb.
| Description: |
|
| Filesize: |
20.1 KB |
| Viewed: |
659 Time(s) |
| This image has been reduced to fit the page. Click on it to enlarge. |

|
| Description: |
| Lun-A-Key with added reverb |
|

Download (listen) |
| Filename: |
PHOBoS - Lun-A-Key - teaser demo.mp3 |
| Filesize: |
966.13 KB |
| Downloaded: |
1551 Time(s) |
_________________
"My perf, it's full of holes!"
http://phobos.000space.com/
SoundCloud BandCamp MixCloud Stickney Synthyards Captain Collider Twitch YouTube |
|
|
Back to top
|
|
|
PHOBoS
Joined: Jan 14, 2010
Posts: 5947
Location: Moon Base
Audio files: 709
|
| Posted: Thu Feb 28, 2013 3:55 pm Post subject:
|
|
|
some pre-final pics. The front panel did stay in place by itself but I secured it with some hotglue.
| Description: |
| PCB and keyboard all wired up. |
|
| Filesize: |
46.34 KB |
| Viewed: |
595 Time(s) |
| This image has been reduced to fit the page. Click on it to enlarge. |

|
| Description: |
| everything installed and ready to be closed up |
|
| Filesize: |
48.94 KB |
| Viewed: |
631 Time(s) |
| This image has been reduced to fit the page. Click on it to enlarge. |

|
_________________
"My perf, it's full of holes!"
http://phobos.000space.com/
SoundCloud BandCamp MixCloud Stickney Synthyards Captain Collider Twitch YouTube |
|
|
Back to top
|
|
|
PHOBoS
Joined: Jan 14, 2010
Posts: 5947
Location: Moon Base
Audio files: 709
|
| Posted: Thu Feb 28, 2013 6:18 pm Post subject:
|
|
|

| Description: |
|
| Filesize: |
56.81 KB |
| Viewed: |
642 Time(s) |
| This image has been reduced to fit the page. Click on it to enlarge. |

|
| Description: |
|
| Filesize: |
59.55 KB |
| Viewed: |
623 Time(s) |
| This image has been reduced to fit the page. Click on it to enlarge. |
|
| Description: |
|
| Filesize: |
67.25 KB |
| Viewed: |
603 Time(s) |
| This image has been reduced to fit the page. Click on it to enlarge. |

|
_________________
"My perf, it's full of holes!"
http://phobos.000space.com/
SoundCloud BandCamp MixCloud Stickney Synthyards Captain Collider Twitch YouTube |
|
|
Back to top
|
|
|
analog_backlash

Joined: Sep 04, 2012
Posts: 393
Location: Aldershot, UK
Audio files: 21
|
| Posted: Fri Mar 01, 2013 6:18 am Post subject:
|
|
|
The final results look great again PHOBoS 
Another construction question. How do you do your panel artwork? I do mine with an inkjet printer and a laminator, but I can't seem to get the results that you do. I have read about using wire-wool on the laminated print surface, to give it a matt finish (which I do). I just never seem to get the artwork smoothly glued down afterwards. 
Any tips?
Gary |
|
|
Back to top
|
|
|
Cynosure
Site Admin

Joined: Dec 11, 2010
Posts: 1029
Location: Toronto, Ontario - Canada
Audio files: 82
|
| Posted: Fri Mar 01, 2013 10:36 am Post subject:
|
|
|
Another awsome build phobos. great job!
_________________
JacobWatters.com |
|
|
Back to top
|
|
|
PHOBoS
Joined: Jan 14, 2010
Posts: 5947
Location: Moon Base
Audio files: 709
|
Posted: Fri Mar 01, 2013 11:33 am Post subject:
How to make frontpanels like PHOBoS
Subject description: step by step guide |
|
|
Thanks! Gary and Jake
let's see if I can give you a step by step rundown on how I do it.
step1: design a frontpanel, I use photoshop since I'm used to it,. but there are better programs for it. Can't give you much suggestions for it,
you'll learn and get better by doing it. And I get a lot of inspiration by watching what other people make. I do usually print out a
simplified greyscaled version, to get a better idea on how it will look. It's also useful to test if you have enough space for components.
step2: when you're completely satisfied with your design, print it (or better, wait untill after step 4). I use a laser printer myself (Samsung
CLP-320, not the best quality but good enough for me), You could use an inktjet, allthough that can get problematic with full color designs, or
maybe have it printed somewhere else.
step3: while I'm making the front design I also make a drill template, which only has crosshairs for the holes and an outline. Sometimes I leave
the text on there too so I know what all the holes are for. Then I use some painters tape to stick it to the panel and then drill all the holes.
- Put a piece of (flat) scrapwood underneath it so you get cleaner holes. After that sand the panel.
update: I now use sprayglue instead of tape which works much better
step 4: Next I paint the panel,. even when I'm covering it for the most part with a frontlabel. Might not be necessary, it depends a bit of
what you use to glue it together. I paint it using spraypaint, usually a couple layers of primer first and then 2 or more layers of color,
with some sanding in between. No clear coating though.
step5: during this painting process I prepare the frontlabel. I first cut it roughly to size, leaving an extra edge of ± 5 mm, using one of those
cheap plastic boxcutters. Always do a test cut first to see if it's sharp enough, else it might damage your nicely printed paper while cutting  . .
Next I add a layer of thin self adhesive plastic to the backside, and then I cut it neatly to size. The plastic I use is actually meant to print on
directly. link. It will add more strength to the paper so it doesn't tear up so easily, which I started doing because of the way I attach the
frontlabel to the panel. Which brings me to the next step.
step6a: When you have your frontlabel printed and cut and panel drilled and painted you have to stick them together. There are several ways
to do this. For my synthcases I used woodglue which is also why I needed to use the plastic else the paper would get all bubbly and tear very
easily. I apply it with a paintroller to the frontpanel. For my PWM Lunetta and this Lun-A-Key I used double adhesive tape instead link. It makes
it a bit more expensive, especially with larger panels, but it sticks better then the glue and adds some extra strenght and thickness. You could
leave the extra plastic layer off if you do it this way,. but it's nicer with. Another way is using spayglue, which I use for my modular lunetta
panels. But it's a bit more messy and doesn't always stick too well.
step6b: the most nerve racking part, glueing it together while trying to line everything up. Unless the label and panel are the same size
(which will makes corners peel off easy) you will need some backlight for this. sometimes a PC monitor will work or a simple light box or just
the sun using a window. When using woodglue you have a little bit of time to slightly adjust it, but with the double adhesive tape you only have
one shot at it. I don't just pull of the protective layer and then hope to get it stuck exactly right at the panel btw. I first pull off a little bit and fold
it back, then line up the part where it's still in place and when I think it's in the correct place I push down on the uncovered, sticky part. From there
on it's just slowly peeling it off while pushing the label on the panel.
step7: now you need to add a protective layer. You could use all kinds of stuff for this but what I use is woodglue, again applied with a paintroller  . .
Just the ordinary white stuff that dries transparent, allthough I've been using a special waterproof version of that lately. You have to work
quick though since it dries pretty fast. But it leaves a nice thick structered layer
step8: after you let this dry (it dries fast but I wait at least an hour). You can cut the holes in the label. I do this by first making some starshaped *
cuts with an exacto knife, and then use a round file. Takes a bit of practise but you get the hang of it after a couple of holes. I always wear a glove
on the hand I use to hold the panel. The glue protects but isn't rocksolid (especially not after 1 hour) And I don't want my fingerprints embedded in it.
and that's it.
_________________
"My perf, it's full of holes!"
http://phobos.000space.com/
SoundCloud BandCamp MixCloud Stickney Synthyards Captain Collider Twitch YouTube
Last edited by PHOBoS on Fri Jan 02, 2015 5:54 pm; edited 2 times in total |
|
|
Back to top
|
|
|
analog_backlash
Joined: Sep 04, 2012
Posts: 393
Location: Aldershot, UK
Audio files: 21
|
| Posted: Fri Mar 01, 2013 2:05 pm Post subject:
|
|
|
Well, that's certainly given me something to think about! Thanks for the in-depth description - I'll probably need to read it a couple of times more to take it all in. You obviously do get good results, so it must be worth all the effort
Gary |
|
|
Back to top
|
|
|
PHOBoS
Joined: Jan 14, 2010
Posts: 5947
Location: Moon Base
Audio files: 709
|
| Posted: Fri Mar 01, 2013 3:49 pm Post subject:
|
|
|
yeah you'll probably have to read it a couple of times,.but if you have any questions, just ask. I tried to find an inexpensive not too hard way, that
gives good results, and this is how I do it at the moment. But the process migth change in the future. A nice and simple way is how Dave (Skrog
Productions) does it, which is print it on vinyl (I assume it's self adhesive). But you would have to know a place that can do that for you.
There are things available for printers too, but the first one I tried (suitable for laser printers it said) kinda melted and it took me a lot of time to
get my printer clean again, and I just got it  . So I'm a bit reluctant now to try stuff like that. . So I'm a bit reluctant now to try stuff like that.
----------------
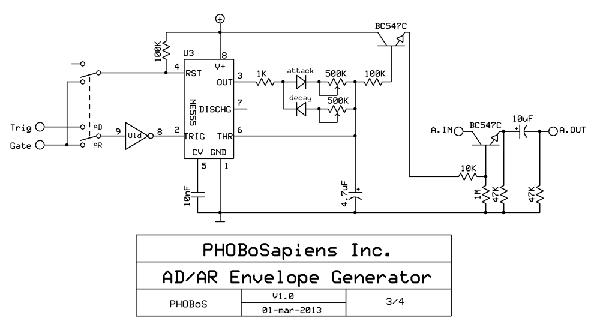
anyway I hadn't posted the schematic for the AD/AR envelope generator yet so here it is.
It's a very basic setup with a single 555, allthough this time I didn't use the discharge pin (7) for the decay/release but pin 3 aswell. I think
I got this idea from a schematic posted in the Schematics Vault but I can't seem to find it right now. Here's how it works:
Starting in AD mode. The 555 get's a trigger pulse (inverted by U1d), which will make the output (pin3) go high. This will charge the
timing capacitor untill it reaches the treshold level (measured by pin 6) and then the ouput will go low again which discharges the cap.
Charge and discharge times are of course adjustable with the two 500K pots.
In AR mode the same thing happens but with a few differences. Because the trigger input of the 555 is connected to the keyboard Gate instead
of Trigger output, it's output will stay high as long as you hold a key down. Only after you release the key it will discharge. Normally it would only
discharge once it has reached the treshold level, but this is were the connection to the reset pin comes in to play. As soon as you release the
key it wil reset the 555 which will make it's ouput low instantly.
Of course so far it's just a varying voltage, now to use it for something. The first thing is a buffer transistor, which functions pretty much the
same as an opamp configured as a voltage follower. I didn't want to use any opamps and since it's a self contained circuit a simple transistor
was good enough. This transistor drives another transistor which actually controls the amplitude of the signal. (VCA). The resistor values
are just the first ones I tried and it worked instantly So I left it at that. I did replace the 47K output resistor with a 47K pot for level control.
| Description: |
|
| Filesize: |
34.19 KB |
| Viewed: |
861 Time(s) |
| This image has been reduced to fit the page. Click on it to enlarge. |
|
_________________
"My perf, it's full of holes!"
http://phobos.000space.com/
SoundCloud BandCamp MixCloud Stickney Synthyards Captain Collider Twitch YouTube
Last edited by PHOBoS on Sat Mar 02, 2013 9:27 am; edited 1 time in total |
|
|
Back to top
|
|
|
PHOBoS
Joined: Jan 14, 2010
Posts: 5947
Location: Moon Base
Audio files: 709
|
| Posted: Sat Mar 02, 2013 8:34 am Post subject:
Lun-A-Key demos |
|
|
2 demos, first one demonstrates the different sounds. First stepping through octaves, then again with suboctave added and then some variations
with the modulation added. After that some different AD settings and pitch control demo. The second one has a VCO added for some extra
background sounds.
Sequencing was done with a modular lunetta patch involving a 4040, 4017 and some other logic.
| Description: |
|
Download (listen) |
| Filename: |
PHOBoS - Lun-A-Key - demo.mp3 |
| Filesize: |
2.64 MB |
| Downloaded: |
1674 Time(s) |
| Description: |
|
Download (listen) |
| Filename: |
PHOBoS - Lun-A-Key - seqdemo.mp3 |
| Filesize: |
4.95 MB |
| Downloaded: |
1666 Time(s) |
_________________
"My perf, it's full of holes!"
http://phobos.000space.com/
SoundCloud BandCamp MixCloud Stickney Synthyards Captain Collider Twitch YouTube |
|
|
Back to top
|
|
|
elmegil

Joined: Mar 20, 2012
Posts: 2179
Location: Chicago
Audio files: 16
|
| Posted: Sat Mar 02, 2013 12:15 pm Post subject:
|
|
|
Now you need to do a cover of Autobahn with those sounds  |
|
|
Back to top
|
|
|
Antimon
Joined: Jan 18, 2005
Posts: 4145
Location: Sweden
Audio files: 371
G2 patch files: 100
|
|
|
Back to top
|
|
|
droffset

Joined: Feb 02, 2009
Posts: 515
Location: London area
Audio files: 2
|
|
|
Back to top
|
|
|
PHOBoS
Joined: Jan 14, 2010
Posts: 5947
Location: Moon Base
Audio files: 709
|
|
|
Back to top
|
|
|
garcho

Joined: Sep 28, 2011
Posts: 41
Location: Richmond, VA
Audio files: 2
|
| Posted: Mon May 05, 2014 3:55 pm Post subject:
|
|
|
absolutely stunning, bravo!
_________________
"The life of a repo man is always intense." |
|
|
Back to top
|
|
|
karczilla

Joined: Dec 10, 2014
Posts: 34
Location: nyc
|
| Posted: Fri Jan 02, 2015 1:43 pm Post subject:
|
|
|
great stuff phobos  |
|
|
Back to top
|
|
|
PHOBoS
Joined: Jan 14, 2010
Posts: 5947
Location: Moon Base
Audio files: 709
|
|
|
Back to top
|
|
|
|

 Forum index » DIY Hardware and Software » Lunettas - circuits inspired by Stanley Lunetta


