| Author |
Message |
PHOBoS

Joined: Jan 14, 2010
Posts: 5911
Location: Moon Base
Audio files: 709
|
 Posted: Sat Oct 01, 2016 5:36 am Post subject:
Scraprack Posted: Sat Oct 01, 2016 5:36 am Post subject:
Scraprack
Subject description: Moon Base studio gear rack |
  |
|
I am currently working on a rack for some gear made from scrap wood.
| Description: |
|
| Filesize: |
137.62 KB |
| Viewed: |
862 Time(s) |
| This image has been reduced to fit the page. Click on it to enlarge. |

|
| Description: |
|
| Filesize: |
128.44 KB |
| Viewed: |
875 Time(s) |
| This image has been reduced to fit the page. Click on it to enlarge. |

|
| Description: |
|
| Filesize: |
129.22 KB |
| Viewed: |
854 Time(s) |
| This image has been reduced to fit the page. Click on it to enlarge. |

|
_________________
"My perf, it's full of holes!"
http://phobos.000space.com/
SoundCloud BandCamp MixCloud Stickney Synthyards Captain Collider Twitch YouTube |
|
|
Back to top
|
|
 |
Cfish

Joined: Feb 24, 2016
Posts: 477
Location: Indiana
|
| Posted: Sat Oct 01, 2016 4:59 pm Post subject:
|
|
|
| Oooooooo that looks like mega fun to fill up. |
|
|
Back to top
|
|
|
Cfish
Joined: Feb 24, 2016
Posts: 477
Location: Indiana
|
| Posted: Mon Oct 03, 2016 2:06 pm Post subject:
|
|
|
| I'm sorta disappointed that it's not filling up yet. LOL |
|
|
Back to top
|
|
|
PHOBoS
Joined: Jan 14, 2010
Posts: 5911
Location: Moon Base
Audio files: 709
|
| Posted: Mon Oct 03, 2016 2:54 pm Post subject:
|
|
|

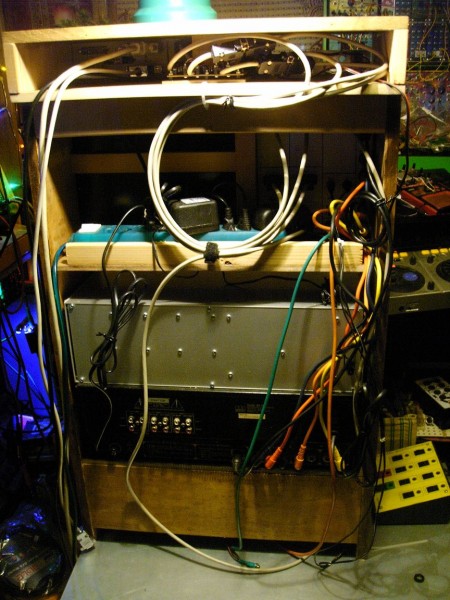
In theory it is actually pretty much filled up, I have all the gear to put in there. But it is also going to have a panel with some in/outputs,
so I have to figure out what I am going to put on there. One thing will be the CV control for the PSK DD2000 Digital Delay and I am going
to put the connectors for the 'Melt-yer-Face' on there. I also need to order the connectors for it and it will take a couple of weeks before
those arrive. But here's a teaser pic just for you which also shows where the panel is located. (next to the WoggleBug XL).
| Description: |
|
| Filesize: |
185.25 KB |
| Viewed: |
899 Time(s) |
| This image has been reduced to fit the page. Click on it to enlarge. |

|
| Description: |
|
| Filesize: |
209.67 KB |
| Viewed: |
855 Time(s) |
| This image has been reduced to fit the page. Click on it to enlarge. |

|
_________________
"My perf, it's full of holes!"
http://phobos.000space.com/
SoundCloud BandCamp MixCloud Stickney Synthyards Captain Collider Twitch YouTube |
|
|
Back to top
|
|
|
Cfish
Joined: Feb 24, 2016
Posts: 477
Location: Indiana
|
| Posted: Mon Oct 03, 2016 3:50 pm Post subject:
|
|
|
very nice. Now you need a fish module that makes close to tone bubble sounds.
You are awesome. Thank you so much for what you give to the DIY world.
You are an inspiratiion to me and many others. |
|
|
Back to top
|
|
|
blue hell
Site Admin

Joined: Apr 03, 2004
Posts: 24590
Location: The Netherlands, Enschede
Audio files: 309
G2 patch files: 320
|
| Posted: Mon Oct 03, 2016 4:35 pm Post subject:
|
|
|
| Cfish wrote: | | You are an inspiratiion to me and many others. |
I fully agree with that 
A fish module would be cool too but be careful.. what you wish may come true 
_________________
Jan
also .. could someone please turn down the thermostat a bit.
 |
|
|
Back to top
|
|
|
PHOBoS
Joined: Jan 14, 2010
Posts: 5911
Location: Moon Base
Audio files: 709
|
|
|
Back to top
|
|
|
Cfish
Joined: Feb 24, 2016
Posts: 477
Location: Indiana
|
| Posted: Mon Oct 03, 2016 6:32 pm Post subject:
|
|
|
Ok, if I have a choice? A modulated sample of fish farts'(Would entirely sum up my life) I love it.
The project is looking good. |
|
|
Back to top
|
|
|
PHOBoS
Joined: Jan 14, 2010
Posts: 5911
Location: Moon Base
Audio files: 709
|
|
|
Back to top
|
|
|
PHOBoS
Joined: Jan 14, 2010
Posts: 5911
Location: Moon Base
Audio files: 709
|
| Posted: Fri Nov 11, 2016 2:30 pm Post subject:
|
|
|
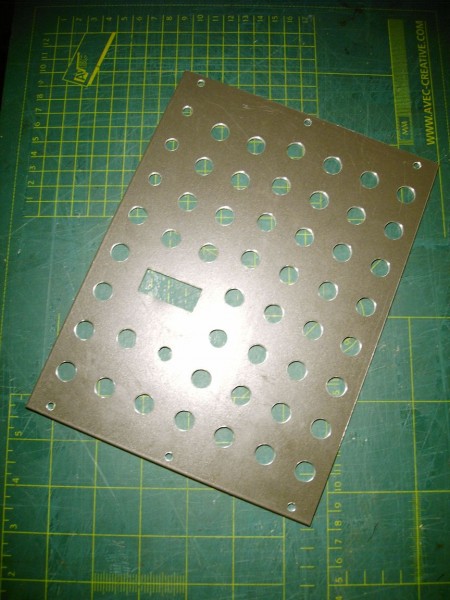
I drilled some holes. Usually I print out a drill template and than stick it on with some spray-glue and secure it with some masking tape.
However the 'problem' with it is that once you start drilling the paper tears away. I do always use a centre punch before but it is useful to
still have a reference when drilling. This time I had stuck the drill template to some thin cardboard just for testing the spacing and if it would
fit in the rack and I decided to use that for drilling too as a test. So I secured it to the (aluminium) panel punched holes and started drilling.
This actually worked great so I will probably use this method in the future too.
For attaching the final front layout to the panel I usually use special, very thin, double sided adhesive tape. At least for aluminium panels.
But I don't have any at the moment and I wondered if (PVA) woodglue would work. Sticks great to paper and I use it for wooden panels but
I had no idea if it would work well on aluminium. So I did a small test and it seems to hold on very well 
| Description: |
| Panel with drill template and 'centre-punched' holes |
|
| Filesize: |
128.9 KB |
| Viewed: |
830 Time(s) |
| This image has been reduced to fit the page. Click on it to enlarge. |

|
| Description: |
|
| Filesize: |
160.72 KB |
| Viewed: |
793 Time(s) |
| This image has been reduced to fit the page. Click on it to enlarge. |
|
_________________
"My perf, it's full of holes!"
http://phobos.000space.com/
SoundCloud BandCamp MixCloud Stickney Synthyards Captain Collider Twitch YouTube |
|
|
Back to top
|
|
|
PHOBoS
Joined: Jan 14, 2010
Posts: 5911
Location: Moon Base
Audio files: 709
|
|
|
Back to top
|
|
|
Cfish
Joined: Feb 24, 2016
Posts: 477
Location: Indiana
|
| Posted: Sun Nov 13, 2016 9:29 am Post subject:
|
|
|
Looking good.
Broke the iron on my soldering station today, so cabinet building is what I will be doing too. |
|
|
Back to top
|
|
|
PHOBoS
Joined: Jan 14, 2010
Posts: 5911
Location: Moon Base
Audio files: 709
|
| Posted: Sun Nov 27, 2016 3:04 pm Post subject:
|
|
|
I mounted the switches to the top by first mounting them on a piece of thin MDF and screwing that to the top. I also added
a cover so I can put something on top. I made it in such a way that it can be removed to have access to the connectors on
the back of the switches. I have some extra space left next to the switches and I am not sure what I will add there, but I
did order a LED strip which I want to mount under the protruding top so maybe I will add a dimmer for that.
| Description: |
|
| Filesize: |
143.62 KB |
| Viewed: |
655 Time(s) |
| This image has been reduced to fit the page. Click on it to enlarge. |

|
| Description: |
|
| Filesize: |
187.97 KB |
| Viewed: |
645 Time(s) |
| This image has been reduced to fit the page. Click on it to enlarge. |

|
_________________
"My perf, it's full of holes!"
http://phobos.000space.com/
SoundCloud BandCamp MixCloud Stickney Synthyards Captain Collider Twitch YouTube |
|
|
Back to top
|
|
|
Skrog Productions

Joined: Jan 07, 2009
Posts: 1225
Location: Scottish Borders
Audio files: 160
|
| Posted: Sun Dec 04, 2016 3:42 am Post subject:
|
|
|
nice multi pole rotary switches Pho , are they screw terminal or solder on for the wires ?
Dave. |
|
|
Back to top
|
|
|
PHOBoS
Joined: Jan 14, 2010
Posts: 5911
Location: Moon Base
Audio files: 709
|
| Posted: Mon Dec 05, 2016 4:14 pm Post subject:
|
|
|
those switches have solder connections,.. a lot of them.
I received the LED strip so mounted that one today and it works great . The whole strip was actually made of 2 parts that were soldered together
and one of them was just the right length. So I removed the solder and split it in half. I used two pieces of wood, one to mount the strip on and one
to cover it so I don't get blinded by it because it is pretty bright. And it also looks better than seeing all the individual LEDs. Although the strip came
with an adhesive backside I did use some epoxy to secure it to make sure it woud stick.
| Description: |
|
| Filesize: |
167.69 KB |
| Viewed: |
621 Time(s) |
| This image has been reduced to fit the page. Click on it to enlarge. |

|
| Description: |
|
| Filesize: |
166.11 KB |
| Viewed: |
640 Time(s) |
| This image has been reduced to fit the page. Click on it to enlarge. |

|
| Description: |
|
| Filesize: |
192.88 KB |
| Viewed: |
635 Time(s) |
| This image has been reduced to fit the page. Click on it to enlarge. |

|
| Description: |
|
| Filesize: |
167.21 KB |
| Viewed: |
669 Time(s) |
| This image has been reduced to fit the page. Click on it to enlarge. |

|
_________________
"My perf, it's full of holes!"
http://phobos.000space.com/
SoundCloud BandCamp MixCloud Stickney Synthyards Captain Collider Twitch YouTube
Last edited by PHOBoS on Mon Dec 05, 2016 6:35 pm; edited 1 time in total |
|
|
Back to top
|
|
|
Cfish
Joined: Feb 24, 2016
Posts: 477
Location: Indiana
|
| Posted: Mon Dec 05, 2016 5:52 pm Post subject:
|
|
|
| Looking good PhoBos. |
|
|
Back to top
|
|
|
PHOBoS
Joined: Jan 14, 2010
Posts: 5911
Location: Moon Base
Audio files: 709
|
| Posted: Wed Dec 07, 2016 4:06 pm Post subject:
|
|
|
Thanks Cfish 
I got all the connectors so those are now installed on the panel. They are mounted on some perfboard connected to angled pin headers.
The idea is to use them together with dupont jumper cables with female connectors, which I'll cut in half and solder to Sub-D connectors.
These have to be mounted on the outside of the backpanel so this way I don't have to run wires though the panel and then solder everything up.
And if I make a mistake somewhere I don't have to desolder anything but just have to reorder the female connectors on the pin headers.
| Description: |
|
| Filesize: |
245.17 KB |
| Viewed: |
613 Time(s) |
| This image has been reduced to fit the page. Click on it to enlarge. |

|
| Description: |
|
| Filesize: |
247.36 KB |
| Viewed: |
602 Time(s) |
| This image has been reduced to fit the page. Click on it to enlarge. |

|
_________________
"My perf, it's full of holes!"
http://phobos.000space.com/
SoundCloud BandCamp MixCloud Stickney Synthyards Captain Collider Twitch YouTube
Last edited by PHOBoS on Thu Dec 08, 2016 12:24 pm; edited 1 time in total |
|
|
Back to top
|
|
|
PHOBoS
Joined: Jan 14, 2010
Posts: 5911
Location: Moon Base
Audio files: 709
|
|
|
Back to top
|
|
|
Grumble

Joined: Nov 23, 2015
Posts: 1320
Location: Netherlands
Audio files: 30
|
| Posted: Thu Dec 08, 2016 3:22 am Post subject:
|
|
|
Nice project!
What does the Casio SK1 doe? |
|
|
Back to top
|
|
|
Cfish
Joined: Feb 24, 2016
Posts: 477
Location: Indiana
|
| Posted: Thu Dec 08, 2016 6:06 am Post subject:
|
|
|
Well that PWM link and the discussion on cmos versus bipolar 555s may have just shined a bright light on a problem I was having.
I almost passed it up because I had no need to dim LEDs right now.
Quick switch of 555s and my problem is gone.
Apparently I used a cmos during testing, and grabbed a bipolar out in the final build and the problem showed up.
Thanks PhoBoS. That was a big help without me asking. |
|
|
Back to top
|
|
|
PHOBoS
Joined: Jan 14, 2010
Posts: 5911
Location: Moon Base
Audio files: 709
|
| Posted: Thu Dec 08, 2016 12:22 pm Post subject:
|
|
|
great to hear that was actually useful
about the SK1, in case you are not familiar with it, it is a (lofi) sampling keyboard. So you can record something and then play it back
at different frequencies. It has an internal microphone, external mic input and a line input and this line input is what I use most the of time.
To get the best possible sound quality the signal you want to sample needs to be at a certain level, too low and you get noise, too high and
it distorts. However there is no way of telling if the level is correct except for just trying it out. So on the panel I added a level control, which
is just an attenuator, a level meter and a peak indicator. It doesn't work perfect but it gives me some idea if the level is within the correct range.
On the backside there is an input which is normalized to the front input (or is that the other way around ?) so when I plug something into the
front it will use that signal else it will use what I have connected to the back. I wil plug an output from my mixer into the back so I can sample
whatever is connected to the mixer but I can also connect something else using the input on the frontpanel.
_________________
"My perf, it's full of holes!"
http://phobos.000space.com/
SoundCloud BandCamp MixCloud Stickney Synthyards Captain Collider Twitch YouTube |
|
|
Back to top
|
|
|
Grumble
Joined: Nov 23, 2015
Posts: 1320
Location: Netherlands
Audio files: 30
|
| Posted: Thu Dec 08, 2016 2:04 pm Post subject:
|
|
|
The first thing I did was googling what an SK1 is, but all I could find was a Casio sampling keyboard.
So you canibalised it and turned it into a module? Nice! |
|
|
Back to top
|
|
|
PHOBoS
Joined: Jan 14, 2010
Posts: 5911
Location: Moon Base
Audio files: 709
|
| Posted: Thu Dec 08, 2016 2:42 pm Post subject:
|
|
|
oh no, I didn't cannibalize it, although I guess you could make a very nice module out of it. It is going to be in the bottom space of the rack.
What I have in the panel is just the level control which will be plugged into the line-in of the SK-1. Someday I will circuit bent it though, you can
do some awesome stuff with it that way but that is going to be a BIG project. So for now I just leave it as it is.
_________________
"My perf, it's full of holes!"
http://phobos.000space.com/
SoundCloud BandCamp MixCloud Stickney Synthyards Captain Collider Twitch YouTube |
|
|
Back to top
|
|
|
PHOBoS
Joined: Jan 14, 2010
Posts: 5911
Location: Moon Base
Audio files: 709
|
| Posted: Mon Dec 12, 2016 3:39 pm Post subject:
|
|
|
The panel is finished & mounted and so far everything seems to be working. I did run into a small problem though: The switches have some logic
chips in them which are powered by 12V (from my modular lunetta), however the outputs from my drum controller (and most of the gate outputs
from my modular) are only 5V which is too low. So I soldered up a bunch of comparators and that solved the issue. I also had to make a bunch
of cables to connect everything.
| Description: |
|
| Filesize: |
164.68 KB |
| Viewed: |
571 Time(s) |
| This image has been reduced to fit the page. Click on it to enlarge. |

|
| Description: |
|
| Filesize: |
109.11 KB |
| Viewed: |
545 Time(s) |
| This image has been reduced to fit the page. Click on it to enlarge. |

|
| Description: |
|
| Filesize: |
199.65 KB |
| Viewed: |
621 Time(s) |
| This image has been reduced to fit the page. Click on it to enlarge. |

|
| Description: |
|
| Filesize: |
217.9 KB |
| Viewed: |
620 Time(s) |
| This image has been reduced to fit the page. Click on it to enlarge. |

|
| Description: |
|
| Filesize: |
198.07 KB |
| Viewed: |
600 Time(s) |
| This image has been reduced to fit the page. Click on it to enlarge. |

|
_________________
"My perf, it's full of holes!"
http://phobos.000space.com/
SoundCloud BandCamp MixCloud Stickney Synthyards Captain Collider Twitch YouTube |
|
|
Back to top
|
|
|
PHOBoS
Joined: Jan 14, 2010
Posts: 5911
Location: Moon Base
Audio files: 709
|
| Posted: Thu Dec 15, 2016 9:33 am Post subject:
|
|
|
It is pretty much finished and installed  The bracket I used for the LED dimmer is temporary untill I know what I else I want to put in there. The bracket I used for the LED dimmer is temporary untill I know what I else I want to put in there.
I also have a free slot for a 1U rack unit but I am not sure yet what I'll use it for, I do have spring reverb that would fit. Now I need some
longer patch cables, too bad that the max size of the ones I use seem to be 90cm, 120cm would be nice. I guess I could use some couplers.
And I finally have a place for my Chromotron
| Description: |
|
| Filesize: |
214.37 KB |
| Viewed: |
609 Time(s) |
| This image has been reduced to fit the page. Click on it to enlarge. |
|
| Description: |
|
| Filesize: |
265.76 KB |
| Viewed: |
621 Time(s) |
| This image has been reduced to fit the page. Click on it to enlarge. |

|
| Description: |
|
| Filesize: |
275.34 KB |
| Viewed: |
605 Time(s) |
| This image has been reduced to fit the page. Click on it to enlarge. |

|
_________________
"My perf, it's full of holes!"
http://phobos.000space.com/
SoundCloud BandCamp MixCloud Stickney Synthyards Captain Collider Twitch YouTube |
|
|
Back to top
|
|
|
|

 Forum index » DIY Hardware and Software » Stickney Synthyards


