Joined: Dec 23, 2005 Posts: 4127 Location: Mount Hope, KS USA
Audio files: 96
Posted: Fri Feb 20, 2009 8:11 pm Post subject:
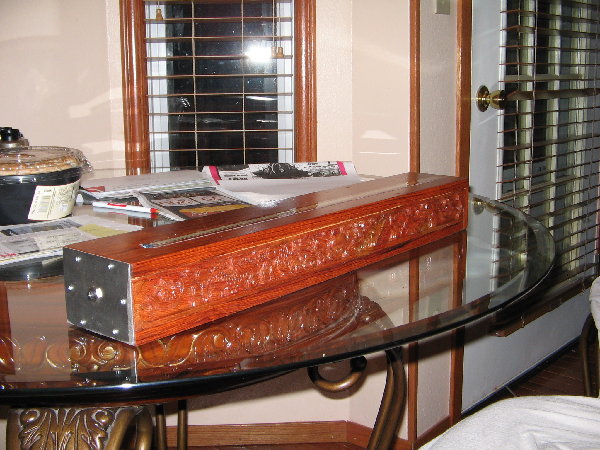
Here's my Dragon Controller.
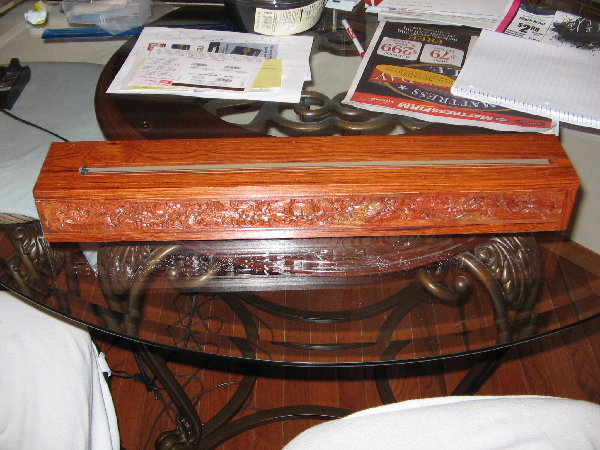
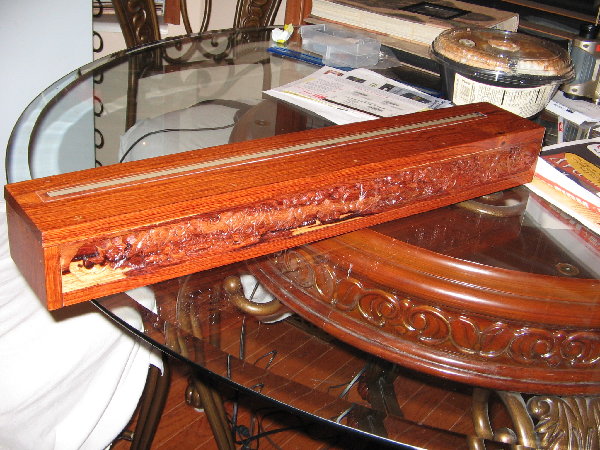
These pictures really don't do it justice - the inlay is exquisite. Each side of the controller has two Asian dragons and other motifs. It was done by a guy in Vietnam, and further worked by my father-in-law. The wood is called "Cam Lai", which I think is Barian Kingwood. It's an extremely hard, dense and heavy wood, and quite beautiful. It's very much prized by the workmen in VN. It's a dark wood that is marbled occasionally by lighter shades of blonde. This controller, I'd say, weighs somewhere between six and eight pounds, if not more. it has some considerable heft to it. It feels like a musical instrument, and it certainly doesn't move around when I play it. I had the ribbon offset as I plan to incorporate some system of positional notation, as an inlay, much like THeff did.
My wife did a lot of the work on it; she applied the ribbon and cut the hole for the connection inside. It's hollow, and the TRS connector connects to the ribbon with a SIP connector. The bottom is attached by screws, should I ever need to go in and attach a new ribbon, which I don't anticipate ever having to do. It sure made connecting this one a snap. This is an excellent connection - the SIP pins are gold plated on the contacts and it works really well. The longest cable I have is six foot, and it works with the Appendage circuitry perfectly; I imagine even much longer cables would pose no problem judging by the success of using a six foot cable. It's a real pleasure to cradle this thing in my lap and play it.
The Appendage board is working superbly for me. The other proto-testers are on the cusp of finishing theirs up. It's very solid, acquires like a dream, and all the voltages and modes are doing just what they're supposed to do.
Hopefully I can cut a video of the dragon in action this weekend.
Cheerios,
Scott
dragon 001.jpg
Description:
Filesize:
938.7 KB
Viewed:
284 Time(s)
This image has been reduced to fit the page. Click on it to enlarge.
dragon 002.jpg
Description:
Filesize:
959.05 KB
Viewed:
268 Time(s)
This image has been reduced to fit the page. Click on it to enlarge.
dragon 003.jpg
Description:
Filesize:
890.95 KB
Viewed:
256 Time(s)
This image has been reduced to fit the page. Click on it to enlarge.
dragon 004.jpg
Description:
Filesize:
1.01 MB
Viewed:
275 Time(s)
This image has been reduced to fit the page. Click on it to enlarge.
Joined: Dec 23, 2005 Posts: 4127 Location: Mount Hope, KS USA
Audio files: 96
Posted: Sat Feb 21, 2009 10:05 am Post subject:
Thanks guys, I'll pass the word on to the people that actually did the work (my wife, father-in-law, and the guy in Vietnam who did the original carving). Believe me, if it would have been me that went after that wood, it would look more like this:
I suppose I'm using the wrong terminology - the sides are carved - I called it inlay; not sure if that's correct.
Man, I'm about ready to buy THeff a ticket to Kansas - he's such a good narrator. I'd like to narrate a vid now that the controls are no longer a miasma of breadboardery and can be seen, but my Kansas drawl combined with my utter lack of presentational skills are something of an impediment.....
Very beautiful peice of kit there Scott!
With the softpot lying across the top like that, it looks a bit like an enormous incense box.
Not the kind you want to see any smoke eminating from though. _________________ What makes a space ours, is what we put there, and what we do there.
That looks awesome! Your design is worthy of an enclosure like that
I have been working on a PIC controlled, multi-postion footswitch to go with the Appendage. Right now the design uses a DG-211 switch and can be set to SP4T, or DPDT.
In the SP4T mode it will sequence with each press of the footswitch, or toggle to 1 of 4 positions based on a CV. The CV mode will allow you to use a variable foot pedal (one with a pot in it) to have 4 postions based on foot pressure.
In the DPDT mode you can set it to latch or just be a momentary switch. I have a finished design that works very well, but I think I am going to add a second DG-211 so it will be a DP4T design. This will allow you to switch a CV and an audio path in all 4 postions.
Another idea is to have a foot switch bank with 4 separate switches. This way you don't have to sequence through to get to a specific patch.
Joined: Dec 23, 2005 Posts: 4127 Location: Mount Hope, KS USA
Audio files: 96
Posted: Sat Feb 21, 2009 3:47 pm Post subject:
Thanks guys. I shot a video, but when I went to play it back, the video camera said "nuh-uh". I think it's thrown a rod, which wouldn't surprise me. It went to Vietnam a few months back and returned with a nice dent in the front of it.
Great ideas, there THeff! I think a switch like that, or even Fonik's switch module would be great for this and other devices as well. Man - there are so many times I want to switch from triggering to gating to triggering and gating my EG, but I can only do that by pulling out and plugging in patch cords at this point. _________________ My Site
Wow!!
Great Video Scott.
I'm gonna nominate you for an Oscar!
(Apparently there's a new category, "Best documentary featuring a Softpot Ribbon Controller") _________________ What makes a space ours, is what we put there, and what we do there.
Joined: Apr 17, 2006 Posts: 2810 Location: New York
Audio files: 24
Posted: Mon Feb 23, 2009 5:18 am Post subject:
Scott, really beautiful enclosure. The carvings are exquisite !!! It's really cool to see this evolve over time. I am most impressed by this. Thanks for hte hard work doing the videos and showing off the close up images of hte carvings.
BTW: Glad the video camera did not go south on you and that it was something simple to repair.
Joined: Dec 23, 2005 Posts: 4127 Location: Mount Hope, KS USA
Audio files: 96
Posted: Mon Feb 23, 2009 7:15 pm Post subject:
Nyahr - that be the filter (low pass output). Just in the parts where I'm actually draini....errr, playing the dragon.
Yep - the camera just stopped recording or playing - the transport wouldn't move during recording or playback, and record mode would never "turn off" or go to pause. It would communicate with the computer, but captures would be corrupt. I googled the model, found a site - others had had similar problems and said to take the bottom plate off and wiggle the connectors. I did, and it started working just fine - been working fine ever since.
Great ideas, there THeff! I think a switch like that, or even Fonik's switch module would be great for this and other devices as well. Man - there are so many times I want to switch from triggering to gating to triggering and gating my EG, but I can only do that by pulling out and plugging in patch cords at this point.
scott, i will order a prototype PCB for my voltage controlled switch end of this week (part of the PS3100/panner order). i will ask for interest in a production run when it is finished. i think a divider AND a switch could do realy cool things in the context of the appendage and klee controllers (oh, and i decided to breadboard and try your quantizer again ). _________________
cheers,
matthias
____________
Big Boss at fonitronik
Tech Buddy at Random*Source
Joined: Apr 17, 2006 Posts: 2810 Location: New York
Audio files: 24
Posted: Tue Feb 24, 2009 10:08 am Post subject:
Quote:
Yep - the camera just stopped recording or playing - the transport wouldn't move during recording or playback, and record mode would never "turn off" or go to pause. It would communicate with the computer, but captures would be corrupt. I googled the model, found a site - others had had similar problems and said to take the bottom plate off and wiggle the connectors. I did, and it started working just fine - been working fine ever since.
Joined: Dec 23, 2005 Posts: 4127 Location: Mount Hope, KS USA
Audio files: 96
Posted: Tue Feb 24, 2009 11:34 am Post subject:
Well, remember Bill, the thing did go to Vietnam, crawl up Sam Mountain; get jostled in the streets of Saigon, get slogged back and forth over the Mekong, hustled up and down the beach at Vung Tau, and put up with my wife's idea of careful handling.
It's a surprise it works at all. Much like me. _________________ My Site
Hmm,..
"If I were a XXXXX, I wouldn't work at all."
Great lyrics. _________________ What makes a space ours, is what we put there, and what we do there.
Joined: Apr 17, 2006 Posts: 2810 Location: New York
Audio files: 24
Posted: Wed Feb 25, 2009 7:03 am Post subject:
Quote:
Well, remember Bill, the thing did go to Vietnam, crawl up Sam Mountain; get jostled in the streets of Saigon, get slogged back and forth over the Mekong, hustled up and down the beach at Vung Tau
Joined: Dec 09, 2007 Posts: 57 Location: Grenoble - France
Posted: Thu Mar 05, 2009 7:21 am Post subject:
Hi guys, I've been working on a similar kind of controller (but not for synths), and I noticed something:
You said in page 2 or 3 that what you use to press the ribbon must be non-conductive material to avoid some troubles. I don't know if this was noticed in the last 20 pages, but the main problem is about the witdh of contact point.
Eg: If I use a rubber, which is non-conductive, but soft enough to simulate a finger, I can get the same troubles as with fingers.
And if you try some tiny metal objects to press the ribbon, such as a knife, there is a clean output..
Edit: after a few test, it appears that even the connection wires soldered on the ribbon are acting as a dielectric antenna: if you move these wire with the hand or any electrical material, noise. But with a piece of platic, nothing.
I've made an Arduino library for reading those sensors, it can also subdivide the sliding zone into tactile areas, working like switches. But these troubles makes it hard to make the difference between a released ribbon or interferences.. But so far it does not work so bad.. _________________ Forty Seven Effects
Joined: Apr 17, 2006 Posts: 2810 Location: New York
Audio files: 24
Posted: Fri Mar 06, 2009 7:44 am Post subject:
Quote:
I've made an Arduino library for reading those sensors, it can also subdivide the sliding zone into tactile areas, working like switches. But these troubles makes it hard to make the difference between a released ribbon or interferences.. But so far it does not work so bad..
Franky, if you could post a link to the Arduino library your talking about, that would help those who want to investigate.
One thing that made a difference in the amount of AC line noise pickup was mounting the softpot to a non-metallic surface. If it had to be mounted to a metallic surface, the surfce needed to be grounded.
You cannot post new topics in this forum You cannot reply to topics in this forum You cannot edit your posts in this forum You cannot delete your posts in this forum You cannot vote in polls in this forum You cannot attach files in this forum You can download files in this forum

 Forum index » DIY Hardware and Software