| Author |
Message |
Franky

Joined: Dec 09, 2007
Posts: 57
Location: Grenoble - France
|
 Posted: Fri Mar 06, 2009 1:37 pm Post subject: Posted: Fri Mar 06, 2009 1:37 pm Post subject:
|
  |
|
Yep, which one?
Theorically, putting the ribbon over a grounded plan should neutralize the capacitive EMI created by the fingers...
About the library, I'd like to release it only when it is totally finished, I still have some imprevements to do.. But it will be available soon!
_________________
Forty Seven Effects |
|
|
Back to top
|
|
 |
State Machine
Janitor


Joined: Apr 17, 2006
Posts: 2810
Location: New York
Audio files: 24
|
| Posted: Fri Mar 06, 2009 2:10 pm Post subject:
|
|
|
| Quote: | | About the library, I'd like to release it only when it is totally finished, I still have some improvements to do.. But it will be available soon! |
Very well, yes. Of course. Much appreciated.
| Quote: | | Theoretically, putting the ribbon over a grounded plan should neutralize the capacitive EMI created by the fingers... |
Certainly, Scott made lots of observations and noted that grounding a plate would help quite a bit. If wood is used, then no worries.
Bill |
|
|
Back to top
|
|
|
Franky
Joined: Dec 09, 2007
Posts: 57
Location: Grenoble - France
|
| Posted: Fri Mar 06, 2009 2:23 pm Post subject:
|
|
|
What do you mean by "no worries"?
My ribbon is taped onto my desk, which is made of wood..
The positive point about testing several surfaces is that it does not need to be in direct contact, because of the plastic and glue layers under the resistive strip in the ribbon. I will try to lay it on a sheet of shielding aluminium tape..
_________________
Forty Seven Effects |
|
|
Back to top
|
|
|
State Machine
Janitor
Joined: Apr 17, 2006
Posts: 2810
Location: New York
Audio files: 24
|
| Posted: Fri Mar 06, 2009 6:41 pm Post subject:
|
|
|
| Quote: | What do you mean by "no worries"?
|
If your on wood, it should be fine. If you on metal, then make sure it's grounded. Is that more clear? 
Bill |
|
|
Back to top
|
|
|
frijitz
Joined: May 04, 2007
Posts: 1734
Location: NM USA
Audio files: 54
|
| Posted: Fri Mar 06, 2009 6:45 pm Post subject:
|
|
|
| State Machine wrote: | If your on wood, it should be fine. If you on metal, then make sure it's grounded. Is that more clear?
Bill |
A little. Which is better, wood or grounded metal?

Ian |
|
|
Back to top
|
|
|
State Machine
Janitor
Joined: Apr 17, 2006
Posts: 2810
Location: New York
Audio files: 24
|
| Posted: Fri Mar 06, 2009 8:11 pm Post subject:
|
|
|
| Quote: | A little. Which is better, wood or grounded metal?
|
Hi Ian,
I would say that neither is better than the other. I am saying that both surfaces would work equally as well if you take the proper precautions. Scott found that if the ribbon was mounted on metal, it was best to ground it. If it's on wood, then you don't need to. Now all that's left of if you like wood or metal
Bill |
|
|
Back to top
|
|
|
State Machine
Janitor
Joined: Apr 17, 2006
Posts: 2810
Location: New York
Audio files: 24
|
| Posted: Sat Mar 07, 2009 8:29 pm Post subject:
|
|
|
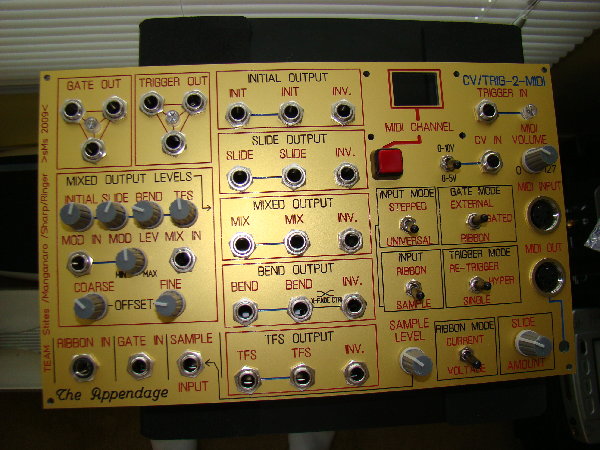
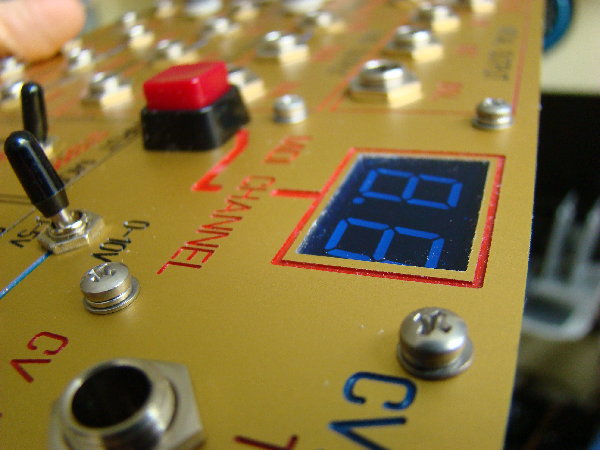
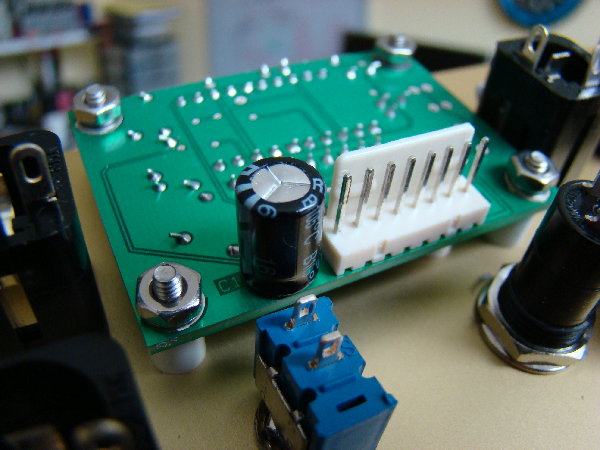
Here is a picture of the finished panel for the Appendage.
Bill
| Description: |
|
| Filesize: |
1.57 MB |
| Viewed: |
314 Time(s) |
| This image has been reduced to fit the page. Click on it to enlarge. |
|
| Description: |
|
| Filesize: |
1.63 MB |
| Viewed: |
282 Time(s) |
| This image has been reduced to fit the page. Click on it to enlarge. |
|
| Description: |
|
| Filesize: |
1.65 MB |
| Viewed: |
282 Time(s) |
| This image has been reduced to fit the page. Click on it to enlarge. |
|
| Description: |
|
| Filesize: |
1.73 MB |
| Viewed: |
280 Time(s) |
| This image has been reduced to fit the page. Click on it to enlarge. |
|
|
|
|
Back to top
|
|
|
Franky
Joined: Dec 09, 2007
Posts: 57
Location: Grenoble - France
|
| Posted: Sun Mar 08, 2009 2:49 am Post subject:
|
|
|
Wow, nice board! How did you do the printings? Laser engraving, milling?
Are you using the Arduino as the MIDI processor?
_________________
Forty Seven Effects |
|
|
Back to top
|
|
|
State Machine
Janitor
Joined: Apr 17, 2006
Posts: 2810
Location: New York
Audio files: 24
|
| Posted: Sun Mar 08, 2009 7:44 am Post subject:
|
|
|
| Quote: | Wow, nice board! How did you do the printings? Laser engraving, milling?
Are you using the Arduino as the MIDI processor?
|
Franky -- The MIDI portion is indeed handled with the Arduino. In fact, I will be using your library for handling the MIDI stuff. I had some code written without the library but will modify it to incorporate calls to that library. It will make the code lots cleaner and I believe your library uses only about 1500 bytes. I will have plenty of code space and will most likely stick with the ATmega168 with 16K of flash memory. After bootloader (2K) and the MIDI library (1.5K) , I have 12.5K for my code.
After Appendage prototyping, that the last thing that will get fully developed. I will publish the schematics and code of course in the spirit of Arduino. 
If I want to expand the analog inputs on this incarnation of Arduino, I will end up using external analog switches to scan more inputs for sliders, buttons, and CV from the Appendage. I want to have this sort of expansion because I want to use it with my IKC keyboard controller as well.
http://electro-music.com/forum/topic-29746.html
Have you had feedback of others using your MIDI library?
The board you see there was designed with ExpressPCB. The panel was designed using "Front Panel Designer" from Front Panel Express. Th material is anodized, engraved, aluminum and then filled in with any color of several you can choose from. They do the manufacturing for you.
http://www.frontpanelexpress.com/?gclid=CNy-0JbIk5kCFQEpGgodk3qlaQ
Bill |
|
|
Back to top
|
|
|
Franky
Joined: Dec 09, 2007
Posts: 57
Location: Grenoble - France
|
| Posted: Sun Mar 08, 2009 9:48 am Post subject:
|
|
|
I don't really have feedback on the library, nope.. But that would be great, as I test it on a Sanguino, I don't use my little boarduino anymore..
Anyway, I will release an update in a while, with a big improvement of the Thru function. It will mirror every incoming message on the MIDI Out, this way you don't need a MIDI Thru anymore. And there can't be any collision, because you call thru and send as 2 separate methods, so they speak one at a time.
It's done, but I've got to write a few methods to enable/disable this option..
Edit: the update is online..
re-Edit: if you want to expand the number of I/O pins, take a look at I2C expanders..
_________________
Forty Seven Effects |
|
|
Back to top
|
|
|
State Machine
Janitor
Joined: Apr 17, 2006
Posts: 2810
Location: New York
Audio files: 24
|
| Posted: Sun Mar 08, 2009 11:37 am Post subject:
|
|
|
| Quote: | | It will mirror every incoming message on the MIDI Out, this way you don't need a MIDI Thru anymore. |
Franky, dude, that is great. That will clean up a bunch of MIDI thru handling code in my listing.
One thing that a THRU funtion must handle is that I need to monitor some of the incoming data from another unit and make sure that no "stuck" notes are created from that device. In other words, the incoming NOTE ON message (on a certain channel) for a particular NOTE Number must have a corresponding NOTE OFF message before another NOTE ON can be send, otherwise a stuck note will be generated. If a NOTE OFF is not sent, my handler must send or "insert" the missing NOTE OFF (OLD_NOTE_OFF) message onto the MIDI OUTPUT stream. Since this is a monophic keyboard device MIDI stream, the detection process is made simple by monitoring if two consecutive NOTE ON messages are received ("NOTE_ON COUNTER >1) . If I do get this condition, I know there will be a stuck note in the stream.
The keyboard device already has many checks and balances in it to prevent two consecutive NOTE ON commands BUT I prefer to apply the "belt AND suspenders approach" since it is critical that NO stuck notes appear in my data stream. Mission critical if I may use the term ...
I don't ant to get too OT here .........
Thanks,
Bill |
|
|
Back to top
|
|
|
State Machine
Janitor
Joined: Apr 17, 2006
Posts: 2810
Location: New York
Audio files: 24
|
| Posted: Sun Mar 08, 2009 11:43 am Post subject:
|
|
|
| Quote: | re-Edit: if you want to expand the number of I/O pins, take a look at I2C expanders..
|
Sure, for DIGITAL I/O, I agree, BUT for the analog INPUTS, there are only 6 on the mega168 so some will need to be shared through an analog switch. I can double it by using some SPDT analog switches like the CD4053.
But you make a good point Frankie that if I wanted to control lots of analog switches, I could use the expanders to steer the analog voltages digitally rather than use up the precious few that exist on the chip. Right now the device is only looking for a TRIGGER event so I have plenty for now to use in the steering logic for the switches.
Philips and TI make some good digital I2C expanders in fact ........
Thanks |
|
|
Back to top
|
|
|
Franky
Joined: Dec 09, 2007
Posts: 57
Location: Grenoble - France
|
| Posted: Sun Mar 08, 2009 4:16 pm Post subject:
|
|
|
To anwser your MIDI problem: if you look at my MIDI.read() method, you will see that it scans the serial input buffer for some valid MIDI messages. There can be 0,1,2 or more stacked into the buffer, but only one message is "extracted" at the time. It means that everything sent should be read, with some latency if your scanning loop is slower than the MIDI stream (but only with a gate/noteOn/off that should be OK). If I had a thread system, that could be almost real-time, a guy did it but the code of the OS is very heavy...
_________________
Forty Seven Effects |
|
|
Back to top
|
|
|
johans121

Joined: Jun 19, 2007
Posts: 178
Location: Huntsville, AL (USA)
|
| Posted: Mon Mar 09, 2009 9:02 am Post subject:
|
|
|
What is the status of the beta builds? how is everything proceeding? I'm anxious to get a couple of these, however I am about to leave the country for a month (or three - depending on how things go) and I will have limited access to email during that time. I really don't want to miss out while I'm gone...
_________________
Don't feed me Indian, you WILL regret it!
-Jim |
|
|
Back to top
|
|
|
State Machine
Janitor
Joined: Apr 17, 2006
Posts: 2810
Location: New York
Audio files: 24
|
| Posted: Mon Mar 09, 2009 11:06 am Post subject:
|
|
|
| Quote: | | What is the status of the beta builds? how is everything proceeding? I'm anxious to get a couple of these, however I am about to leave the country for a month (or three - depending on how things go) and I will have limited access to email during that time. I really don't want to miss out while I'm gone... |
So far all four prototypes are being worked right now. Things thus far have gone very well with some issues being dealt with as of this writeing:
They are:
1) Current regulation in current mode while using TFS. Some tweaks have been made in this area to the current source bias network and a diode type change in the TEMCO.
2) Sample Clock noise on INIT CV. This will be resolved with extra feedback capacitor and omission of clock line on AUX connector
3) Some PCB Layout improvements.
4) Gain compensation on the MIX input to negate the FX of <unity gain.
All these items are under control and we are deciding on the optimum fix for some of them.
As far as when we will be done, maybe a month to two months? It's hard to say when dealing with all four of us who also hold full time jobs and own homes. Everyone on the forum has been pretty cool and patient and for this we thank you all.
The documentation will need to also "mature" with the changes and this takes a bit of time.
Maybe one of the other team members can also comment on status that I may have missed.
We want the Appendage to be as successful as the Klee sequencer so we proceed through testing with a critical eye in anticipation of anything that could go wrong.
Bill |
|
|
Back to top
|
|
|
johans121
Joined: Jun 19, 2007
Posts: 178
Location: Huntsville, AL (USA)
|
| Posted: Mon Mar 09, 2009 1:35 pm Post subject:
|
|
|
| State Machine wrote: | | As far as when we will be done, maybe a month to two months....Everyone on the forum has been pretty cool and patient and for this we thank you all. |
Well, I'm glad things are looking positive!
I would really hate to mis out on this. Seriously, could you please reserve 2 for me? I am planning a trip to India, beginning mid April. I am booking a ticket for one month with the intention on extending my stay for up to three, depending on how happy/miserable I am during the first month. I am traveling light, so I don't know whether I'll be bringing my laptop with me or not (don't know if I really want to haul that around with me). I also am planning on staying in the larger cities as little as possible - hence the limited email/internet availability.
_________________
Don't feed me Indian, you WILL regret it!
-Jim |
|
|
Back to top
|
|
|
Sound
Joined: Jun 06, 2006
Posts: 842
Audio files: 1
|
| Posted: Tue Mar 24, 2009 6:50 am Post subject:
|
|
|
| State Machine wrote: |
We want the Appendage to be as successful as the Klee sequencer so we proceed through testing with a critical eye in anticipation of anything that could go wrong.
Bill |
Thanks very much for your effort and work. I already can see the appandage connected to my system.
Regards. |
|
|
Back to top
|
|
|
Photon

Joined: Mar 22, 2005
Posts: 363
Location: Boston
Audio files: 1
|
|
|
Back to top
|
|
|
Scott Stites
Janitor

Joined: Dec 23, 2005
Posts: 4127
Location: Mount Hope, KS USA
Audio files: 96
|
| Posted: Fri Mar 27, 2009 7:02 pm Post subject:
|
|
|
Dang, looks like you nailed it to me! Nice panel, indeed, very well laid out IMO. The controls are right there so's you can tweak things very immediately - it's a good performance setup, especially with that joystick right there. Looks made for mayhem!
Cheerios,
Scott
_________________
My Site |
|
|
Back to top
|
|
|
State Machine
Janitor
Joined: Apr 17, 2006
Posts: 2810
Location: New York
Audio files: 24
|
| Posted: Fri Mar 27, 2009 7:09 pm Post subject:
|
|
|
| Quote: | | Here's my first crack at an Appendage panel. It's still a little rough. I post with hope that someone from Team Appendage® will offer some critique. Let me know if the control groupings don't make sense or if I've forgotten or mislabeled anything. This will be the largest panel that I've ever tried to etch, so I'd like to get it right the first time. |
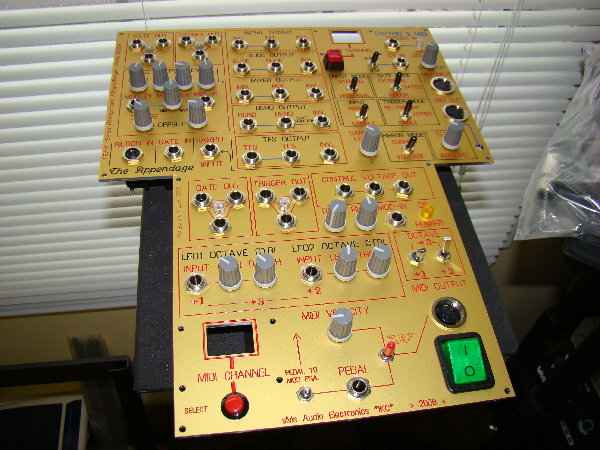
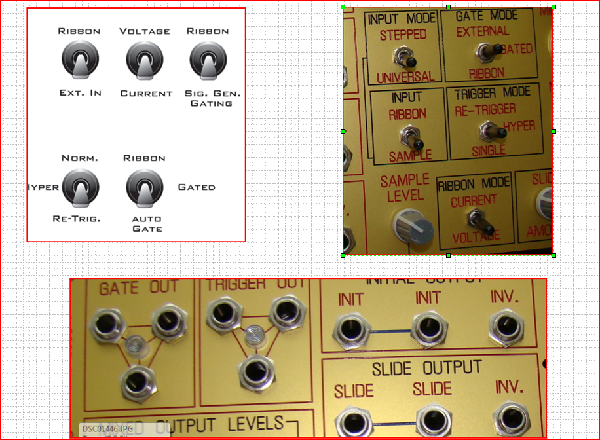
Peter, very nice panel indeed !!! I just want to make a suggestion. Take a peek at the picture I have attached. It compares your switch position vs. function to mine (and Scott's) The documentation that will be supplied on how to build your panel will be based on the switch positions on my panel. If they are oriented like yours, things will just get confusing when you go to test your Appendage ans some functions will appear to function in reverse. Also, the signal names on my panel are what we (the TEAM) generally agreed would make the most sense BUT that's really a matter of your preference so you can call them what you wish.
I would also suggest MULTI's .... you will most likely want more than one destination for a TRIG, GATE, or CV .... I added multi's on all these signals to avoid needing an external multi. Just a suggestion.
I wil assume you are mounting the ribbon onto the panel so there is no need for an input jack? If you decide to go with a jack input, it must be an insulated TRS type jack. We are using Switchcraft P/N N112BX Mouser P/N 502-N112BX
http://mouser.com/Search/Refine.aspx?Keyword=502-N112BX
| Quote: | | The panel will be mounted almost horizontally (15˚ slope) as part of the controller that I'm building. On the left most side I've incorporated a joystick that isn't part of the ribbon controller. More details soon. Thanks for looking. |
I see the Joystick, very cool ......
BTW, are you coming down to Analog heaven this year? I will bring my Appendage for everyone to play with. 
Bill
| Description: |
|
| Filesize: |
896.61 KB |
| Viewed: |
245 Time(s) |
| This image has been reduced to fit the page. Click on it to enlarge. |
|
| Description: |
|
| Filesize: |
23.86 KB |
| Viewed: |
228 Time(s) |
| This image has been reduced to fit the page. Click on it to enlarge. |
|
|
|
|
Back to top
|
|
|
bugfight

Joined: Aug 02, 2007
Posts: 188
Location: Arlington, TX USA
|
| Posted: Fri Mar 27, 2009 7:24 pm Post subject:
|
|
|
| State Machine wrote: | | ... I will bring my Appendage for everyone to play with... |
ewwwwww |
|
|
Back to top
|
|
|
Photon
Joined: Mar 22, 2005
Posts: 363
Location: Boston
Audio files: 1
|
| Posted: Sat Mar 28, 2009 7:20 am Post subject:
|
|
|
Thanks guys
Bill that's just the kind of feedback I was looking for. I totally forgot that yr. panels were posted here when I started mine. I'll take a look at your layouts and move some stuff around and add some mults. I'll repost rev2 soon.
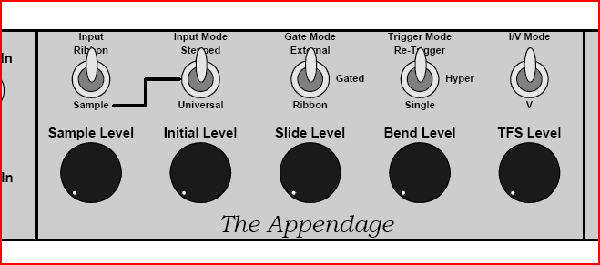
BTW: Is the stepped/universal input mode an add-on or stock?
re:AHNE, Its prob. 80% likely that I'll get out there.
peter |
|
|
Back to top
|
|
|
bugfight
Joined: Aug 02, 2007
Posts: 188
Location: Arlington, TX USA
|
| Posted: Sat Mar 28, 2009 9:02 am Post subject:
|
|
|
i dig the joystick idea too.
one thing i will probably add on mine is some way of triggering an envelope over on the left side, maybe just a momentary button or maybe something like a key to get velocity as well. might also add a short vertical ribbon like some have suggested...
the queue is lovely, dark and deep... |
|
|
Back to top
|
|
|
Scott Stites
Janitor
Joined: Dec 23, 2005
Posts: 4127
Location: Mount Hope, KS USA
Audio files: 96
|
| Posted: Sat Mar 28, 2009 9:47 am Post subject:
|
|
|
Stepped/Universal is stock, though you wouldn't have to install it (you would have to wire it in one position on a connector internally). You may want it though - it goes good with the Klee, for example. "Stepped" is designed specifically for stepped voltages that a CV keyboard or a sequencer would put out, while universal treats any input signal as a standard S&H/T&H.
In stepped mode, the Appendage synchronizes with the input to provide autoglide, gate and trigger signals at the right time. Autoglide will kick in after a gate input is received; initial will hold the first note and slide will output a continuous voltage tracking any change from initial that comes in while the gate is high. Bend will put out the difference between the initial note and any changes that occur while the gate it high. The upshot is, if you are using a keyboard, if you hold down a key and play legato, the AutoGlide will affect the notes in between, but will not glide if you release all keys, then play another - so it acts as a legato portamento. A sort of half-duplex duophony is possible too - a VCO controlled by the initial voltage will hold that first note, and a VCO controlled by the slide voltage will play the first note and any other note in the legato passage. This mode allows the discriminator in the Appendage to detect changes in notes, prompting a re-trigger (if desired).
IOW, if the trigger mode control is set for "Hyper" in that mode, it will actually re-trigger on the legato notes while the gate output stays high as long as the gate input stays high. All this applies, again, to sequencers - it's very handy for generating sub-sequences out of a main sequence.
In either S&H mode (stepped or universal), the ribbon is active for TFS only, the rest of the circuitry is processing the external input.
Cheerios,
Scott
_________________
My Site |
|
|
Back to top
|
|
|
Photon
Joined: Mar 22, 2005
Posts: 363
Location: Boston
Audio files: 1
|
| Posted: Sun Mar 29, 2009 4:40 pm Post subject:
|
|
|
| very cool. Thanks for the info Scott. I'm going to keep on refining my panel, but I think I'll wait for the release of the build docs. before I commit it to metal. |
|
|
Back to top
|
|
|
|

 Forum index » DIY Hardware and Software


